background image

Peer

Station

SIG-220

– Installation Guide 

(Preliminary)

32

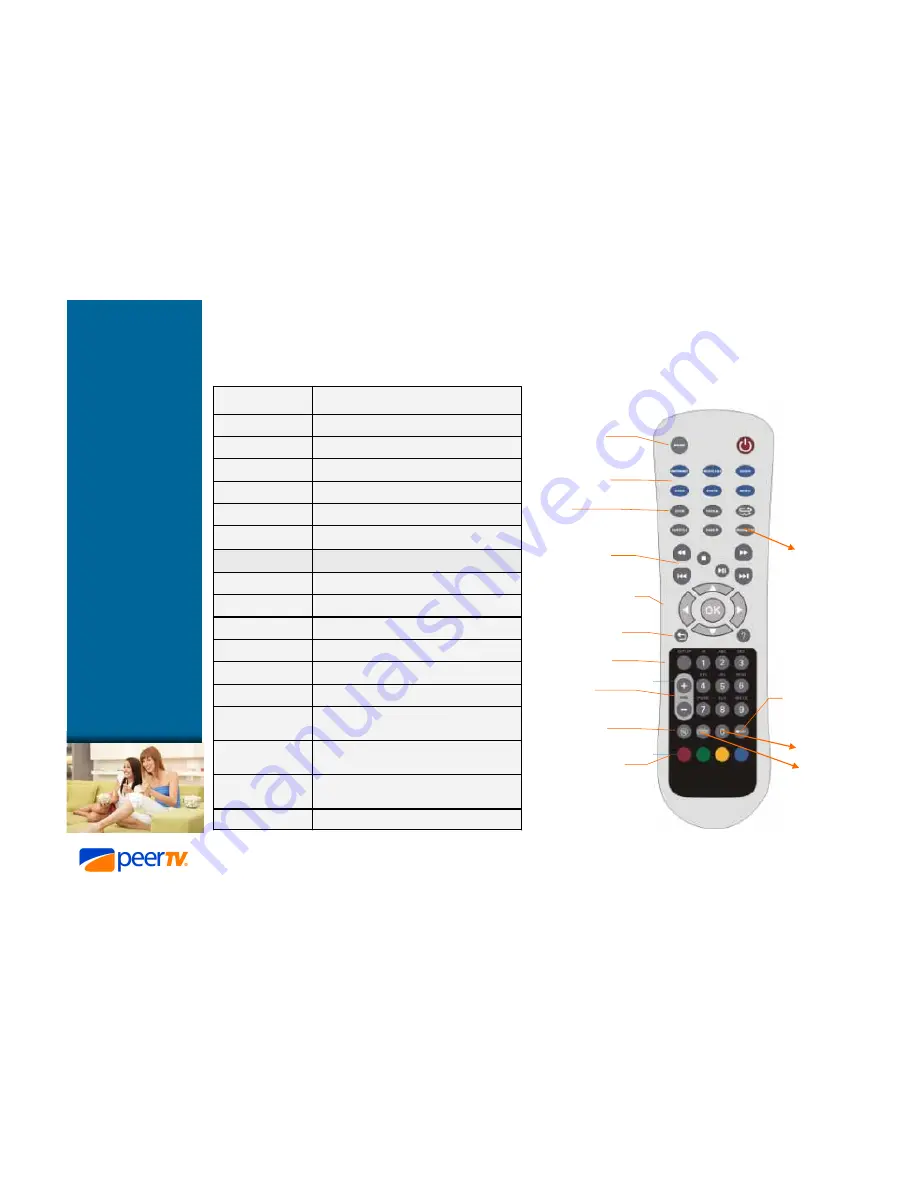
Remote Control Summary Page

Aspect Ratio setting

16:9 / 4:3

Hide/Unhide media bar up or down / 
Extended Info  

(delete in current version)

?

Changing FONT & Numbers in SETUP

Keyboard Key

Go to the Previous file in the play list

Previous in the 
Play list

Go to the next file in the play list

Next in the Play 
list

Pause Play

Play Pause  >II

Stop Playing

Stop

Rewind

Back <<

Fast Forward

Forward >>

Player Control

Zoom (CIF, VGA, FULL)

Zoom

Displays the TV mode.

Internet

Displays the Radio mode

Radio

Displays the Photo mode.

Photo

Displays the Music mode.

Music

Displays the Video mode.

Video

Main Menu 

(Change font in current version)

Home

Function

Media Buttons

Change font 

& Numbers

Zoom

Player Control 
Buttons

Navigation Panel

Color Buttons

Yellow

- Help 

Green

– Refresh

Blue

– Play mode 

Red

- Options

Media buttons

+/- Volume 
buttons

Main Menu

Setup button

Back operation

Space

Mute button

Aspect 

Ratio

Erase font 
input

Summary of Contents for PeerStation SIG-220

Page 1: ...PeerStation SIG 220 Internet TV Apps Platform Installation Guide July 2008...

Page 2: ...and instructions placed on the product or described in the operating instructions This symbol is intended to alert the user to the presence of un insulated dangerous voltage within the product s encl...

Page 3: ...me consult your dealer or local power company Overloading Do not overload wall outlets extension cords or convenience receptacles beyond their capacity since this can result in fire or electrical shoc...

Page 4: ...nd opening in the cabinet are provided for ventilation and to ensure reliable operation of the product to protect it from overheating These openings must not be blocked or covered The openings should...

Page 5: ...produce heat as well as direct sunlight If the product experiences sudden changes in temperature moisture may form inside the product Customer Care Please refer to your IPTV subscription provider for...

Page 6: ...Installation Guide Preliminary 6 Package Contents Make sure you have received the following items in your PeerStation Box Remote Control Power Adapter AA Batteries 2 A V Cable composite Ethernet RJ45...

Page 7: ...em to deliver the best living room experience for content stored on its internal hard disk home network devices PCs Network Attached Storage and Internet media sites Setup Overview NAS Net Attached St...

Page 8: ...z Connect to an Audio system z Connect a LAN cable if wired LAN is available z Connect the power and see active on screen display z Enter setup and change networking and video settings to desired val...

Page 9: ...20 Installation Guide Preliminary 9 Connecting to a standard TV set 1 Use either RCA or S Video for better quality to connect PeerStation to a standard TV Power on the unit S Video Composite RCA RCA S...

Page 10: ...Note Some older HD TVs fail to decode HDMI correctly and are safer to use with component out which provides almost identical performance Note Some older HD TVs fail to decode HDMI correctly and are s...

Page 11: ...g to an audio playback device 2 2 RCA Stereo Coax SPDIF Out Audio amp home theater system Use stereo RCA type connection or the provided Coax SPDIF output to connect to an audio amp receiver home thea...

Page 12: ...ilable near the installation point of PeerStation connect to the LAN port 10baseT type located on the back panel Assuming that the home router provides IP address through DHCP mechanism this should pr...

Page 13: ...SIG 220 Installation Guide Preliminary 13 Connecting the Power 4 4 Connect the supplied power adapter Power Connector AC Wall Start up screen appears indicating that PeerStation is searching for acti...

Page 14: ...work cannot be detected PeerStation indicates that no IP address server DHCP Server can be set Boot of the applications starts anyhow shortly afterwards so Setup key must be pressed while in notice Bl...

Page 15: ...Station SIG 220 Installation Guide Preliminary 15 Setup Mode Entering setup mode requires few seconds application load time after which the setup screen appears Set up menus should appear as follows 5...

Page 16: ...Preliminary 16 Network Type Setup Use the RIGHT arrow key to select connectivity and then press OK to bring up network type selection dialog Use UP Down arrows to select LAN Wireless and then press OK...

Page 17: ...Fixed IP is rarely used usually by professional installer For a Wireless LAN By pressing the red button you can search for available networks and choose your network from a list If your network name...

Page 18: ...P Server can be Found Boot of the applications starts anyhow shortly afterwards so Setup key must be pressed while in notice Blue screen or You can start the Setup from the main menu next page Press S...

Page 19: ...ideo for Standard Definition TVs For true HD performance you need to connect either Component or DVI to HDMI cable and select Component DVI Video Mode Choose 480i 576i for standard TVs 1080i for HDTVs...

Page 20: ...10 is displayed network detection has probably failed internal default MAC Address Physical address of LAN interface technician info Software Version Version info of the built in software technician...

Page 21: ...rmation Select System and then use the RIGHT arrow key and the UP Down arrows to select HDD Information The following parameters are displayed HDD Total Size Total size of the internal installed hard...

Page 22: ...t HDD Tools The following operations can be used Perform Disk Check Checks the HDD and displays the HDD status Perform Disk Check Auto Fix Mode Checks the HDD fixes existing problems displays the HDD...

Page 23: ...arrows select Exit Mode and then the option marked Save Exit After a short black screen a normal boot should proceed and if network setup complies with the connected home network it should proceed to...

Page 24: ...liminary 24 Acess Setup from MediaXplorer Main Menu In The Main Menu is the Media Type Selection screen If home network needs to be setup Press The Setup key Press Setup to correct network definition...

Page 25: ...start browsing Available types Video watch streaming video web sites video files from the internal HDD or videos from your local network Music listen to your music collection or connect to various web...

Page 26: ...ft Right move one level up down into folder back to previous level OK select or play the selected item Back goes to last displayed screen Hide Unhide player Extended Media Info Blue Selection between...

Page 27: ...displayed Use arrows to navigate OK to start playback OK starts pauses media playback Left Right arrows jump in played media fixed amount of time button brings up down the info panel Back button goes...

Page 28: ...220 Installation Guide Preliminary 28 Volume Control Audio level can be controlled via the IR remote Use the mute button to mute or to unmute the audio Note that overall volume depends on Audio Amp s...

Page 29: ...tation SIG 220 Installation Guide Preliminary 29 Music Files Playback During music playback a background clip is played It can be turned off by using the stop button Left Right arrows jumps within the...

Page 30: ...r PeerStation s internal HDD can serve as a central repository of your digital media in a Windows based home network To start loading media to PeerStation s hard disk run your Windows file browser and...

Page 31: ...target directories delete files etc Note however the following 1 Do not change the top level directory structure as it is expected by the MediaXplorer navigation logic You can however add sub folders...

Page 32: ...lay Pause II Stop Playing Stop Rewind Back Fast Forward Forward Player Control Zoom CIF VGA FULL Zoom Displays the TV mode Internet Displays the Radio mode Radio Displays the Photo mode Photo Displays...

Page 33: ...loop once Blue Color Buttons Displays the Setup configuration screen Setup Increase or Decrease the volume Volume Activates the selection OK Move right Right Move left return to previous menu Left Mo...

Page 34: ...iFi MiniPCI 802 11b g module optional z 2 5 ATA HDD Internal Up to 160GB optional z External HDD USB 2 0 or NAS Built in Support for Network Peripherals z Composite S Video Component z DVI for HD TVs...

Reviews: