


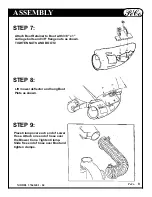


MODEL 37641401 - 04
PeCo
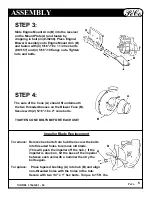
WARNING!
Do not work around the mower deck boot or the
blower area until you are certain that the mower
blades and the blower fan have stopped rotating.
Outdoor Power Equipment Institute Recommendations
WARNING TO PURCHASERS OF INTERNAL COMBUSTION ENGINE EQUIPPED
MACHINERY OR DEVICES IN THE STATE OF CALIFORNIA:
The equipment which you have purchased does not have a spark arrester muffler. If this
equipment is to be used on any forest covered and brush covered land or grass covered
unimproved land in the state of California, the law requires that a spark arrester muffler be
installed and be in effective working order. The spark arrester must be attached to the
exhaust system and comply with Section 4442 of the California Public Resources Code.
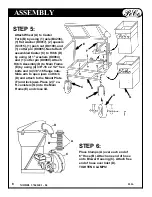
WARNING!
To avoid serious injury, perform maintenance on
the vacuum collector ONLY AFTER STOPPING THE
TRACTOR ENGINE AND WAITING FOR ALL MOV-
ING PARTS TO COME TO A COMPLETE STOP. Set
the parking brake. Always remove the ignition key
before beginning the
maintenance
WARNING!
For your personal safety, ALWAYS mow UP and
DOWN the face of slopes and NEVER across the
face. NEVER attempt to mow excessively steep
slopes and use caution when turning on any
slope.
7. Always stop Vac engine when emptying the
container.
8. Stop tractor and vac engines and remove spark
plug wire before removing or replacing hose, boot,
blower cone or performing any maintenance.
9. Mow up and down the face of slopes (not steeper
than 10 degrees); never across the face of the slope.
10. It is recommended that the container be kept
only half full when negotiating any slopes. Start
mowing on slopes when the container is empty.
11. Inspect your lawn and remove any foreign ob-
jects before mowing. Never deliberately run mower
across any foreign object.
12. Wear ear protection if noise level is offensive.
WARNING!
NEVER operate the mower unless the discharge
guard and either the deflector assembly or the
vacuum collector adapter are fastened securely in
place.
3
SAFETY
1. Read the owner's manual carefully and familiar-
ize yourself with the proper use of your attachment.
Do not allow anyone who is not acquainted with the
Safety Instructions to use your attachment.
2. Know the controls and how to stop quickly.
READ THE OWNER'S MANUAL!
3. Do not allow children to operate the vehicle. Do
not allow adults to operate it without proper instruc-
tion.
4. Be especially watchful of children and pets
darting into the area while operating.
5. Keep your eyes and mind on your tractor while
mowing or operating your attachment. Don't let
others distract you.
6. Do not attempt to operate your tractor or mower
when not in the driver's seat.


