background image

CAUTION!  SETTING THE CROSSOVER FREQUENCY CONTROL TOO LOW MAY ALLOW THE SAT-

ELLITE SPEAKER TO BE OVERLOADED BY DEEP BASS AT HIGH SPL !

Setting the control lower DOES NOT increase the deep bass output of the PVs 12 Sub, a middle range (9:30 to 

2:30 clock face position) setting works best for most speakers.

If the powered full-range speakers are not set on top of the PVs12 Sub on the pole, then the polarity switch set-

tings may need to be different than what is provided here.  The Crossover Frequency Control may need to be set 

to a slightly lower point in order for the Subwoofer and the satellites to sum well through the crossover region.  

The settings outlined above will work the best when the satellite speaker and the Subwoofer are closer together, 

and essentially the same distance from the audience.

Setting the PVs12 Sub Controls for Use with Other Satellite Speakers

Crossover Frequency Control (11): In general, for smaller full-range speakers to be used as satellites, set the 

Crossover Frequency Control (11) to a higher frequency setting.  For larger full-range speakers, set the Crossover 

Frequency Control (11) to a lower frequency setting.  Setting the Crossover Frequency Control very much below 

the 10 o’clock position for smaller satellite speakers will not be needed most of the time, as a crossover frequency 

below 110 Hz is not going to allow thePVs15 Sub and the smaller satellite speaker to add together very well in 

the crossover region.

Polarity Switch (12): Try changing the Polarity Switch setting back and forth at each selected crossover frequen-

cy, so as to determine which switch position provides the most bass output in the crossover region.  When listen-

ing, either have someone else toggle the Polarity switch, and listen back where the audience will be, or toggle the 

polarity and then go listen in the audience area.  Listening while standing behind the Sub will not allow you to 

hear the correct summation of the Sub and the top speaker.

Level Controls (7):  Start with the PVs 12 Sub Level control in the straight up position, and adjust the satellite 

speaker system to match it’s level.  Note that if the Subwoofer can be heard as a distinctly separate sound source, 

then it is probably set too high in level.

Disconnecting AC Power to the PVs 12 Sub

We recommend that the Power switch (4) be used to turn the unit off first, and then the AC power cord can be 

removed, this minimizes stress to the power amplifiers and the transducers from turn-off transients.  The pow-

er switch has an arc suppression capacitor to help during turn-off, and tends to make a clean disconnect from 

the AC power, while the power cord IEC connector can make intermittent contact before finally becoming fully 

disconnected, e.g., as when wiggling the cord.

Summary of Contents for PVs 12 Sub

Page 1: ...www peavey com PVs 12 Sub Enclosure Operating Manual ...

Page 2: ...om that to which the receiver is connected Consult the dealer or an experienced radio TV technician for help The equipment complies with FCC radiation exposure limits set forth for an uncontrolled environment This transmitter must not be co located or operating in conjunction with any other antenna or transmitter The equipment should be installed and operated with minimum distance 5cm between the ...

Page 3: ...sion and limiting and the low frequency EQ Input is via a combo female XLR and 1 4 TRS phone jack with balanced input to the preamp EQ electronics and a gain control A pair of High Pass Outputs in the form of male XLR jacks provides a buffered and balanced output signal for satellite speakers to carry the high range of the music A Full Range Thru output has a male XLR connector These outputs allow...

Page 4: ...outlined below Changing the Voltage Range of the PVs 12 Sub First make sure the PVs 12 Sub is disconnected from the power line and that the power switch 4 is in the OFF position Second unscrew the screws holding the clear switch protector on the voltage selector switch 1 just a little just enough to allow rotation of the clear switch protector The screws DO NOT need to be unscrewed very far Third ...

Page 5: ...d within the cap of the fuse enclosure just above the ON OFF switch If the fuse fails THE FUSE MUST BE REPLACED WITH THE SAME TYPE AND VALUE IN ORDER TO AVOID DAM AGE TO THE EQUIPMENT AND TO PREVENT VOIDING THE WARRANTY The fuse in the PVs 12 Sub can be replaced with a time delay type 5 x 20 mm size 250V rated fuse For 100 120VAC operation a fuse rated at 5 amps should be used In the USA types GDC...

Page 6: ... is used to directly set the system output level for a given input signal Normal usage is with the knob set to half way this is then equivalent in gain to a typical power amp input SIG LED 8 Illuminates GREEN when a signal is present at the input jack 5 LIM LED 9 It illuminates RED when the power amp engages the compression or limiting circuitry Regular flashing is ac ceptable but not a constant i...

Page 7: ...e Subwoofer speaker Useful for DJ and EDM music genre s it may cause excessive boom if used for vocals or acoustic instruments BASS ENHANCE LED 14 Illuminates Orange when the Bass Enhance switch has been engaged HIGH PASS OUTPUTS 15 16 These outputs provide a high pass filtered signal to be fed to a full range powered speaker system Other full range powered speakers can be used and full range pass...

Page 8: ...th speaker systems less than 29 high and less than 44 lbs in weight Do not place a taller larger or heavier speaker system than this on the top pole mount and pole or it may be unsafe due to the potential to tip over The adjustable pole should only be used with the PVs 12 Sub in the upright orientation with an adjusted length of 36 88 93 6 cm which is the first pin position exposed when the center...

Page 9: ...e can be inserted and threaded into place on the PVs 12 Sub Tighten firmly by hand using the base portion of the pole do not over tighten or use pliers or other mechanical aids to tighten the pole into the Sub mounting plate The PVs 12 Sub must be placed on firm and level ground in order for the pole mounted speaker to be safe from tipping When installing or de installing the speaker on the pole i...

Page 10: ... and the balanced input circuitry will provide some interference rejection a balanced cable using either the balanced TRS 1 4 phone plug or the XLR plug will pro vide superior interference rejection and performance Sometimes with difficult interference problems it will be helpful to lift the shield ground Pin 1 of an XLR of a balanced cable at the PVs 12 Sub end This can be done quite easily by ac...

Page 11: ...ch it is necessary to verify the mixer output is not clipping Cables from the High Pass Outputs 15 16 The preferred method of connecting a full range satellite speaker system to the PVs 12 Sub s High Pass Outputs 15 16 is to use a balanced XLR cable no longer than necessary to comfortably reach the satellite speaker system If the satellite speaker is on top of a pole above the PVs12 Sub then a 6 f...

Page 12: ...Polarity Top Box Level Gain DM112 Xover Frequency Polarity Top Box Level Gain DM115 Xover Frequency Polarity Top Box Level Gain PVXp10 DSP Xover Frequency Polarity Top Box Level Gain PVXp12 DSP Xover Frequency Polarity Top Box Level Gain PVXp15 DSP Xover Frequency Polarity Top Box Level Gain P1 BT Xover Frequency Polarity Top Box Level Gain P2 BT Xover Frequency Polarity Top Box Level Gain Frequen...

Page 13: ...eded most of the time as a crossover frequency below 110 Hz is not going to allow thePVs15 Sub and the smaller satellite speaker to add together very well in the crossover region Polarity Switch 12 Try changing the Polarity Switch setting back and forth at each selected crossover frequen cy so as to determine which switch position provides the most bass output in the crossover region When listen i...

Page 14: ...he mixer and the powered speaker Ensure that shielded cables have been used to route the signal to the PVs 12 Sub s input If speaker cables with 1 4 plugs are used as input cables instead of shielded cables they will be prone to hum or buzz Hum may be ground loop related It may be helpful to lift the shield ground Pin 1 on a balanced cable at the PVs 12 Sub end This is done quite easily by activat...

Page 15: ...be disconnected from the AC power source before any work is done on it Refer all servicing to qualified service personnel Sunlight Heat Avoid prolonged exposure to direct sunlight as this may cause the unit to overheat and thermally shut off Excessively hot operating conditions can also cause a thermal shutdown Do not store in extremely hot or cold conditions or extremely high humidity Always allo...

Page 16: ...put into a 4 ohm nominal load and 1000W peak available power and shall incorporate DSP controlled signal compression and limiting The input signal shall be electronically divided into high frequencies and low frequencies by a Linkwitz Riley fourth order slope line level crossover with crossover frequencies variable from 90 Hz to 180 Hz via a rear panel Crossover knob The low frequencies shall be p...

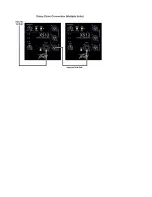
Page 17: ...Typical Hook up Connections Loudspeaker System Specifications ...

Page 18: ...m ground to provide for breaking any possible ground loops There shall be a Direct Thru output connector consisting of a male XLR jack There shall be two female XLR jack filtered high pass outputs providing a crossed over signal to satellite speakers The system power amplifier shall have an unfiltered frequency response of 20 Hz to 20 kHz which deviates no more than 1 3 dB up to rated power hum an...

Page 19: ...526 20 709 546 21 496 349 13 740 458 18 031 34 1 339 254 10 000 214 8 425 508 20 000 19 50 768 171 6 732 224 8 819 166 6 535 254 10 000 174 50 6 870 415 16 339 52 2 047 ...

Page 20: ...19 50 768 224 8 819 ...

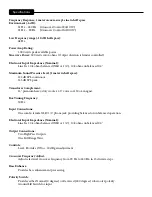
Page 21: ...k Transducer Complement 12 premium heavy duty woofer 2 5 voice coil 50 oz magnet Box Tuning Frequency 50 Hz Input Connections One combo female XLR 1 4 phone jack providing balanced or unbalanced operation Electronic Input Impedance Nominal Line In 20 k ohms balanced XLR or 1 4 10 k ohms unbalanced 1 4 Output Connections Two High Pass Outputs One Full Range Thru Controls Level Provides Off to 20 dB...

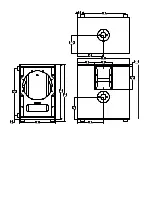
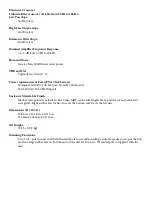
Page 22: ...0 120 VAC 50 60 Hz Domestic 220 240 VAC 50 60 Hz Export Enclosure Materials Finish Black acrylic painted enclosure with 15 mm MDF with a full length black powder coated perforated steel grille Eight rubber feet for floor use on the bottom and for on the left side Dimensions H x W x D 21 82 in x 14 38 in x 20 13 in 554 mm x 365 mm x 511 mm Net Weight 57 Lbs 25 9 kg Mounting Provisions Two 1 3 8 pol...

Page 23: ......

Page 24: ......

Page 25: ...ed only to equipment manufactured after 13 August 2005 www peavey com Warranty registration and information for U S customers available online at www peavey com warranty or use the QR tag below Features and specifications subject to change without notice Peavey Electronics Corporation 5022 Hartley Peavey Drive Meridian MS 39305 601 483 5365 FAX 601 486 1278 ...

Reviews: