Connecting AC Power To The PVs12 Sub
The PVs 12 Sub typically comes with a 7.5-foot (or longer) IEC connection AC power cord. If you are using
an extension cord or power strip with this powered speaker, make sure it is of good quality and of a sufficient
current capacity to maintain safety and maximize the power output capability of the PVs 12 Sub. For maximum
undistorted output, do not connect any other device to the same extension cord that the PVs 12 Sub is connected
to. Do not exceed the rated current capacity of the extension cord with the sum total of all units connected to it.
When first plugging in the PVs 12 Sub AC cord, make sure the power switch is in the Off position, and then
turn it On only once the power cord has been connected. Built-in muting will engage when the proper sequence
of steps is taken.
Special Note for Permanent Installation
When installing the PVs 12 Sub, AC power runs will be used and a certified electrician should be consulted to be
sure that all AC wiring complies with local codes and regulations. It is also advisable to use a cable clip properly
affixed to the cabinet to strain relief the IEC power cord connected to the amplifier module at (2) so the power
cord cannot be pulled out or vibrate loose.
Connecting a Signal to the PVs12 Sub
There are a variety of ways to input a signal to the PVs 12 Sub.
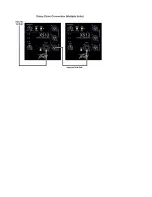
The input (5) provides a balanced line-level input, allowing the use of a 1/4” TRS (ring-tip-sleeve) type phone
plug or a male XLR plug. Of course, an unbalanced 1 / 4 “ phone plug can be used as well, but it will not have
the benefit of the balanced connections rejection of outside interference such as hum and RFI.
Do not connect cables to the jacks while the unit is ON and the Gain knob is turned up! While a standard
single-ended 1/4” phone plug-equipped cable will work well and the balanced input circuitry will provide some
interference rejection, a balanced cable using either the balanced TRS 1/4” phone plug or the XLR plug will pro-
vide superior interference rejection and performance.
Sometimes, with difficult interference problems, it will be helpful to lift the shield ground ( Pin #1 of an XLR)
of a balanced cable at the PVs 12 Sub end. This can be done quite easily by activating the Ground Lift switch
(10) built-in to the PVs 12 Sub. Check any input changes carefully, always turning the Gain control down before
plugging and unplugging cables, or lifting the ground.
Use of high quality, premium cables is recommended for the PVs 12 Sub, as these usually have better shielding
and materials and will provide greater long-term reliability. The best option is a shielded balanced cable no lon-
ger than necessary to reach the PVs 12 Sub. It is usually a good idea to leave some slack at the input to the PVs
12 Sub and also to tape the cables down or run them under a cable guard to avoid anyone tripping over them or
pulling the PVs 12 Sub over when it is holding a speaker on top of it’s pole.
Gain Control Adjustment
The PVs12 Sub is equipped with a Gain control (7) on the input to facilitate use in many different applications.
With the Gain control adjusted fully clockwise, gain is at maximum and the input sensitivity is 0.16 V RMS for
full-rated output.
It is recommended that the PVs 12 Sub Level control be set close to straight up. At this setting, the input sensi-
tivity is approximately 1.4 volts RMS for full-rated output. The PVs 12 Sub will now more closely match a typical
power amp input.
If the mixing board indicates clipping of its output signals, then all of the PVs 12 Sub power capability is not be-
ing utilized cleanly. Clipping the signal before it gets to the PVs 12 Sub is not optimal. Reduce the mixer output
level and turn up the Gain control on the PVs 12 Sub.
The amplifier in the PVs 12 Sub is equipped with DSP based compression and limiting and the LIM LED indica-
Summary of Contents for PVs 12 Sub
Page 1: ...www peavey com PVs 12 Sub Enclosure Operating Manual ...
Page 17: ...Typical Hook up Connections Loudspeaker System Specifications ...
Page 20: ...19 50 768 224 8 819 ...
Page 23: ......
Page 24: ......


