Peavey BASS AMPLIFIER 126 Operating Manual Download Page 8

TÄRKEÄT TURVALLISUUSOHJEET 

1. 

Lue nämä ohjeet. 

2. 

Säilytä nämä ohjeet.

3. 

Huomioi kaikki varoitukset.

4. 

Noudata kaikkia ohjeita.

5. 

Älä käytä laitetta veden lähellä. 

6. 

Puhdista vain kuivalla kankaalla.
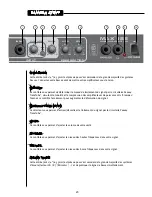
7. 

Älä tuki mitään tuuletusaukkoja. Asenna valmistajan ohjeiden mukaisesti. 

8. 

Älä asenna lämpölähteiden, kuten pattereiden, liesien tai muiden lämpöä tuottavien laitteiden (kuten vahvistinten) lähelle.

9. 

Älä  poista  polarisoidun  tai  maadoitustyyppisen  tulpan  suojausta.  Polarisoidun  tulpan  toinen  napa  on  leveämpi  kuin  toinen. 
Maadoitustulpassa on kaksi napaa ja kolmas maadoitusnapa. Leveä napa ja maadoitusnapa on tarkoitettu turvaamaan laitteen 
käyttöä. Jos mukana toimitettu tulppa ei sovi pistorasiaan, kutsu sähkömies vaihtamaan pistorasia, sillä se on vanhentunut. 

10. 

Suojaa virtajohtoa päälle kävelemiseltä ja nipistykseltä, erityisesti pistotulppien, pistorasioiden sekä laitteen ulosvientien kohdalla.

11. 

Käytä vain valmistajan toimittamia lisälaitteita.

12. 

Käytä  vain  valmistajan  määrittämän  tai  laitteen  mukana  myydyn  vaunun,  jalustan,  kolmijalan,  kiinnikkeen  tai  pöydän  kanssa. 
Käytettäessä vaunua liikuta vaunun ja laitteen yhdistelmää varovasti, jotta vältetään loukkaantumiset kaatumisesta johtuen. 

13. 

Irrota laite sähköverkosta ukkosmyrskyjen aikana tai jos laitetta ei käytetä pitkään aikaan.

14. 

Huoltaminen  tulee  jättää  pätevän  huoltohenkilöstön  tehtäväksi.  Huoltoa  tarvitaan,  kun  laite  on  jollakin  tavoin  vioittunut,  esim. 
virtalähteen johto tai pistoke on vioittunut, laitteen sisään on joutunut nestettä tai esineitä, laite on altistettu sateelle tai kosteudelle, 
laite ei toimi normaalisti tai se on pudonnut.

15. 

Älä  koskaan  katkaise  maadoitusnastaa.  Ottamalla  meihin  yhteyttä  saat  kirjasen  "Sähköiskuvaara  ja  maadoitus".  Kytke  vain 
virtalähteeseen, joka vastaa laitteen virtajohdon viereen merkittyä tyyppiä.

16. 

Jos laite kiinnitetään laiteräkkiin, tulee se tukea takaosastaan.

17.  

Note for UK only: If the colors of the wires in the mains lead of this unit do not correspond with the terminals in your plug‚ proceed as 
follows:


a) The wire that is colored green and yellow must be connected to the terminal that is marked by the letter E‚ the earth symbol‚ 
colored green or colored green and yellow.


b) The wire that is colored blue must be connected to the terminal that is marked with the letter N or the color black.


c) The wire that is colored brown must be connected to the terminal that is marked with the letter L or the color red.

18. 

Tätä  sähkölaitetta  ei  tule  altistaa  nestetipoille  tai  roiskeille,  eikä  laitteen  päälle  saa  asettaa  nestettä  sisältäviä  esineitä,  kuten 
maljakoita.

19. 

Laitteen virtakytkin ei katkaise ensiövirran molempia puolia. Laitteen sisällä voi olla vaarallinen jännite, kun virtakytkin on pois-
asennossa. Virtajohto toimii pääkytkimenä, ja sen pitää olla aina käytettävissä.

20. 

Altistus erittäin korkeille äänitasoille voi aiheuttaa pysyvän kuulovaurion. Henkilöiden alttius melun aiheuttamille kuulovaurioille 
vaihtelee, mutta lähes kaikkien kuulo vaurioituu altistuttaessa riittävän kovalle melulle riittävän kauan. Yhdysvaltain hallituksen 
työturvallisuus- ja terveyshallinto (OSHA) on määrittänyt seuraavat hyväksyttävät melutasoaltistukset: 

VAARA:

 Käytettäessä sähkölaitteita tulee aina huomioida mm. seuraavat turvallisuusohjeet:

OSHA:n mukaan altistus yo. tasoja korkeammalle määrälle voi aiheuttaa osittaisen kuulon menetyksen. Käytettäessä vahvistinjärjestelmää 
tulee kuulovaurioiden estämiseksi käyttää korvatulppia tai kuulosuojaimia, mikäli altistus ylittää yllä asetetut rajat. Jotta vältetään mahdollisesti 
vaarallinen  altistus  korkeille  äänenpaineen  tasoille,  suositellaan,  että  kaikki  korkeaa  äänenpainetta  tuottavien  laitteiden,  kuten  tämän 
vahvistimen, lähistöllä olevat henkilöt suojaavat kuulonsa, kun laite on käytössä.

Kesto päivää kohti tunteina

Äänitaso dBA, hidas vaste

8

90

6

92

4

95

3

97

2

100

1 1⁄2

102

1

105

1⁄2

110

1⁄4 tai alle

115

SÄILYTÄ NÄMÄ OHJEET!

FINNISH

Summary of Contents for BASS AMPLIFIER 126

Page 1: ...www peavey com MAX 126 Bass Amplifier Operating Manual ENGLISH 15 DEUTSCH 19 FRAN AIS 22 ESPA OL 25 ITALIANO 36 FINNISH 28 SWEDISH 33...

Page 2: ...e fonctionnant pour avertissements suppl mentaires r avsedd att varna anv ndaren f r f rekomsten av oisolerad farlig sp nning inom produktens h lje som kan vara av tillr cklig niv f r att personer ska...

Page 3: ...ti riempiti con liquidi come vasi non dovrebbero essere posizionati sopra questo apparecchio Prima di usare questo apparecchio leggere la guida operativa per ulteriori informazioni Destinado a alertar...

Page 4: ...ck rear support should be provided 17 Note for UK only If the colors of the wires in the mains lead of this unit do not correspond with the terminals in your plug proceed as follows a The wire that is...

Page 5: ...po use alg n tipo de apoyo trasero 17 Nota para el Reino Unido solamente Si los colores de los cables en el enchufe principal de esta unidad no corresponden con los terminales en su enchufe proceda de...

Page 6: ...dez comme suit a Le connecteur vert et jaune doit tre connectrer au terminal not E indiquant la prise de terre ou correspondant aux couleurs verte ou verte et jaune du guide b Le connecteur Bleu doit...

Page 7: ...ischen Schlag und Erdung zu Schlie en Sie nur an die Stromversorgung der Art an die am Ger t neben dem Netzkabel angegeben ist 16 Wenn dieses Produkt in ein Ger te Rack eingebaut werden soll muss eine...

Page 8: ...se tukea takaosastaan 17 Note for UK only If the colors of the wires in the mains lead of this unit do not correspond with the terminals in your plug proceed as follows a The wire that is colored gree...

Page 9: ...the colors of the wires in the mains lead of this unit do not correspond with the terminals in your plug proceed as follows a The wire that is colored green and yellow must be connected to the termin...

Page 10: ...posta vicino al cavo di alimentazione 16 Se questo prodotto deve essere montato a rack necessario sostenerlo anche nella parte posteriore 17 Nota per UK Se i colori dei fili nel cavo di alimentazione...

Page 11: ...nit do not correspond with the terminals in your plug proceed as follows a The wire that is colored green and yellow must be connected to the terminal that is marked by the letter E the earth symbol c...

Page 12: ...be connected to the terminal that is marked by the letter E the earth symbol colored green or colored green and yellow b The wire that is colored blue must be connected to the terminal that is marked...

Page 13: ...d yellow must be connected to the terminal that is marked by the letter E the earth symbol colored green or colored green and yellow b The wire that is colored blue must be connected to the terminal t...

Page 14: ...connected to the terminal that is marked by the letter E the earth symbol colored green or colored green and yellow b The wire that is colored blue must be connected to the terminal that is marked wit...

Page 15: ...sure the product has the proper AC line voltage supplied You can find the proper voltage for your amp printed next to the AC line power cord on the rear panel of the unit Each product feature is numbe...

Page 16: ...to turn the Vintage control on and off 4 Gain This control sets the overall volume level of the MAX 126 5 High EQ This control allows you to dial in high frequencies or treble sounds for your bass 6...

Page 17: ...ed Power 10 Watts RMS 8 Ohms nominal 1 kHz 120 VAC line Power Consumption Domestic 26 Watts 60 Hz 120 VAC Export 26 Watts 50 60 Hz 230 240 VAC PREAMP The following specs are measured at 1 kHz with all...

Page 18: ...18 10 EQ LO HI INPUT INPUT TAPE CD BASS GUITAR HEADPHONE 8 OHM SPEAKER 10 WATTS RMS INTO GAIN AMPLIFIER POWER PASSIVE VINTAGE BLOCK DIAGRAM MAX 126...

Page 19: ...dass das Ger t an die korrekte Netzspannung Wechselspannung angeschlossen ist Die f r Ihr Ger t korrekte Spannung ist neben dem Wechselstrom Netzkabel auf der R ckseite des Ger ts aufgedruckt Jede Fu...

Page 20: ...te wird der Vintage Regler ein bzw ausgeschaltet 4 Gain Mit diesem Regler wird der Gesamtlautst rkepegel des MAX 126 eingestellt 5 High EQ Hiermit drehen Sie genau so viel an H hen bzw Treble auf wie...

Page 21: ...versorgt ENDSTUFE Nennleistung 10 Watts RMS 8 Ohms nominal bei 1 kHz 120 V Wechselstromleitung Leistungsaufnahme USA 26 Watts 60 Hz 120 V Wechselstrom Export 26 Watts 50 60 Hz 230 240 V Wechselstrom V...

Page 22: ...mplificateur Il est important de v rifier que l alimentation lectrique corresponde aux annotations situ es proche du connecteur IEC de votre unit Les num ros pr sents dans ce manuel correspondent aux...

Page 23: ...pression des amplificateurs de puissance dits lampes Tournez ce contr le horairement pour augmenter la d formation du signal 3 S lecteur Vintage On Off Ce s lecteur vous permet d activer d sactiver le...

Page 24: ...nominal 1 kHz 120 VAC line Consommation Etats Unis 26 Watts 60 Hz 120 VAC Autre 26 Watts 50 60 Hz 230 240 VAC PREAMPLI Les sp cifications sont mesur es 1 kHz avec tous les contr les en position 5 Can...

Page 25: ...piado al producto Puede encontrar el voltaje apropiado para su amplificador impreso al lado del cable de alimentaci n en el panel trasero de la unidad Cada aspecto del producto est numerado Acuda al d...

Page 26: ...la cantidad de distorsi n compresi n a v lvulas girando el control en el sentido de las agujas de un reloj 3 Vintage encendido apagado Este bot n le permite encender o apagar el control Vintage 4 Gan...

Page 27: ...POTENCIA Potencia tasada 10 Vatios RMS a 8 Ohmios nominal a 1 kHz l nea de 120 VAC Consumo de Potencia Dom stico 26 vatios 60 Hz 120 VAC Export 26 vatios 50 60 Hz 230 240 VAC PREVIO Las siguientes es...

Page 28: ...ke varmistaa ett tuotteeseen on kytketty oikea vaihtovirtaj nnite Vahvistimen oikea j nnite on painettu verkkovirtajohdon viereen laitteen takaosaan Laitteen jokainen ominaisuus on numeroitu Voit l yt...

Page 29: ...nt Voit lis t putkis r n ja kompressoinnin m r k nt m ll s dint my t p iv n 3 Vintage P lle Pois T ll painonapilla voit kytke Vintage s d n p lle tai pois 4 Gain T m s din asettaa MAX 126 n nenvoimak...

Page 30: ...en gammal r rbasf rst rkare ka m ngden r rdistorsion genom att vrida ratten medurs 3 Vintage p av Den h r tryckknappen l ter dig sl av och p retroreglaget 4 Gain Detta reglage styr den vergripande lj...

Page 31: ...keffekt 10 watt RMS 8 nominellt vid 1 kHz 120 VAC anslutning Effektf rbrukning Inhemsk 26 watt 60 Hz 120 VAC Export 26 watt 50 60 Hz 230 240 VAC F RF RST RKARE F ljande v rden r uppm tta vid 1 kHz med...

Page 32: ...nimellinen 1 kHz 120 V j nnite Virrankulutus Yhdysvaltain mallit 26 W 60 Hz 120 V AC Vientimallit 26 W 50 60 Hz 230 240 V AC ESIVAHVISTIN Seuraavat tiedot on mitattu 1 kHz ll kaikki s timet asennossa...

Page 33: ...till att produkten matas med korrekt n tsp nning Korrekt sp nning f r din f rst rkare finns tryckt p enhetens bakre panel bredvid str mkontakten n tanslutningen Samtliga produktens detaljer r numrerad...

Page 34: ...sumer must pay initial shipping charges If the repairs are covered by Warranty Peavey will pay the return shipping charges How To Get Warranty Service 1 Take the defective item and your sales receipt...

Page 35: ...eferenced in Directive 2002 96 EC Annex IV OJ L 37 38 13 02 03 and defined in EN 50419 2005 The bar is the symbol for marking of new waste and is applied only to equipment manufactured after 13 August...

Page 36: ...FROM Place Postage Here Peavey Electronics Corporation Attn Warranty Department P O Box 5108 Meridian Ms 39302 5108...

Reviews: