Peavey BASS AMPLIFIER 126 Operating Manual Download Page 13

重要安全事项 

1.  

阅读说明书。

2.  

妥善保管说明书。

3.  

注意所有安全警告。

4.  

按照要求和指示操作。

5.  

请勿在靠近水(或其它液体)的地方使用本机。

6.  

本机只能用干燥布料擦拭。

7.  

请勿遮盖任何通散热口。确实依照本说明书安装本机。 

8.  

请勿将本机安装在任何热源附近,例如电暖器、蓄热器件、火炉或其他发热电器(包括功率放大器)。

9.  

请勿破坏两脚型插头或接地型插头的安全装置。两脚型插头有两个不同宽度的插头片,一个窄,另一个宽一点。接地型插头有两个相同
的插头片和一个接地插脚。两脚型插头中宽的插头片和接地型插头接地插脚起着保障安全的作用。如果所附带的插头规格与您的插座不
匹配,请让电工更换插座以保证安全。 

10.  

请勿踩踏或挤压电源线,尤其是插头、插座、设备电源输入接口或者电源线和机身连接处。

11.  

本机只可以使用制造商指定的零件 / 配件。

12.  

本机只可以使用与本机搭售或由制造商指定的机柜、支架、三角架、托架或桌子。使用机柜时,请小心移动已安装设备的机柜,以避免
机会推翻造成身体伤害。

13.  

在雷雨天或长期不使用的情况下,请拔掉电源插头。 

14.  

所有检查与维修都必须由指定的专业维修人员进行。如本机的任何形式的损伤都须检修,例如电源线或插头受损,有液体或物体落入机
身内,曾暴露于雨天或潮湿的地方,不能正常运作,或曾掉落后损坏等。

15. 

不得拔出接地插脚。请写信索取免费手册《 Shock Hazard and Grounding》。使用前,请仔细检查确认所使用的电源电压是否匹配设备
上标注的额定电压。 

16.  

如果本机装在机柜中 , 其后部也应给予相应的支撑固定。

17.


Note for UK only:

 If the colors of the wires in the mains lead of this unit do not correspond with the terminals in your plug‚ proceed as 

follows:


a) The wire that is colored green and yellow must be connected to the terminal that is marked by the letter E‚ the earth symbol‚ 
colored green or colored green and yellow.


b) The wire that is colored blue must be connected to the terminal that is marked with the letter N or the color black.


c) The wire that is colored brown must be connected to the terminal that is marked with the letter L or the color red.

18.  

本机不得暴露于滴水或溅水中。请勿将诸如花瓶等装有液体的物体放置于本机上。 

19.  

本机电源开关不能同时断开两端的电源,完全切断外部电源。因此当开关位于“OFF”位置时,本机外壳仍有可能带有触电的危险。电
源插头或耦合器能够与设备或者电源容易分开,保证电源的完全切断,从而保证安全。 

20.  

声压级较高的噪音容易造成听力的永久性损失。因噪声而造成的听力损失程度 , 个体间的差异较大 , 但几乎每个人在声压级较高的噪音
环境里一定时间,都会有不同程度的听力损失。美国政府职业安全与保健管理局(OSHA)就此规定了下列容许噪声级 :

警告 :

操作电器产品时,请务必遵守基本安全注意事项,包括 :

据 OSHA, 任何超出以上所允许的范围 , 都会造成部分听力的损失。使用本功放系统时,必须佩戴如耳塞等保护耳朵的器件,防止长时间处于上述
限制级以上的环境而引起永久性听力受损。本机运行时,如果超过上述所规定的最大限制,为了抵御较高的声压对于听受损所造成的潜在危险,建
议使用诸如功放系统等引起高声压级噪声的所有人均佩戴保护耳朵的器件。

每天持续小时数

声压级(dBA)慢反应

8

90

6

92

4

95

3

97

2

100

1

½

102

1

105

½

110

¼

 或更少

115

请妥善保管本说明书! 

CHINESE

Summary of Contents for BASS AMPLIFIER 126

Page 1: ...www peavey com MAX 126 Bass Amplifier Operating Manual ENGLISH 15 DEUTSCH 19 FRAN AIS 22 ESPA OL 25 ITALIANO 36 FINNISH 28 SWEDISH 33...

Page 2: ...e fonctionnant pour avertissements suppl mentaires r avsedd att varna anv ndaren f r f rekomsten av oisolerad farlig sp nning inom produktens h lje som kan vara av tillr cklig niv f r att personer ska...

Page 3: ...ti riempiti con liquidi come vasi non dovrebbero essere posizionati sopra questo apparecchio Prima di usare questo apparecchio leggere la guida operativa per ulteriori informazioni Destinado a alertar...

Page 4: ...ck rear support should be provided 17 Note for UK only If the colors of the wires in the mains lead of this unit do not correspond with the terminals in your plug proceed as follows a The wire that is...

Page 5: ...po use alg n tipo de apoyo trasero 17 Nota para el Reino Unido solamente Si los colores de los cables en el enchufe principal de esta unidad no corresponden con los terminales en su enchufe proceda de...

Page 6: ...dez comme suit a Le connecteur vert et jaune doit tre connectrer au terminal not E indiquant la prise de terre ou correspondant aux couleurs verte ou verte et jaune du guide b Le connecteur Bleu doit...

Page 7: ...ischen Schlag und Erdung zu Schlie en Sie nur an die Stromversorgung der Art an die am Ger t neben dem Netzkabel angegeben ist 16 Wenn dieses Produkt in ein Ger te Rack eingebaut werden soll muss eine...

Page 8: ...se tukea takaosastaan 17 Note for UK only If the colors of the wires in the mains lead of this unit do not correspond with the terminals in your plug proceed as follows a The wire that is colored gree...

Page 9: ...the colors of the wires in the mains lead of this unit do not correspond with the terminals in your plug proceed as follows a The wire that is colored green and yellow must be connected to the termin...

Page 10: ...posta vicino al cavo di alimentazione 16 Se questo prodotto deve essere montato a rack necessario sostenerlo anche nella parte posteriore 17 Nota per UK Se i colori dei fili nel cavo di alimentazione...

Page 11: ...nit do not correspond with the terminals in your plug proceed as follows a The wire that is colored green and yellow must be connected to the terminal that is marked by the letter E the earth symbol c...

Page 12: ...be connected to the terminal that is marked by the letter E the earth symbol colored green or colored green and yellow b The wire that is colored blue must be connected to the terminal that is marked...

Page 13: ...d yellow must be connected to the terminal that is marked by the letter E the earth symbol colored green or colored green and yellow b The wire that is colored blue must be connected to the terminal t...

Page 14: ...connected to the terminal that is marked by the letter E the earth symbol colored green or colored green and yellow b The wire that is colored blue must be connected to the terminal that is marked wit...

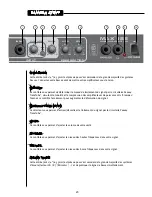
Page 15: ...sure the product has the proper AC line voltage supplied You can find the proper voltage for your amp printed next to the AC line power cord on the rear panel of the unit Each product feature is numbe...

Page 16: ...to turn the Vintage control on and off 4 Gain This control sets the overall volume level of the MAX 126 5 High EQ This control allows you to dial in high frequencies or treble sounds for your bass 6...

Page 17: ...ed Power 10 Watts RMS 8 Ohms nominal 1 kHz 120 VAC line Power Consumption Domestic 26 Watts 60 Hz 120 VAC Export 26 Watts 50 60 Hz 230 240 VAC PREAMP The following specs are measured at 1 kHz with all...

Page 18: ...18 10 EQ LO HI INPUT INPUT TAPE CD BASS GUITAR HEADPHONE 8 OHM SPEAKER 10 WATTS RMS INTO GAIN AMPLIFIER POWER PASSIVE VINTAGE BLOCK DIAGRAM MAX 126...

Page 19: ...dass das Ger t an die korrekte Netzspannung Wechselspannung angeschlossen ist Die f r Ihr Ger t korrekte Spannung ist neben dem Wechselstrom Netzkabel auf der R ckseite des Ger ts aufgedruckt Jede Fu...

Page 20: ...te wird der Vintage Regler ein bzw ausgeschaltet 4 Gain Mit diesem Regler wird der Gesamtlautst rkepegel des MAX 126 eingestellt 5 High EQ Hiermit drehen Sie genau so viel an H hen bzw Treble auf wie...

Page 21: ...versorgt ENDSTUFE Nennleistung 10 Watts RMS 8 Ohms nominal bei 1 kHz 120 V Wechselstromleitung Leistungsaufnahme USA 26 Watts 60 Hz 120 V Wechselstrom Export 26 Watts 50 60 Hz 230 240 V Wechselstrom V...

Page 22: ...mplificateur Il est important de v rifier que l alimentation lectrique corresponde aux annotations situ es proche du connecteur IEC de votre unit Les num ros pr sents dans ce manuel correspondent aux...

Page 23: ...pression des amplificateurs de puissance dits lampes Tournez ce contr le horairement pour augmenter la d formation du signal 3 S lecteur Vintage On Off Ce s lecteur vous permet d activer d sactiver le...

Page 24: ...nominal 1 kHz 120 VAC line Consommation Etats Unis 26 Watts 60 Hz 120 VAC Autre 26 Watts 50 60 Hz 230 240 VAC PREAMPLI Les sp cifications sont mesur es 1 kHz avec tous les contr les en position 5 Can...

Page 25: ...piado al producto Puede encontrar el voltaje apropiado para su amplificador impreso al lado del cable de alimentaci n en el panel trasero de la unidad Cada aspecto del producto est numerado Acuda al d...

Page 26: ...la cantidad de distorsi n compresi n a v lvulas girando el control en el sentido de las agujas de un reloj 3 Vintage encendido apagado Este bot n le permite encender o apagar el control Vintage 4 Gan...

Page 27: ...POTENCIA Potencia tasada 10 Vatios RMS a 8 Ohmios nominal a 1 kHz l nea de 120 VAC Consumo de Potencia Dom stico 26 vatios 60 Hz 120 VAC Export 26 vatios 50 60 Hz 230 240 VAC PREVIO Las siguientes es...

Page 28: ...ke varmistaa ett tuotteeseen on kytketty oikea vaihtovirtaj nnite Vahvistimen oikea j nnite on painettu verkkovirtajohdon viereen laitteen takaosaan Laitteen jokainen ominaisuus on numeroitu Voit l yt...

Page 29: ...nt Voit lis t putkis r n ja kompressoinnin m r k nt m ll s dint my t p iv n 3 Vintage P lle Pois T ll painonapilla voit kytke Vintage s d n p lle tai pois 4 Gain T m s din asettaa MAX 126 n nenvoimak...

Page 30: ...en gammal r rbasf rst rkare ka m ngden r rdistorsion genom att vrida ratten medurs 3 Vintage p av Den h r tryckknappen l ter dig sl av och p retroreglaget 4 Gain Detta reglage styr den vergripande lj...

Page 31: ...keffekt 10 watt RMS 8 nominellt vid 1 kHz 120 VAC anslutning Effektf rbrukning Inhemsk 26 watt 60 Hz 120 VAC Export 26 watt 50 60 Hz 230 240 VAC F RF RST RKARE F ljande v rden r uppm tta vid 1 kHz med...

Page 32: ...nimellinen 1 kHz 120 V j nnite Virrankulutus Yhdysvaltain mallit 26 W 60 Hz 120 V AC Vientimallit 26 W 50 60 Hz 230 240 V AC ESIVAHVISTIN Seuraavat tiedot on mitattu 1 kHz ll kaikki s timet asennossa...

Page 33: ...till att produkten matas med korrekt n tsp nning Korrekt sp nning f r din f rst rkare finns tryckt p enhetens bakre panel bredvid str mkontakten n tanslutningen Samtliga produktens detaljer r numrerad...

Page 34: ...sumer must pay initial shipping charges If the repairs are covered by Warranty Peavey will pay the return shipping charges How To Get Warranty Service 1 Take the defective item and your sales receipt...

Page 35: ...eferenced in Directive 2002 96 EC Annex IV OJ L 37 38 13 02 03 and defined in EN 50419 2005 The bar is the symbol for marking of new waste and is applied only to equipment manufactured after 13 August...

Page 36: ...FROM Place Postage Here Peavey Electronics Corporation Attn Warranty Department P O Box 5108 Meridian Ms 39302 5108...

Reviews: