


B
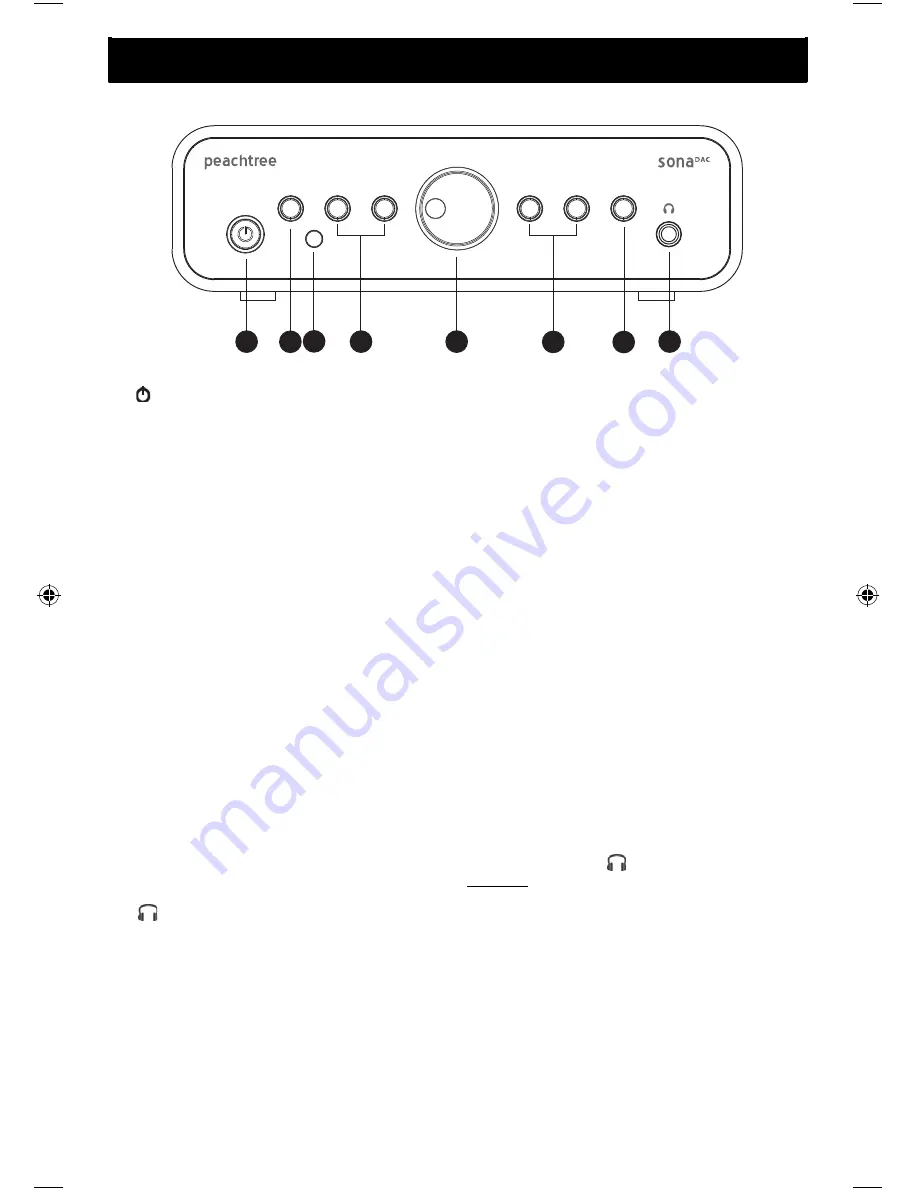
Button: With the AC cord attached and the rear panel POWER switch set to ON,
this button toggles the unit between On mode which lights the button blue and Standby
mode which lights the button red. Note: When the unit is in Standby mode, pressing
any input button will put the unit into On mode and select that input.
C
USB Button: This selects the USB input and lights the button blue or green. *Note: the
USB input is capable of accepting audio up to 384kHz when the USB 1.0/2.0 button on
the rear panel is set to 2.0. PC Users Note: For playback of files above 96kHz,
Windows requires that you install the included driver on your PC.
D
IR Receiver Window:
Allows infrared commands from the wireless remote to control
the unit. For best results please ensure an unobstructed line-of-sight between the top
side of the remote control (where the IR transmitter is located) and this window.
E
OPT1 & OPT2 Buttons: These select the OPT1 or OPT2 digital audio inputs and light
the corresponding input button blue or green. *Note: these inputs are capable of
accepting digital audio up to 192kHz.
F
Volume Knob: Rotate clockwise to increase and counter-clockwise to decrease output
level. Note: the volume knob is motorized and rotates when the volume up or down
buttons are pressed on the remote control. The knob also has a dimple to more easily
indicate the current setting from a distance.
G
COAX1 & COAX2 Buttons: These select the COAX1 or COAX2 digital audio inputs
and light the corresponding button blue or green. *Note: these inputs are capable of
accepting digital audio up to 192kHz.
H
PHASE Button: Inverts the phase of the XLR, RCA and OUTPUTS. When the
button is lit blue, the phase of the output is inverted.
I
Output: 1/4” headphone output connection. Inserting a headphone connection
automatically mutes the XLR & RCA OUTPUTS. Removing a headphone connection
automatically un-mutes the XLR & RCA OUTPUTS. **CAUTION** Lower the output
level when inserting or removing a headphone connection.
*See Volume Control Bypass on page 7 for more details.
6
COAX1
COAX2
OPT1
OPT2
PHASE
USB
1
5
2 3
4
7
8
6
FRONT PANEL
B
Button: With the AC cord attached and the rear panel POWER switch set to ON,
this button toggles the unit between On mode which lights the button blue and Standby
mode which lights the button red. Note: When the unit is in Standby mode, pressing
any input button will put the unit into On mode and select that input.
C
USB Button: This selects the USB input and lights the button blue or green. *Note: the
USB input is capable of accepting audio up to 384kHz when the USB 1.0/2.0 button on
the rear panel is set to 2.0. PC Users Note: For playback of files above 96kHz,
Windows requires that you install the included driver on your PC.
D
IR Receiver Window:
Allows infrared commands from the wireless remote to control
the unit. For best results please ensure an unobstructed line-of-sight between the top
side of the remote control (where the IR transmitter is located) and this window.
E
OPT1 & OPT2 Buttons: These select the OPT1 or OPT2 digital audio inputs and light
the corresponding input button blue or green. *Note: these inputs are capable of
accepting digital audio up to 192kHz.
F
Volume Knob: Rotate clockwise to increase and counter-clockwise to decrease output
level. Note: the volume knob is motorized and rotates when the volume up or down
buttons are pressed on the remote control. The knob also has a dimple to more easily
indicate the current setting from a distance.
G
COAX1 & COAX2 Buttons: These select the COAX1 or COAX2 digital audio inputs
and light the corresponding button blue or green. *Note: these inputs are capable of
accepting digital audio up to 192kHz.
H
PHASE Button: Inverts the phase of the XLR, RCA and OUTPUTS. When the
button is lit blue, the phase of the output is inverted.
I
Output: 1/4” headphone output connection. Inserting a headphone connection
automatically mutes the XLR & RCA OUTPUTS. Removing a headphone connection
automatically un-mutes the XLR & RCA OUTPUTS. **CAUTION** Lower the output
level when inserting or removing a headphone connection.
*See Volume Control Bypass on page 7 for more details.
6
COAX1
COAX2
OPT1
OPT2
PHASE
USB
1
5
2 3
4
7
8
6
FRONT PANEL


