background image

Manual 


15 

-

When the WAA01 directory contains more than 99 subdirectories, a new directory called “WAA02“ is 

created. 
-This means that the data paths correspond to the following schema:  
 
WAA01\  
WAA01001.xls  
WAA01002.xls  
........................ 
WAA01099.xls  
WAA02\  
WAA02001.xls  
WAA02002.xls  
........................ 
WAA02099.xls  
WAAXX\  
........................ 
........................ 
 
Note: 

The maximum value for “XX“ is 10. 


5.17  To save the SD card data on the computer (EXCEL software) 

 
1.After closing the logging function properly, remove the SD card from the meter. 
2.Put the SD card into the corresponding card reader of the computer. 
3.Start the EXCEL software. 
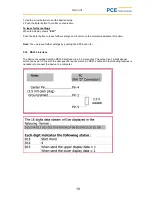
4.Call up the desired file (with .xls at the end) from the SD card. The data appear as a chart and can be 
presented as practical diagrams by means of the software. 
 
The following is an example hereof: 


5.18  Further settings 


To enter further settings of the device, hold the SET button (8) for more than two seconds. It is important 
that during this process, the datalogger function is not active. Release the button now. You can switch 
between the adjustment ranges by pushing the SET button again. The display will show: 
 

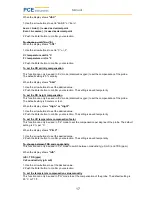
Sd F:

Formatting the memory card 

dAtE:

Setting time / date 

SP-t:

Setting sampling time 

PoFF:

Setting automatic power-off 

bEEP:

Switching beeper on or off 

dEC:

Setting the decimal point fort he SD card 

Summary of Contents for PCE-PHD 1

Page 1: ...Business Park Ensign way Southampton Hampshire United Kingdom SO31 4RF Tel 02380 98703 0 Fax 02380 98703 9 info industrial needs com www industrial needs com www pce instruments com english Manual PH EC O2 pH meter PCE PHD 1 Version 2 0 18 11 2014 ...

Page 2: ...ion 11 5 8 Salt content measurement 11 5 9 Calibration of the salt content measurement 11 5 10 Dissolved oxygen measurement 11 5 11 Atmospheric oxygen content measurement 12 5 12 Calibration of the atmospheric oxygen content measurement 12 5 13 Maintenance of the oxygen probe 12 5 14 Other functions 13 5 15 Datalogger 13 5 16 SD card structure 14 5 17 To save the SD card data on the computer EXCEL...

Page 3: ...ct exposure to sunlight or moisture e g wet hands must be avoided The opening of the case should only be done by qualified personnel of PCE Instruments The instrument should never be placed with the user interface facing an object e g keyboard side on a table You must not make any technical changes to the device The appliance should only be cleaned with a damp cloth use only pH neutral cleaner no ...

Page 4: ...01 mS cm 0 01 mS cm 0 1 mS cm 2 of the measurement range 1 digit 1413 mS cm automatic 0 60 ºC Total dissolved solids TDS Measurement range Resolution Accuracy Temperature compensation 0 132 ppm 132 1 320 ppm 1 320 13 200 ppm 13 200 132 000 ppm 0 1 ppm 1 ppm 10 ppm 100 ppm 2 of the measurement range 1 digit automatic 0 60 ºC Salt content Measurement range Resolution Accuracy Temperature compensatio...

Page 5: ... chip micro computer LSI circuit Data logger Sampling time sampling range Auto 1 sec to 8 hrs 59 min 59 sec with a sampling time of 1sec automatic saving may not work Manual Push the data logger button to save data once sampling time target 0 sec Advanced settings formatting of the SD memory card clock time setting year month date hour minute second sampling time setting auto power OFF setting bee...

Page 6: ...is on the power consumption will increase by approx 12 mA Data Hold data on display can be held frozen Memory recall minimum and maximum values Conditions to achieve the stated accuracies field strength 3 V m and frequency 30 MHz ...

Page 7: ...e button button control button 7 Time button 8 Logger button SET button sampling check 9 Stand 10 Battery compartment cover 11 Battery comparment screw 12 Mounting hole for tripod 13 Temperature socket PH ATC socket 14 DO socket 15 CD socket 16 PH socket BNC socket 17 DC 9V socket for PSU 18 Reset button 19 RS232 interface 20 Slot for SD card ...

Page 8: ...ntly calibrate before starting with the measurement pH measurement manual temperature compensation 1 Switch on the device 2 Select the PH measurement mode 3 Put the plug of the probe into the BNC socket 16 4 Adapt the temperature manually to the temperature of the solution to be measured 5 Hold the handle of the probe and dip the complete probe head into the solution 6 Stir slightly 7 The display ...

Page 9: ...t use Additionally occasional calibrations of a used probe makes sense in order to ensure precise measurements For calibration a pH electrode and a pH standard solution are necessary To carry out a pH calibration 1 Put the plug of the pH probe into the BNC socket 16 2 Switch on the device 3 Select the PH measurement mode 4 Adapt the temperature manually to the temperature of the standard solution ...

Page 10: ...h the measurement To measure conductivity 1 Put the plug of the conductivity probe into the CD socket 15 2 Switch on the device 3 Select the Cd measurement mode 4 Hold the handle of the probe and dip the complete probe head into the solution 6 Shake the probe to make sure that the air bubble escapes from the probe head 6 The display will show the conductivity value and the measured temperature val...

Page 11: ...the Enter button so that the data are saved and the calibration is finished Note If you only want to carry out a one point calibration it is sufficient to calibrate the measurement range of 2 mS If you make a calibration with several points you must first calibrate the range of 2 mS and afterwards the other ranges 5 8 Salt content measurement To measure the salt content 1 Put the plug of the condu...

Page 12: ... in order to switch from mg l to O2 The atmospheric oxygen content is now displayed as a reference value 5 12 Calibration of the atmospheric oxygen content measurement CAUTION To ensure the best possible calibration result make sure that the calibration is carried out in a well ventilated environment The volume share of oxygen in the ambient air is normally 20 9 That is why this value serves as th...

Page 13: ...led by pushing the Hold button again Data record The data record function allows you to save the maximum and minimum values Push the REC button 4 once to activate the memory function The REC symbol is displayed Das REC Symbol wird angezeigt When the REC function is switched on If you push the REC button once the maximum value and the REC MAX symbol are displayed If you want to delete the maximum v...

Page 14: ...pling time 0 seconds To start logging 1 Push the REC button 4 once The display shows REC 2 Push the Logger button 8 DATALOGGER flashes on the display once and the beeper chimes At the same time the measurement values are time stamped and saved 3 On the lower side of the display you can see where the data is saved This information is also saved on the SD card If you want to save the data somewhere ...

Page 15: ... Start the EXCEL software 4 Call up the desired file with xls at the end from the SD card The data appear as a chart and can be presented as practical diagrams by means of the software The following is an example hereof 5 18 Further settings To enter further settings of the device hold the SET button 8 for more than two seconds It is important that during this process the datalogger function is no...

Page 16: ...change the flashing value 2 To get to the next value push the Enter button 4 3 After making the desired settings push the SET button to save the changes The display switches automatically to the setting of the sampling time Note Once the time has been set it goes on even when you switch off the device provided that the batteries are flawless To set the sampling time hour minute second When the dis...

Page 17: ...et the compensation of the probe The default setting is 0 meters or feet When the display shows High or Highf 1 Use the arrow buttons to set the desired value 2 Push the Enter button to confirm your selection The setting is saved temporarily To set th eCD temperature compensation factor This function can only be used in Cd mode to set the compensation per degree of the probe The default setting is...

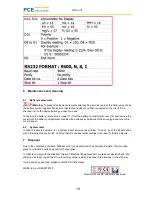
Page 18: ...her settings and to return to the normal measurement function Note You can leave further settings by pushing the ESC button 3 5 19 RS232 interface The device is equipped with an RS232 interface via a 3 5 mm socket The output is a 16 digit stream which can be set in line with the user specific requirements An RS232 cable with the following features is necessary to connect the device to a computer ...

Page 19: ...back on 6 2 System reset In case of a severe system error a system reset can solve the problem To do so push the Reset button with a thin object during switch on Note that this causes furher settings to be reset to factory defaults 7 Disposal Due to the contained pollutants batteries must not be disposed of as household waste They must be given to collection points designed fort hat purpose In ord...

Page 20: ... UK Ltd Units 12 13 Southpoint Business Park Ensign Way Southampton Hampshire United Kingdom SO31 4RF By phone Support 02380 987 035 Sales 02380 987 030 You can find an overview of our measuring instruments here http www industrial needs com measuring instruments htm You can find an overview of our scales here http www industrial needs com balances htm ...

Reviews: