


www.pbteen.com
2/4
ASSEMBLY INSTRUCTION:
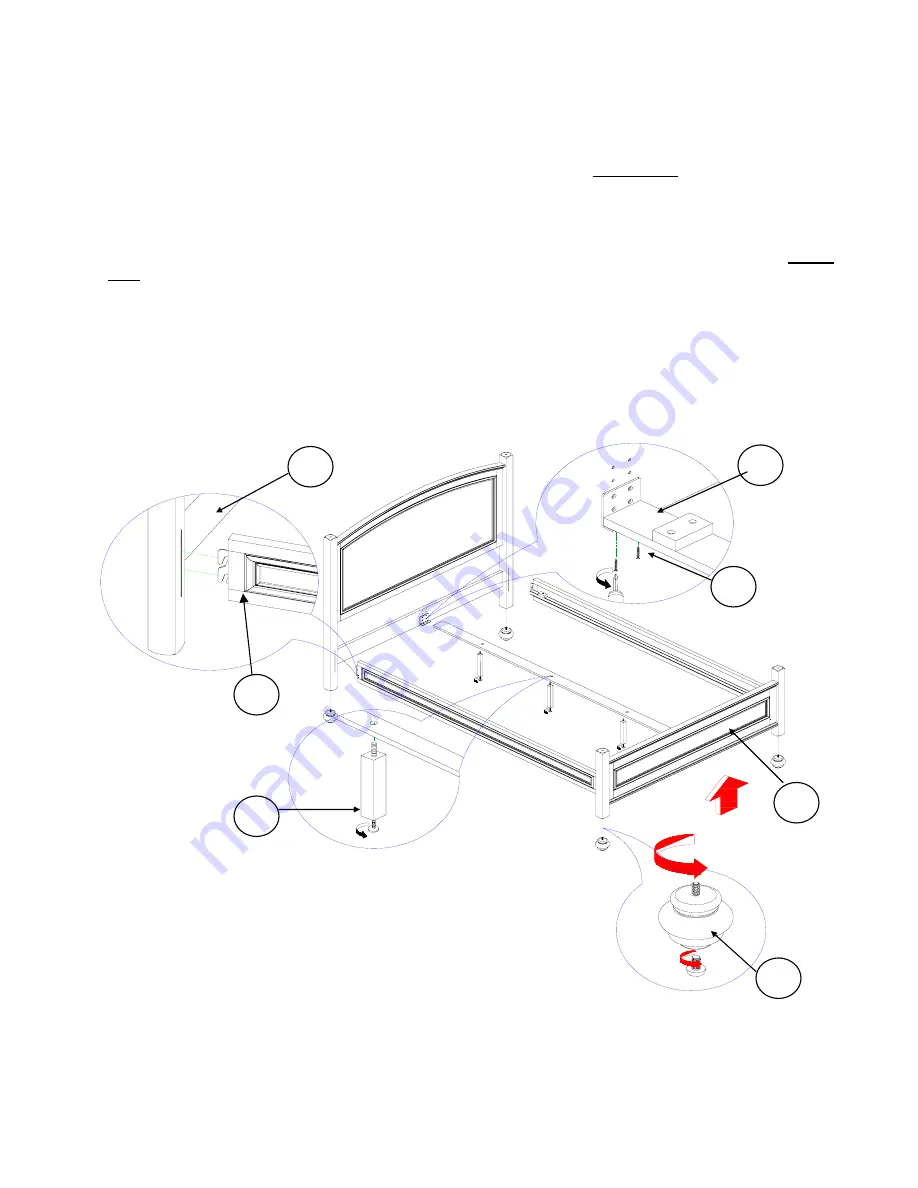
1. On a soft, scratch-free surface, such as a carpet or rug, remove all the parts from boxes.
Insert the exposed
screw of the Legs (L) into the pre-drilled holes on the bottom posts of the Headboard (A) and Footboard (B);
turn clockwise until tights as shown below in Figure 1.1.
2. Hold the Headboard (A) in a vertical position tilted slightly forward. Attach each Side Rail (D) to the
Headboard (A) by inserting the hooked ends of the Side Rail (D) into the corresponding slots in the
Headboard (A) as shown below in Figure 1.2. Push down firmly on the top of the Side Rail (D) until they seat
themselves securely into the Headboard (A). Repeat with Footboard (B). Please Note: There are two possible
heights for the Side Rails (D); make sure the Side Rails (D) are on the same level for both the Headboard (A)
and Footboard (B)
3. Insert the exposed screw of the Center Legs (J) into the pre-drilled holes on the bottom of Center Support Rail
(I) as shown below in Figure 1.3
4. Place the Center Support Rail (I) onto the metal bracket located on Headboard (A) and Footboard (B). Please
Note: If you placed the Side Rail (D) in the highest level on the Headboard (A) and Footboard (B), unscrew
the metal bracket on the Headboard (A) and Footboard (B) and then re-attach to the upper pre-drilled holes.
5. Fasten Center Support Rail (I) into place by screwing the Short Wood Screw (N) through the pre-drilled holes
on the Center Support Rail (I) and into the metal bracket on Headboard (A) and Footboard (B) as shown
below in Figure 1.4.
Adjust the recessed levelers located at the bottom of each Center Leg (J) by turning the
levelers counter clockwise until adequate contact in made with the floor.
B
J
L
Figure 1.1
Figure 1
Figure 1.3
N
I
Figure 1.4
A
D
Figure 1.2


