


Page 3
X
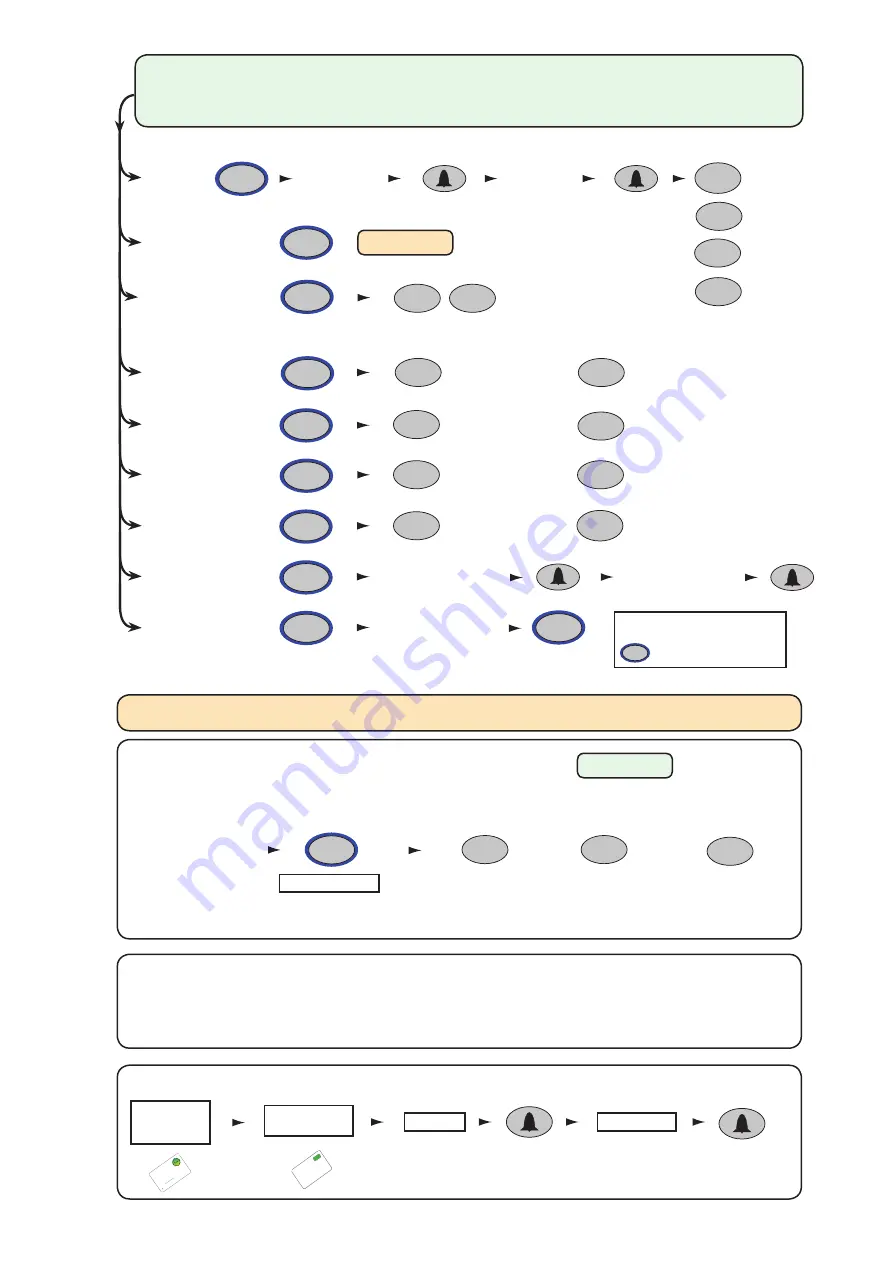
Single or multiple
codes
Silent operation
20 wrong keystrokes
= 60 second lockout
Door open time
(seconds)
Change
Programming Code
Exit button
Set a
user code
Data Reset (except
Programming code)
OR
One code only
Multiple codes allowed
Silent
Beep on
OFF
ON
Enter time in seconds
(default = 07, max = 60)
Open door for
time in option 5
Toggle door open
until pressed again or
toggle code entered
Enter user code
4-8 digits
Re-enter
user code
Enter 6 digit
Programming Code
= Delete
= Normal
= Toggle
= Duress
Enter 6 digit
Programming Code
Re-enter 6 digit
Programming Code
6
OR
OR
X
OR
2
4
6
8
OR
OR
OR
2
2
2
2
2
3
4
7
5
6
9
8
6
6
START
- Enter the
6 digit Programming Code
and hold down a function key
for
3 seconds.
- The unit beeps and the LED flashes faster.
Continue the key sequence to set the option - The keypad returns to operating mode.
Function keys
= Hold down for 3 secs
4
1
Combined Card &
Keypad modes
Section 3 - CARDLOCK/PROXIMITY with TOUCHLOCK mode
(i) The KP reader must first be initialised in TOUCHLOCK mode
: See Section 2
(Individual Toggle function is not available)
(ii) Set up the required operating mode, as follows:
(iii) Present enrolment card
Card plus PIN.
A card requires a 4 digit PIN to be assigned to it before it will work, as follows:
Present
enrolment
card
Present user
card
Enter PIN
Re-Enter PIN
Card plus Code.
Access is granted by presenting a valid token and then entering a valid user code.
Card or Code.
Access is granted by presenting a valid token or entering a valid user code.
Touchlock programming - Function 2 to enable multiple user codes, Function 8 to add user codes. (4 digits)
1
Card plus PIN
Card or Code
Card plus Code
2
3
OR
OR
Enter 6 digit
Programming
Code
Hold for 3 secs
1
PR
OX
IM
IT
Y
en
ro
lm
en
t c
ar
d
1. A
t installation, p
resent thi
s
card to th
e reader to
validat
e
the tok
ens in this p
ack.
2. T
o re-
va
lidate a user tok
en,
presen
t this enrolment
card
to the reader follo
wed b
y the
user
tok
en.
1.
At in
sta
llat
ion
, p
res
en
t th
is c
ard
to
th
e
rea
de
r to
va
lida
te th
e t
ok
en
s in
th
is p
ack
2.
To re
-va
lida
te a
us
er to
ken
pr
ese
nt th
is
en
rolm
en
t c
ard
to
th
e r
ea
der
fo
llow
ed
by
th
e
use
r to
ken
Pa
xto
n A
cce
ss
FUNCTION CARD
en
rolm
en
t c
ard
Mo
re i
nfo
:
htt
p:/
/pa
xto
n.i
nfo
/74
Amber and
Green flash
LED's flash faster
Amber flashes
See Section 3
9


