background image

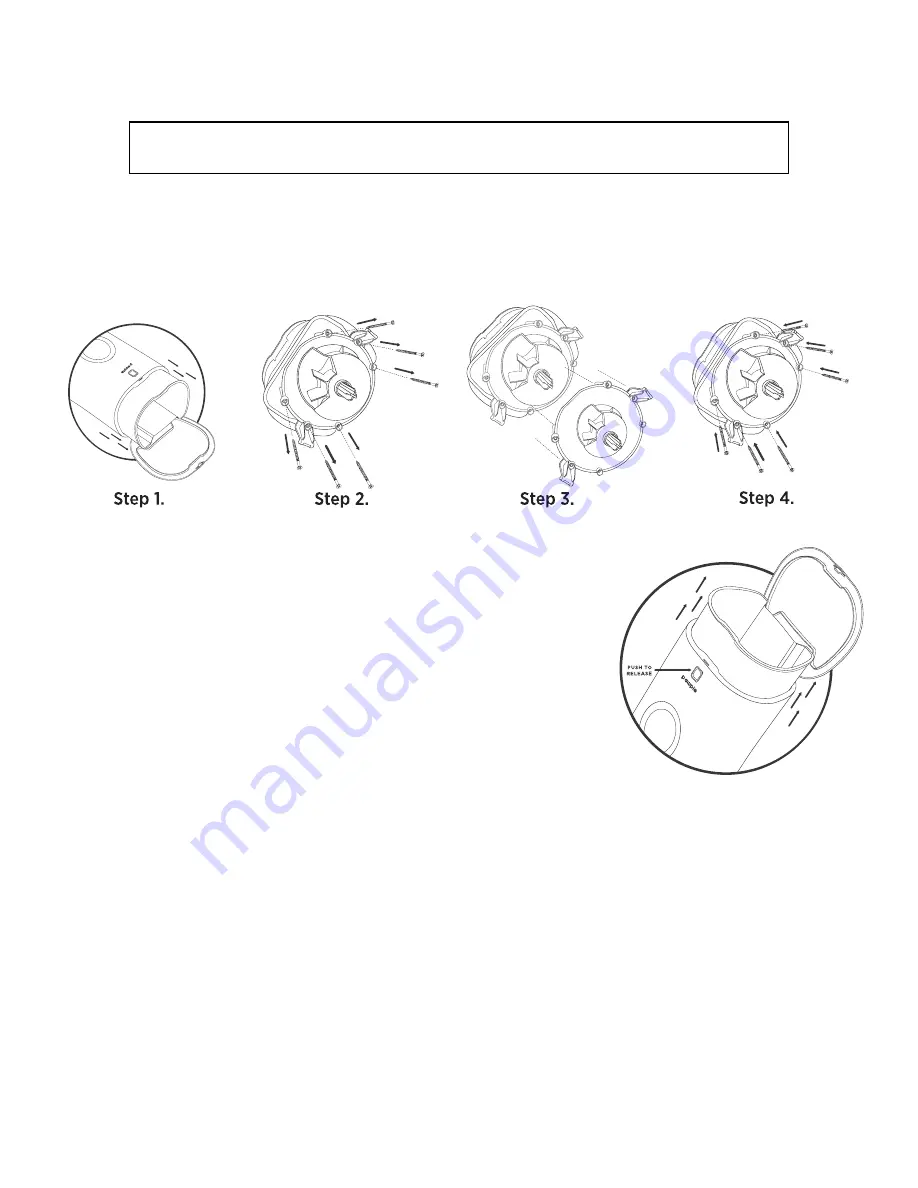
Switching to Small Portion Dispenser

1.  Empty and remove the food bucket and flip it upside down.
2.  Remove the screws holding the portion dispenser wheel in place.
3.  Replace the large portion dispenser with the small portion dispenser.
4.  Replace the screws. 


5

NOTE: Most standard food sizes require the pre-installed large portion dispenser. Only use the small portion 

dispenser with smaller-sized kibble.

Care and Maintenance

1.  The feeder bowl is dishwasher-safe for your convenience. 
2.  The internal food container is not dishwasher-safe, 

but can be removed and cleaned with water and 
a mild cleaning agent. Use only pet-safe cleaning 
agents and make sure to thoroughly rinse and fully 
dry the food bucket before replacing it.

3.  The body of the feeder is not dishwasher-safe. Do not 

submerge the body in water; this could damage the internal 
electronics and cause the batteries to short out, create an 
electrical shock, or catch fire.

4.  To clean the body, wipe it with a soft cloth and a mild 

cleaning agent.

5.  If the LOW BATTERY indicator LED starts flashing, replace the 

batteries in the battery compartment, or connect the feeder 
to a power adapter. Three (3) alkaline D batteries should last 
approximately one (1) year, depending on the quantities and 
frequency of food being dispensed.

6.  Make sure all parts of the feeder are completely dry before 

refilling and re-assembling the device. 

7.  Exposure to sunlight could damage the internal electronics 

or cause discoloration; be sure the device is placed in a 
shady place.

Summary of Contents for PAWAUFD

Page 1: ...7L AUTOMATIC PET FEEDER USER GUIDE PAWAUFD ...

Page 2: ...y Please read all directions before using the product and retain this guide for reference This product is intended for household use only It is not intended for commercial use This product is covered by a limited one year warranty Coverage is subject to limits and exclusions See warranty for details Package Contents Main body Food bowl Small portion dispenser Large portion dispenser installed by d...

Page 3: ...Product Overview 1 Cover 2 Cover Lock 3 Food Compartment 4 Display 5 Cover Release Button 6 Body 7 Food Outlet 8 Food Bowl 9 USB Port 10 Power Button 11 Battery Compartment 2 5 ...

Page 4: ...ppings are not torn and that you match the positive and negative poles with the markings in the compartment 3 Make sure the power switch is in the on position I Check Motor Functions 1 Press and hold the MANUAL button on the feeder for three 3 seconds The rotor should rotate and release one portion 2 Repeat this process two more times If it completes successfully then the motor functions are worki...

Page 5: ...he portion size from 1 39 Refer to the included portion chart to determine your appropriate portion size 3 Set Meal Time Press and hold the corresponding MEAL and HOUR buttons simultaneously Press HOUR while holding down MEAL to set the hour for that meal to dispense Repeat this process with the MEAL and MINUTE buttons to set the minutes if needed Record a Voice Message 1 Press and hold the REC bu...

Page 6: ...to thoroughly rinse and fully dry the food bucket before replacing it 3 The body of the feeder is not dishwasher safe Do not submerge the body in water this could damage the internal electronics and cause the batteries to short out create an electrical shock or catch fire 4 To clean the body wipe it with a soft cloth and a mild cleaning agent 5 If the LOW BATTERY indicator LED starts flashing repl...

Page 7: ...ar of the internal food wheel to prevent accidents or injuries 8 Always turn the unit off before cleaning 9 Make sure to check the level of food regularly to ensure the feeder is dispensing food properly 10 This product was not intended for use or play by children and we recommend you do not allow children to play or tamper with it to reduce the risk of important settings being changed or damage t...

Page 8: ...s not cover any damage due to a transportation b storage c improper use d failure to follow the product instructions or to perform any preventive maintenance e modifications f unauthorized repair g normal wear and tear or h external causes such as accidents abuse or other actions or events beyond our reasonable control WHAT IS THE PERIOD OF COVERAGE This limited warranty starts on the date of your...

Reviews: