background image

8

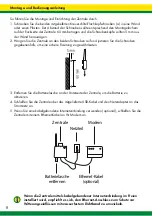
So führen Sie die Montage und Einrichtung der Zentrale durch:
1.  Schrauben Sie die beiden mitgelieferten Kreuzschlitz-Flachkopfschrauben (a) in eine Wand 

oder einen Pfosten. Der Abstand der Schrauben sollte entsprechend den Montagelöchern 
auf der Rückseite der Zentrale 60 mm betragen und die Schraubenköpfe sollten 5 mm aus 
der Wand herausragen.

2.  Hängen Sie die Zentrale an den beiden Schrauben auf und justieren Sie die Schrauben 

gegebenenfalls, um eine sichere Fixierung zu gewährleisten.

3.  Entfernen Sie die Batterielasche an der Unterseite der Zentrale, um die Batterie zu  

aktivieren.

4.  Schließen Sie die Zentrale über das mitgelieferte USB-Kabel und den Netzadapter an das 

Stromnetz an. 

5.  Wenn Sie eine kabelgebundene Internetverbindung verwenden (optional), schließen Sie die 

Zentrale mit einem Ethernet-Kabel an Ihr Modem an.

Montage- und Bedienungsanleitung

!

!

Wenn die Zentrale mittels kabelgebundener Internetverbindung im Freien 

installiert wird, empfiehlt es sich, den Ethernet-Anschluss zum Schutz vor 

Witterungseinflüssen mit wasserfestem Dichtband zu umwickeln.

Zentrale

Batterielasche

entfernen

Ethernet-Kabel

(optional)

Netzteil

Modem

Summary of Contents for Farm Network

Page 1: ...gshandleiding Instrucciones de montaje y de uso PATURA Farm Network syst me de surveillance de cl tures PATURA Farm Network fence monitoring system PATURA Farm Network hekwerk monitoring systeem PATUR...

Page 2: ...nance entretien et garantie 30 ENGLISH Before you start 31 Installing the center gateway 35 Installing the nodes 38 Using the Datamars Livestock Monitoring apps 42 Maintenance servicing and warranty 4...

Page 3: ...r einer Scheune installierten Zentrale erreichen werden diese in die Cloud gesendet 4 Sobald die Spannung abf llt erhalten Sie automatisch eine Warnung Sie k nnen diese Daten in der Web oder mobilen A...

Page 4: ...ehlen kontaktieren Sie Ihren H ndler 4 Lieferumfang Starterset Ref 156322 Montage und Bedienungsanleitung Lieferumfang St ck Bezeichnung 1 3 2 4 Starterset bestehend aus 1x Zaun berwachungszentrale 3x...

Page 5: ...nde Fernglas Kompass oder eine Kompass App auf Ihrem Mobiltelefon Mobiltelefon mit installierter Datamars Livestock App Verbindungsklemmen 2 pro Station eine f r den Erdungsanschluss und eine f r den...

Page 6: ...allieren Web App Datamars Livestock Monitoring So erstellen Sie ein Konto f r die Web App Datamars Livestock Monitoring 1 Rufen Sie monitoring livestock datamars com auf und klicken Sie auf Hier regis...

Page 7: ...e eines Geb udes wo die Anschl sse vor Witterungseinfl ssen und Spritzwasser gesch tzt sind oder falls dies nicht m glich ist im Geb udeinneren an dem durch ein Fenster eine klare Sichtverbindung zur...

Page 8: ...rung zu gew hrleisten 3 Entfernen Sie die Batterielasche an der Unterseite der Zentrale um die Batterie zu aktivieren 4 Schlie en Sie die Zentrale ber das mitgelieferte USB Kabel und den Netzadapter a...

Page 9: ...ars Livestock Monitoring verwendet haben 3 Auf dem Startbildschirm wird der Name des Betriebs angezeigt den Sie bei der Kontoerstellung registriert haben 4 Tippen Sie in der Datamars Livestock App auf...

Page 10: ...n Zaunstationen Ihres Systems dem Magnetschl ssel und Ihrem Mobiltelefon neben die Zentrale 2 Entfernen Sie die Batterielasche an der Station um die Batterie zu aktivieren 3 Starten Sie die Datamars L...

Page 11: ...tze 1 pro Station Im Lieferumfang enthalten Hochspannungs Untergrundkabel f r die Erd und Zaunzuleitung 2 3 m pro Station Nicht im Lieferumfang enthalten Verbindungsklemmen 2 pro Station eine f r den...

Page 12: ...eindeutigen Namen z B Hintere Koppel Briefkasten Scheune usw und legen Sie einen geografischen Standort fest So bringen Sie eine Station am Zaun an Siehe Bilder des Stationmontagesatzes auf Seite 4 1...

Page 13: ...en der Zaunstation an den spannungsf hrenden Elektrozaundraht ca 0 5 m des Hochspannungs Untergrundkabels ab Isolieren Sie an beiden Enden 20 mm ab Schlie en Sie ein Ende des Kabels mithilfe einer Ve...

Page 14: ...ss wieder fest 6 Befestigen Sie das Erdkabel mithilfe von Kabelbindern am Zaunpfosten 7 Begeben Sie sich zum Standort der n chsten Station und wiederholen Sie den Installationsvorgang f r diesen und a...

Page 15: ...15...

Page 16: ...einen festgelegten Zeitraum ab dem Kaufdatum eine Garantie auf Material und Verarbeitungsfehler Sollte ein Garantiefall eintreten schicken Sie das Produkt bitte mit dem Kaufbeleg an die Verkaufsstell...

Page 17: ...is transmet les donn es mesur es la centrale install e dans un b timent ou une ferme qui les envoie dans le cloud 4 Lors d un probl me de tension vous tes automatiquement alert Vous pouvez donc consul...

Page 18: ...ributeur 4 Kit de d marrage Ref 156322 Contenu de la livraison Contenu de la livraison Pi ce D signation 1 3 2 4 Le kit de d marrage contient 1x Centrale de surveillance de cl ture 3x Relais de survei...

Page 19: ...l ments n cessaires Jumelles Boussole ou application de boussole sur smartphone Smartphone avec l application Datamars Livestock Colliers de serrage 2 par relais un pour la prise de terre et un pour l...

Page 20: ...atamars Livestock Monitoring Pour cr er un compte sur l application web Datamars Livestock Monitoring 1 Ouvrir l application monitoring livestock datamars com et cliquer sur s inscrire ici 2 Suivre le...

Page 21: ...r en bois ou un poteau l ext rieur d un b timent tout en assurant la protection des connexions contre les intemp ries et l infiltration d eau ou si cela est impossible pr s d une fen tre offrant une v...

Page 22: ...a languette de la batterie situ e l arri re de la centrale pour pouvoir activer la batterie 4 Branchez la centrale sur l alimentation lectrique l aide du c ble USB et de l adaptateur secteur fournis 5...

Page 23: ...tilis es lors de la cr ation du compte sur l application Web Datamars Livestock Monitoring 3 Le nom de l exploitation enregistr lors de la cr ation du compte appara tra sur I cran d accueil 4 Dans l a...

Page 24: ...t de la centrale muni de tous les relais de votre exploitation de la cl magn tique et de votre t l phone mobile 2 Retirez la languette de la batterie situ e sur le relais pour activer la batterie 3 O...

Page 25: ...pour le raccordement de la prise de terre et de la cl ture non contenu dans la livraison Des colliers de serrage 2 pour chaque relais pour la connexion la terre et la cl ture Non contenus dans la livr...

Page 26: ...tez les images la page 18 1 Fixez le piquet de montage 3 sur un piquet en bois ou en acier l aide du mat riel fourni Le relais doit tre situ le plus haut possible au dessus du poteau de la cl ture afi...

Page 27: ...e 3 Pour raccorder le relais au fil de cl ture sous tension coupez 0 5 m du c ble haute tension D nudez 20 mm aux deux extr mit s Connectez une extr mit du c ble l aide d un collier de serrage au fil...

Page 28: ...re c bles 7 Positionnez vous l emplacement du relais suivant et proc dez son installation ainsi que tous les autres ll ne doit y avoir AUCUN fil entre les deux bornes de connexion cela entra nerait la...

Page 29: ...29...

Page 30: ...ut d faut de mat riel ou de fabrication compter de la date d achat pour une p riode d termin e En cas de dommage couvert par la garantie veuillez retourner ce produit votre distributeur accompagn de v...

Page 31: ...from the nodes reaches the center gateway installed at a shed or barn it is sent up into the cloud 4 When voltage drops an alert is automatically sent to you You can see this data on the Datamars Live...

Page 32: ...pplier 4 Included in delivery Starter Kit Ref 156322 Installation and mounting Instructions Included in delivery Qty Description 1 3 2 4 Farm Network Starter Kit consists of 1x Fence Monitoring center...

Page 33: ...compass app on your mobile phone Mobile phone with the Datamars Livestock app installed Joint clamps 2 for each node one for the earth connection and one for the fence connection 1x cordless screwdri...

Page 34: ...atamars Livestock Monitoring web app To sign up for an account on the Datamars Livestock Monitoring web app 1 Go to monitoring livestock datamars com and click Sign up here 2 Follow the instructions e...

Page 35: ...he outside of a building where the connectors are protected from the weather and water ingress or if this is not possible then where a window will provide clear line of sight with the location of the...

Page 36: ...emove the battery tab on the back of the center gateway to activate the battery 4 Connect the center gateway to the power supply using the USB lead and power adaptor supplied 5 If you are using a wire...

Page 37: ...when you registered an account on the Datamars Livestock Monitoring web app 3 The farm name which you registered when you signed up for an account will be on the Home screen 4 On the Datamars Livestoc...

Page 38: ...ll the fence nodes in your system the mag key and your mobile phone 2 Remove the battery tab on the node to activate the battery 3 Launch the Datamars Livestock app 4 Tap My Devices then Add device 5...

Page 39: ...ed Insulated underground fence cable for a lead out cable and an earth cable 2 3 m per node Not supplied Joint clamps 2 for each node one for the earth connection and one for the fence connection Not...

Page 40: ...in delivery 1 Attach the mounting rod 3 to a wood or steel post using the hardware provided The mounting rod should be installed so that the node is as high as possible above the fence post for optim...

Page 41: ...0 5 m of insulated underground fence cable to connect the fence node to the normally live electric fence wire Strip 20 mm of insulation at both ends Use a joint clamp to connect one end of the cable t...

Page 42: ...minal finger tight 6 Use cable ties to secure the earth cable to the fence post 7 Drive to the location of the next node and begin the installation process for the next and all remaining nodes There m...

Page 43: ...43...

Page 44: ...cling office or the dealer from whom you purchased the product This product is warranted against faulty material and workmanship for a period from the date of purchase If a warranted defect occurs ret...

Page 45: ...het hele bedrijf 3 Zodra de door het station verzonden gegevens de in een schuur of stal ge nstalleerde centrale eenheid bereiken worden ze naar de cloud gestuurd 4 Zodra de spanning daalt krijgt u au...

Page 46: ...cteer dan de dealer 4 Leveringsomvang Startset Ref 156322 Montage en bedieningshandleiding Leveringsomvang Stuk Beschrijving 1 3 2 4 Startset bestaande uit 1x Afrasterings bewakingscentrale 3x Afraste...

Page 47: ...Kompas of een kompas app op uw mobiele telefoon Mobiele telefoon met daarop de app van Datamars Livestock ge nstalleerd Verbindingsklemmen 2 per station n voor de aardaansluiting en n voor de aanslui...

Page 48: ...app Datamars Livestock Monitoring Om een account aan te maken voor de web app Datamars Livestock Monitoring gaat u als volgt te werk 1 Ga naar monitoring livestock datamars com en klik op Registreer h...

Page 49: ...aansluitingen beschermd zijn tegen weersinvloeden en opspattend water Is dit niet mogelijk dan binnen in het gebouw waar via een raam een duidelijke zichtlijn is naar het dichtstbijzijnde station Beve...

Page 50: ...t batterijlipje aan de onderkant van de centrale om de batterij te activeren 4 Sluit de centrale met de meegeleverde USB kabel en lichtnetadapter aan op het lichtnet 5 Gebruikt u een bekabelde interne...

Page 51: ...nt in de web app Datamars Livestock Monitoring 3 Op het beginscherm wordt de naam aangegeven van de boerderij die u heeft geregistreerd toen u het account aanmaakte 4 Tik in de Datamars Livestock app...

Page 52: ...ns van uw systeem de magneetsleutel en uw mobiele telefoon naast de centrale staan 2 Verwijder het batterijlipje van het station om de batterij te activeren 3 Start de Datamars Livestock app 4 Tik op...

Page 53: ...et 1 per station In de levering inbegrepen Ondergrondse hoogspanningskabel voor aarde en afrasteringsvoeding 2 3 m per station Niet in de levering inbegrepen Verbindingsklemmen 2 per station n voor de...

Page 54: ...enz en stel een geografische locatie in Zo brengt u een station aan op de afrastering Zie de afbeeldingen van de station montageset op Pagina 46 1 Bevestig de montagestang 3 aan een houten of stalen p...

Page 55: ...iten van het afrasteringsstation op de stroomvoerende elektrische afrasteringsdraad ca 0 5 m van de ondergrondse hoogspanningskabel af Strip aan beide uiteinden 20 mm af Sluit een uiteinde van de kabe...

Page 56: ...Bevestig de aardkabel met kabelbinders aan de afrasteringspaal 7 Ga naar de plaatsen van het volgende stations en herhaal daar telkens de installatieprocedure Er mag GEEN draad tussen de twee klemmen...

Page 57: ...57...

Page 58: ...or materiaal en fabricagefouten gedurende een bepaalde periode vanaf de datum van aankoop Mocht er zich een aanleiding voordoen om een garantieclaim in te dienen stuur het product dan met het aankoopb...

Page 59: ...un cobertizo o granero estos datos se enviar n a la nube 4 Tan pronto caiga la tensi n usted recibir autom ticamente un aviso Podr visualizar estos datos en la aplicaci n web o en la aplicaci n para e...

Page 60: ...4 Elementos incluidos en el kit de inicio Ref 156322 Volumen de suministro Unidades Denominaci n 1 3 2 4 Elementos del kit de inicio 1x Central de monitorizaci n de cercas 3x Estaci n de monitorizaci...

Page 61: ...ilar de su tel fono m vil Tel fono m vil con la aplicaci n Datamars Livestock instalada Bornes de conexi n 2 por estaci n uno para la conexi n a tierra y otro para la conexi n de cercas 1x Destornilla...

Page 62: ...tamars Livestock Monitoring As debe crear una cuenta en la aplicaci n web Datamars Livestock Monitoring 1 Vaya a monitoring livestock datamars com y haga clic en Registrarse aqu 2 Siga las instruccion...

Page 63: ...ficio donde las conexiones queden protegidas de la intemperie y de las salpicaduras de agua o si esto no fuese posible en el interior del edificio donde haya una ventana que proporcione una l nea visu...

Page 64: ...n segura 3 Retire la leng eta de la bater a de la parte inferior de la central para activar la bater a 4 Conecte la central a la red el ctrica con el cable USB suministrado y el adaptador de red 5 Si...

Page 65: ...ta en la aplicaci n web Datamars Livestock Monitoring 3 La pantalla de inicio mostrar el nombre de la explotaci n que haya registrado al crear la cuenta 4 En la aplicaci n Datamars Livestock vaya a Mi...

Page 66: ...estaciones de cercas de su sistema la llave magn tica y su tel fono m vil 2 Retire la leng eta de la bater a de la estaci n para activar la bater a 3 Inicie la aplicaci n Datamars Livestock 4 Vaya a M...

Page 67: ...taci n Se incluye en la entrega Cable subterr neo de alta tensi n para las conducciones subterr neas y de las cercas 2 3 m por estaci n No se incluye en la entrega Bornes de conexi n 2 por estaci n un...

Page 68: ...ero etc y especifique una ubicaci n geogr fica Para conectar una estaci n a la cerca Consulte las im genes del kit de montaje de estaci n en la 60 1 Fije la varilla de montaje 3 a una estaca de madera...

Page 69: ...ctar la estaci n de cerca al alambre el ctrico conductor de corriente de la cerca corte cerca de 0 5 m del cable subterr neo de alta tensi n Pele unos 20 mm de los dos extremos Conecte un extremo del...

Page 70: ...i n a tierra 6 Conecte el cable de puesta a tierra a la estaca de la cerca con los sujetacables 7 Vaya a la ubicaci n de la siguiente estaci n y repita el proceso de instalaci n para esta y para todas...

Page 71: ...71...

Page 72: ...riodo que sigue a su fecha de compra En caso de necesitarse esta garant a env e el producto al punto de venta junto con el tique de compra La informaci n del periodo de garant a y dem s normas aplicab...

Reviews: