EN
130
1
2
1
1
2
1
2
1
1.
2.
2
2
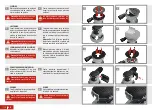
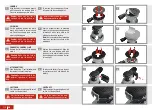
SANDING
Align the holes in the sanding paper
with the ones in the sanding plate
.
Press the sanding paper into place.
Caution!
Make sure the tool is
switched off and the battery re-
moved.
1
To remove the sanding paper
care-
fully peel it off the sanding plate
Never use the sander without sand-
ing paper or polishing pad.
2
Apply a proper amount of polishing
agent to the clean polishing pad and
smoothen it with a putty knife or flat
object over the entire surface.
Note:
Dirt and spots without polishing
agent may destroy the surface of the
workpiece.
2
POLISHING
Put the polishing pad on the work-
bench with the white velcro fastener
up. Place the sanding plate centred
onto the polishing pad.
Caution!
Make sure the tool is
switched off and the battery re-
moved.
1
SWITCH OFF
Stop the sander by pressing the on/ off
switch
at the position
0
.
Lift up the sander from the work-
piece before switching off the tool.
2
SWITCH ON
Start the sander by pressing the on/ off
at the position
I
.
Start the tool before sanding to pre-
vent damage to your workpiece.
1
, press the bat-
tery release switch
and slide off the
battery.
2
ATTACH BATTERY
Slide the battery
(not included) onto
the tool until it snaps into place.
Caution!
Only use the tool with the
batteries specified in technical
data.
1
Replace the sanding plate
. Align the
holes in the new sanding plate with
the ones in the orbital sander and fix
the sanding plate by screwing the four
screws tight.
2
CHANGE THE SANDING PLATE
Remove the four screws of the sanding
plate
Caution!
Make sure the tool is
switched off and the battery re-
moved.
1

