background image

www.parweld.com

www.parweld.com

8

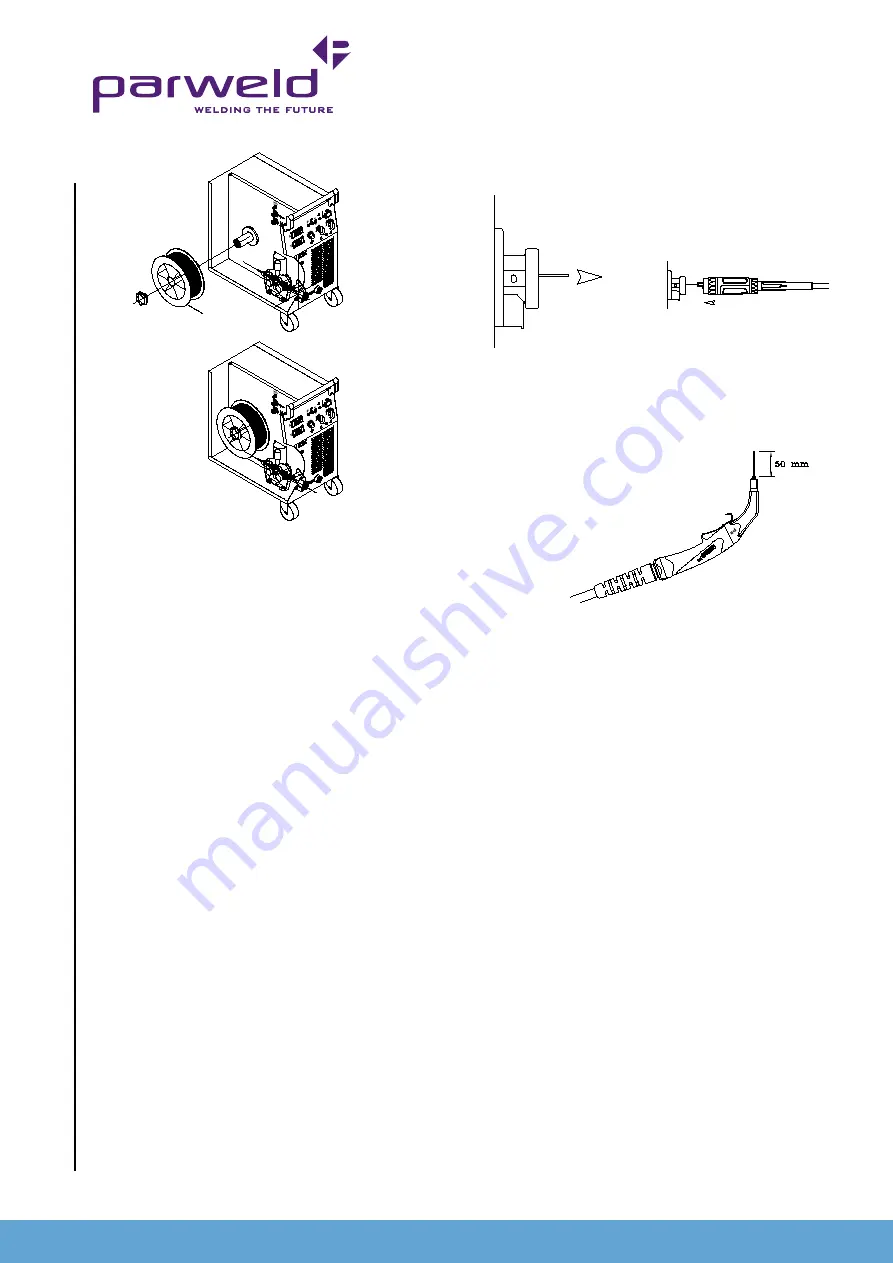
Fig 1

Fig 2

x

straighten the first six inches. (If the electrode is not properly 

straightened, it may not feed properly through the wire drive 

system Manually feed the wire from the wire reel and through 

the wire guide and then over the top of the wire feed rollers 

(ensure the pressure arms are in the raised position.)

6.  Continue to feed the wire through the outlet guide until 20mm 

of wire is protruding from the front of the machine torch 

connector.

7.  Reposition the adjustable pressure arms to there original 

position to apply pressure. Adjust pressure as necessary.

note the pressure arm should be adjusted in order to give 

the minimum amount of pressure on the wire to allow reliable 

feeding, 

5.7 torch installation

Your Parweld MIG/MAG Welding Torch has been supplied ready to 

weld.  It has been supplied with the standard consumables denoted 

in the product brochure.

To connect the torch to the power source:-

1.  Remove the tip adaptor and contact tip
2.  Inch the wire from the exit of the wire guide on the feed unit 

as Figure 1.  Ensure that it does not short out on any machine 

panels.

3.  Carefully slide the electrode wire into the torch liner and 

slowly locate the torch gun plug body into the feed unit central 

connector and tighten the gun plug nut as Figure 2

note; to aid the initial location of a new torch and to prevent 

damage to the gas nipple O-ring a very light application of 

grease to the O Ring is beneficial.

4.  Keeping the torch as straight as possible, use the power source 

inch facility or torch trigger to feed the electrode wire 50mm 

from the end of the liner conduit.

5. 

Once the electrode wire has stopped, refit the tip adaptor, 

diffuser, contact tip and gas nozzle.

6.  Trim the electrode wire to within 5mm of the face of the nozzle, 

this will facilitate jolt free arc initiation.

7. 

Press the gas purge button and check the gas flow is adequate 

for your application.

8. 

An inexpensive flow meter is available from Parweld reference 

806001.

9.  If you are setting a water-cooled torch ensure you have the 

recommended water flow rate.

Note;-  It is essential to ensure adequate flow of clean, cool water 

to prevent irreparable torch failure, a minimum of 1.2 l/min is 

recommended.

Parweld recommend the use of its XTS water recirculation system 

designed specifically for use with all water cooled MIG, TIG and 

Plasma welding torches.

The Parweld XTS recirculation equipment can be fitted with a fail-

safe flow protection device to prevent overheating or meltdown.

Note.  Water flows into the torch through the blue hose.  The blue 

hose delivers cold water directly to the prime source of heat, the 

swan neck and consumables.  The re circulated water is then 

passed through the torch power cable to cool the power cable as it is 

returned to the cooler through the red water return lead.

Ensure all air is removed from the water cooling circuit before 

welding.

5.8  Work return lead connection

Insert the work return lead connector into the receptacle on the front 

panel of the machine and twist it clockwise until tightly secured. 
Connect the earth clamp to the work piece as close as possible to 

the point to be welded and ensure that a good electrical connection 

is created to bare metal.

Summary of Contents for XTM303C

Page 1: ...Operator Manual ISSUE 3 XTM303C...

Page 2: ...er maintanance this equipment should provide years of reliable service All our systems conform to ISO9001 2000 and are independently audited by NQA The entire product range carries the CE mark and is...

Page 3: ...ing drive roll sets 7 5 6 Welding wire installation 7 5 7 Torch installation 8 5 8 Work return lead connection 9 5 9 Shielding gas connection 9 6 0 Operation 9 6 1 Feeding wire electrode 9 6 2 Optimis...

Page 4: ...manual Wear a safety harness if working above floor level Keep all panels and covers securely in place Clamp work cable with good metal to metal contact to work piece or worktable as near the weld as...

Page 5: ...or before going near arc welding gouging or spot welding operations NOISE can damage hearing Noise from some processes or equipment can damage hearing Wear approved ear protection if noise level is hi...

Page 6: ...does not go off when the power source has cooled down then have the machine checked by a qualified engineer 6 On Off switch The machine is switched off when the light 4 is off and the fan is not runn...

Page 7: ...is suitably rated for the power draw of the machine and the environmental location Have a qualified electrician connect the input plug For long runs over 30m larger copper wires should be used The gre...

Page 8: ...ource inch facility or torch trigger to feed the electrode wire 50mm from the end of the liner conduit 5 Once the electrode wire has stopped refit the tip adaptor diffuser contact tip and gas nozzle 6...

Page 9: ...e head and body protection 1 Position wire over joint The end of the wire may be lightly touching the work 2 Lower welding helmet operate gun trigger and begin welding Hold the gun so the contact tip...

Page 10: ...feed speed Improper welding technique Place stringer bead in proper locations at joint during welding Adjust work angle or widen groove to access bottom during welding Momentarily hold arc on groove...

Page 11: ...perates but does not feed Insufficient drive roll pressure Incorrect drive rolls Excessive wire spool brake tension Incorrect liner Blocked liner Bird nesting Burn back Bird nesting Excessive feed rol...

Page 12: ...ch spares 12 XP8 300A Air Cooled Mig Welding Torch Rating 300A 8 7kW Mixed Gas 80 20 80 Duty Cycle EN60974 7 0309 0459 0 0 8mm to 1 2mm wires B A 2 1 4 3 6 5 7 8 9 10 11 12 13 14 15 17 16 18 19 21 21...

Page 13: ...9 0459 1 0mm 1 2mm x 10ft 3m XP2024 12 40 Steel Liner 0409 0459 1 0mm 1 2mm x 13ft 4mt XP2024 12 50 Steel Liner 0409 0459 1 0mm 1 2mm x 16ft 5m NI XP2024PC 12 30Polyamide Copper Liner 0309 0459 0 8mm...

Page 14: ...0 Bar E700113 1 Gauge Argon 30 lpm flow E700123 2 Gauge Argon 30 lpm flow Flow Meters Features Designed from brass bar whilst the tube and cover are moulded from high quality polycarbonate to ensure...

Page 15: ...www parweld com 15...

Page 16: ...M303C The above listed products are certified to be compliant with the rohs directive with all homogeneous component parts being controlled to ensure material contents as per the list below Cadmium 0...

Page 17: ...ts or parts of the product determined by Parweld to be defective Parweld makes no other warranty express or implied This warranty is exclusive and in lieu of all others including but not limited to an...

Page 18: ...Parweld Limited Bewdley Business Park Long Bank Bewdley Worcestershire England DY12 2TZ tel 44 1299 266800 fax 44 1299 266900 www parweld com info parweld co uk...

Reviews: