background image


33 


33


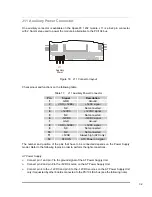
ATX Power Supply 

¾

  Connect pin 1 and pin 7 to the ground signal of the ATX Power Supply Unit. 

¾

  Connect pin 2 and pin 8 to the +5VDC source on the ATX Power Supply Unit. 

¾

  Connect pin 4 to the +12VDC and pin 6 to the –12VDC sources on the ATX Power Supply 

Unit only if requested by other boards connected to the PC/104 ISA bus (see the following 
note). 

¾

  Connect pin 11 to the +5VSB source on the ATX Power Supply Unit. This signal is always 

high, even if the power supply is turned off. 

¾

  Connect pin 12 to the ATX ON signal of the ATX Power Supply Unit. This signal is used to 

power on the Power Supply itself. 


Power button 

If the soft power management is enabled, a low signal in this pin turns the system on or off. 


Note. The +12VDC and -12VDC voltages are neither used nor generated by the 
SpacePC 1232 module: they are only conveyed on the PC/104 bus (connector J1) 
and can be used by other devices or modules that are stacked onto the CPU module. 


WARNING! IMPROPER CONNECTION OF THE POWER SUPPLY WILL RESULT IN 
SERIOUS DAMAGE FOR THE MODULE. 

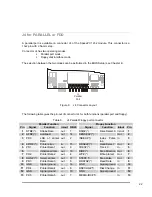
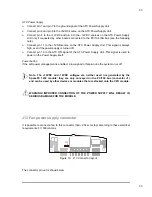
J13 Fan power supply connector 

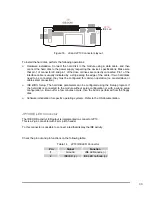
It is possible to connect a fan to this connector (3pin, 2.54-mm step) according to these electrical 
requirements: 5V, 500mA max. 
 

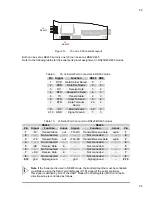
J13

-  +


Figure 19.  J13 Connector layout 


The connector pin out is shown below. 

Summary of Contents for SpacePC 1232 Series

Page 1: ...USER MANUAL SPACEPC 1232 SERIES PC 104 SINGLE BOARD COMPUTER ALSO KNOWN AS THE CPU 1232 5 18 2005 MNL 0501F 01 ...

Page 2: ... the related software Parvus Corporation reserves the right to change the contents and form of this document as well as the features and specifications of its products at any time without notice Trademarks and registered trademarks appearing in this document are the property of their respective owners CONVENTIONS The following table lists conventions that are used throughout this guide Icon Notice...

Page 3: ... and J2 for the ISA Bus 15 The ISA BUS 15 How to connect to the CPU other PC 104 PC 104 devices the stack assembly 15 J3 for Multifunction J14 for Mouse 17 J3 Multifunction Connector 17 J14 Mouse Connector 19 Parvus Multifunction Adapter 20 J4 for PARALLEL or FDD 22 HOW TO USE THE PARVUS FDD ADAPTER 23 J5 and J6 Serial Port Interfaces 24 J7 for 2 x USB J8 for AUDIO CODEC 26 J7 for 2 x USB 26 J8 fo...

Page 4: ... Virtual Peripherals connection 62 Important note 65 Chapter 7 Watchdog Timer 66 Watchdog modalities 67 BIOS INT 52h functions 0Ch 0Dh 0Eh 67 Super I O registers programming 67 Watchdog time out pin 69 Chapter 8 Troubleshooting 70 Common Problems and Solutions 71 Troubleshooting a PC 104 System 72 Technical Sales Assistance 72 Returning For Service 73 Appendix 74 A 1 Electrical and Environmental S...

Page 5: ... 81 Ground the Instrument 81 Do Not Substitute Parts or Modify Equipment 82 Flammability 82 EMI Caution 82 CE Notice 82 Disclaimer of Warranty 82 Notice 82 Reliability 83 Life Support Policy 83 Acronyms and Abbreviations 85 ...

Page 6: ...It is also known as the CPU 1232 Related Products Development kit for SpacePC 1232 multifunction adapter Cable set for SpacePC 1232 AC97 CODEC and USB adapter Parallel to Floppy adapter Ethernet RJ45 adapter For a complete list of our products please go to our web site www parvus com In the following paragraphs you will find a brief description of the SpacePC 1232 ...

Page 7: ... SDRAM ISA Bus Super I O SMC FD37B782 Fast Ethernet Controller 2 x USB Speakers Line out CD ROM Audio Microphone USB AC97 Codec Adapter FDD Adapter Ethernet Adapter ISA BUS CPU 1232 Module SSD SpacePC 1232 Functional Block Diagram The figure below shows the functional blocks diagram of the module Figure 1 Functional block diagram of the SpacePC 1232 module CPU 1232 ...

Page 8: ...pports a wide variety of Power Management standards APM Advanced Power Management for Legacy power management ACPI Advanced Configuration and Power Interface for Windows power management Note Geode processor family was acquired by AMD from National Semiconductor in 2003 Memory Configurations 64 128 Mbytes surface mount SDRAM Integrated system memory and graphic frame memory Unified Memory Architec...

Page 9: ...ace One PS 2 mouse connector One speaker port One standard EIDE HD interface One 10 100 Fast Ethernet Controller RJ45 Ethernet Adapter needed Software programmable watchdog from 1 second to 255 seconds or from 1 minute to 255 minutes Real time clock external battery required for date and time backup BIOS The Parvus Eurotech BIOS is stored into a reprogrammable on board device Utilities for BIOS up...

Page 10: ...cture LCD TFT interface Also LCD TFT flat panels can be connected to the SpacePC 1232 If LCD TFT and CRT screens are used at the same time the refresh frequency of the CRT video will be modified according to the LCD TFT setting It may be possible to view flickering on the CRT screen ...

Page 11: ...rs Jumper Layout and Configuration Figure below shows the jumper layout of the SpacePC 1232 module In the below figure the jumpers are indicated as JP followed by the jumper s number while pin 1 of every jumper is indicated by a red square pad Figure 2 Jumpers and solder jumpers on the SpacePC 1232 module ...

Page 12: ...Open The following table provides a quick cross reference for the SpacePC 1232 module s jumpers Table 1 Jumper Settings PIN Type Function Default JP1 2 pin jumper Write protection on Bios Flash Closed Write not allowed on Boot Block Open Boot Block can be written Open JP5 2 pin jumper Power Supply Source Selection for SSD Socket 1 2 Battery 2 3 VDD 2 3 JP7 2 pin jumper Invalid Setup Open Module st...

Page 13: ...e shown the connectors with their layout and function s J10 AC97 Audio Serial 2 Serial 1 Parallel Port Auxiliary Power PS 2 Mouse VGA 2x USB Multifunction Connector Ethernet IDE Led J14 J6 J5 J3 J13 J4 J18 J11 J16 J17 U1 J19 JP10 J1 J2 NS Geode Gx1 Processor NS Geode CS5530A I O Companion SSD Figure 3 Connectors layout Note in the previous figure a red square pad indicates pin 1 of each connector ...

Page 14: ...ultifunction Connector 22 J4 Parallel Port Floppy 26 J5 Serial Port 1 28 J6 Serial Port 2 28 J7 USB ports A and B 29 J8 AC97 Audio Interface Connector 30 J9 IDE DOM 33 J10 VGA 34 J11 Auxiliary Power Supply 35 J13 Fan 36 J14 PS 2 Mouse 24 J16 Reserved J17 Reserved J18 Fast Ethernet 37 J19 LCD TFT 39 SSD Solid State Disk socket DIL 32 Disk on Chip JP10 IDE Activity Led 33 ...

Page 15: ...e are designed to allow the connection onto a stack of other PC 104 and or PC 104Plus devices We recommend you to follow the procedure below ensuring that stacking of the modules does not damage connectors or electronics parts 1 Turn off power to the PC 104 system or stack 2 Select and install standoffs to properly position the module on the PC 104 stack 3 Touch a grounded metal part of the rack t...

Page 16: ...will normally not include the PCI bus 0 6 in 15mm Spacers 4 plcs Stackthrough 8 bit module 0 435 in 11 mm 0 6 in 15 mm Stackthrough 16 bit module Stackthrough PC 104Plus module Non Stackthrough PC 104Plus module 0 6 in 15mm Spacers 4 plcs 0 6 in 15mm Spacers 4 plcs 0 100 in 2 54 mm 0 062 in 1 57 mm Figure 5 The Module Stack Do not force the module onto the stack Wiggling the module or applying too...

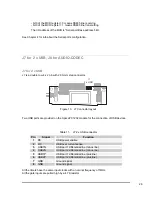
Page 17: ...4 pin with 2 mm step connector and allows the connection of a PS 2 compatible mouse Later on there is a brief description about the Parvus Multifunction Adapter and the VGA and the Ethernet J3 Multifunction Connector Multifunction Connector J3 Figure 6 J3 Connector layout This connector implements the following functions MULTIFUNCTION AT Keyboard System reset External battery Speaker Power button ...

Page 18: ...ystem reset Connecting the pin 3 of the multifunction connector to ground performs a hardware reset of the module It is possible to use an external push button normally open J3 provides a connection for an external normally open pushbutton to manually reset the system Connect the other side of the switch to ground The reset signal is de bounced on the board External Battery Pin 9 of the multifunct...

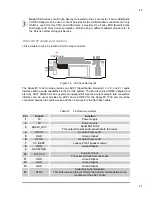
Page 19: ...wer management is enabled a low signal in the pin10 turns the system on or off J14 Mouse Connector A PS 2 compatible mouse can be connected to the J14 connector 4pins 2 mm step PS 2 Mouse J14 Figure 7 J14 Connector layout The J14 pin out is given below Table 5 J14 for Mouse connector Pin Signal Function 1 5V Power supply 2 MSCLK Mouse clock 3 GND Ground signal 4 MDAT Mouse data ...

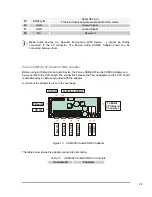
Page 20: ...and keyboard with two PS 2 connectors providing also a speaker a battery and a reset pushbutton Mouse Keyboard Reset Pushbutton Power Led Spkr Led Speaker To J14 Conn of CPU Board Mouse sign Not used Battery To Multif Conn of CPU Board J4 J5 J6 J3 J2 S1 J1 Figure 8 Multifunction Adapter both sides ...

Page 21: ...21 Table 6 J4 To CPU Multifunction Connector PIN SIGNAL 1 SPKR 2 8 5V 3 RES_PB_IN 4 10 N C 5 KBDAT 6 KBCLK 7 GND 9 BATT_IN Table 7 J6 To CPU J14 Mouse signals PIN SIGNAL 1 5V 2 MSCLK 3 GND 4 MSDAT ...

Page 22: ...nction Floppy Function Pin Signal Function in out DB25 Signal Function In out Pin 1 STB Strobe Data out 1 DSO Drive Select 0 In out 1 2 AFD Autofeed out 14 DENSEL Out 2 3 PD0 LSB of printer Data out 2 INDEX Index Pulse Inp In 3 4 ERR Printer error in 15 HDSEL Head Select Out 4 5 PD1 Printer Data 1 out 3 TRK0 Track 0 In 5 6 Initialize printer out 16 DIR Step Direction Out 6 7 PD2 Printer Data 2 out...

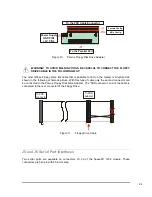
Page 23: ...d 24 25 SLCT Ready To Receive in 13 WGATE Write Gate Out 25 26 NC Reserved 26 The stands for signal active low Note FDD shouldn t be directly connected to the J4 connector Before using a Floppy Disk an adapter must be inserted between the parallel port flat cable and the Floppy Disk Drive HOW TO USE THE PARVUS FDD ADAPTER There are two configurations available for the Parvus FDD Adapter 1 J1A Male...

Page 24: ...ble to find on the market is structured as shown in the following schematic picture With this type of cable only the second connector can be connected to the Parvus Floppy Disk Drive Adapter The FDD connector end of the cable is connected to the rear connector of the Floppy Drive To FDD connector To FDD adapter X Figure 11 Floppy Drive Cable J5 and J6 Serial Port Interfaces Two serial ports are av...

Page 25: ...ort Connector in RS422 RS485 modes RS422 RS485 Pin Signal Function In out Signal Function In out Pin 1 TX Transmit data out TX RX Transmit Receive data out in 1 2 Not connected Not connected 2 3 TX Transmit Data out TX RX Transmit Receive data out in 3 4 Not connected Not connected 4 5 RX Receive Data in Not connected 5 6 Not connected Not connected 6 7 RX Receive Data in Not connected 7 8 Not con...

Page 26: ...onnector layout Two USB ports are provided on the SpacePC 1232 module for the connection of USB devices Table 11 J7 2 x USB connector Pin Signal Function 1 PE USB power enable 2 OC USB over current sense 3 USB1N USB port 1 differential line minus line 4 USB2N USB port 2 differential line minus line 5 USB1P USB port 1 differential line plus line 6 USB2P USB port 2 differential line plus line 7 GND ...

Page 27: ...tem The Parvus Audio CODEC Adapter but also any AC97 CODEC which supports an independent input and output sample rate conversion interface can be used provides an AC97 and a CODEC for the SpacePC 1232 and should be connected between the audio device and the J8 connector via a flat ribbon cable Table 12 J8 pinout connectors Pin Signal Function 1 5V Power supply 2 5V Power supply 3 SDATA_OUT Serial ...

Page 28: ...Before using a USB and or an Audio Device the Parvus USB AC97 AudioCODEC Adapter can be connected to the CPU board The connection between the Parvus adapter and the CPU board is established by a cable set provided with the adapter A picture of the adapter is given in the next page Video IN CD IN AUX IN SpkPhone IN OUT To Multif CPU Board Connector Line IN Mic IN Line OUT SPK OUT USB 1 USB 2 Figure...

Page 29: ...lowing both for system design flexibility and increased performance The LM4549 is an Audio CODEC for PC systems which is fully PC98 compliant and performs the analog intensive functions of the AC97 Rev2 1 architecture Using 18 bit Sigma Delta A D s and D A s the LM4549 provides 90dB of Dynamic Range This board in its Audio Section is provided with 4 stereo inputs 1 microphone input 1 stereo line i...

Page 30: ...lave or cable select connection IDE BIOS Setup The hard disk parameters can be configured using the Setup program If the hard disk is connected to the module without setup configuration or with a wrong setup configuration a time out for a few minutes occurs then the boot is performed from the floppy disk Software initialization for specific operating systems Refer to the OS documentation JP10 IDE ...

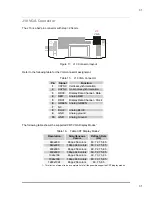
Page 31: ...REEN Analog GREEN 7 NC 8 BLUE Analog BLUE 9 GND Analog ground 10 GND Analog Ground The following table shows the supported CRT VGA Display Modes1 Table 16 Table CRT Display Modes1 Resolution Simultaneous Colors Refresh Rate Hz 640x480 8bpp 256 colors 60 72 75 85 640x480 16bpp 64K colors 60 72 75 85 800x600 8bpp 256 colors 60 72 75 85 800x600 16bpp 64K colors 60 72 75 85 1024x768 8bpp 256 colors 60...

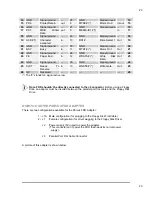
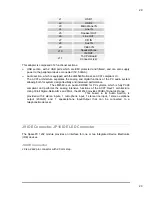
Page 32: ... 6 12VDC 12VDC signal 7 GND Ground 8 VDD 5VDC 5VDC signal 9 N C Not connected 10 N C Not connected 11 5VSB Always high ATX only 12 ATX ON ATX Power on signal The number and position of the pins that have to be connected depends on the Power Supply model Refer to the following topics in order to perform the right connections AT Power Supply Connect pin 1 and pin 7 to the ground signal of the AT Pow...

Page 33: ...ower Supply Unit This signal is used to power on the Power Supply itself Power button If the soft power management is enabled a low signal in this pin turns the system on or off Note The 12VDC and 12VDC voltages are neither used nor generated by the SpacePC 1232 module they are only conveyed on the PC 104 bus connector J1 and can be used by other devices or modules that are stacked onto the CPU mo...

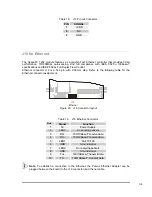
Page 34: ...Refer to the following table for the Ethernet connector assignment Ethernet J18 Figure 20 J18 Connector layout Table 19 J18 Ethernet Connector Pin Signal Function 1 5V Power Supply 2 LED0 On sending packets 3 RX 100 10Base T receive data 4 RX 100 10Base T receive data 5 LED1 Link 10 100 6 GND Ground signal 7 LED2 On receiving packets 8 GND Ground signal 9 TX 100 10Base T transmit data 10 TX 100 10...

Page 35: ...s 100 meters Connection to a 10BASE T hub for 10 Mbps operation requires a Cat 3 4 5 UTP cable or Cat 5 STP cable Preferred maximum cable length between SpacePC 1232 module and Ethernet adapter is 10 cm 4 The SpacePC 1232 module features a single chip Fast Ethernet controller that provides 32 bit performance 10 100Mbps auto sensing PCI bus master capability and full compliance with IEEE 802 3u 100...

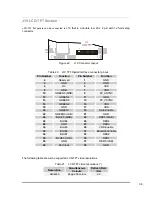
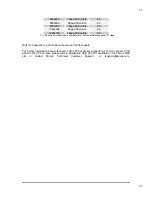
Page 36: ...DD 10 GREEN5 MSB 9 FP_HSYNC 12 GREEN4 11 GND 14 GREEN3 13 FP_VSYNC 16 GREEN2 15 VDD 18 GND 17 VDD 20 GREEN1 19 Data Enable 22 GREEN0 LSB 21 GND 24 BLUE5 MSB 23 RED5 MSB 26 BLUE4 25 RED4 28 GND 27 RED3 30 BLUE3 29 VDD Enable 32 BLUE2 31 BackLight Enable 34 BLUE1 33 RED2 36 BLUE0 LSB 35 RED1 38 GND 37 RED0 LSB 40 Dot Clock 39 GND The following table shows the supported LCD TFT video resolutions Tabl...

Page 37: ...complete list of all the possible supported TFT video Refer to Chapter 4 to get info about how to set the flat panels For further information about other new LCD TFT flat panels supported or how to connect a flat panel to the CPU module please refer to Application Note An 0031 available on the Parvus Web site or contact Parvus Technical Customer Support at tsupport parvus com ...

Page 38: ...38 ...

Page 39: ... 4 The Setup Program This chapter explains how to use and modify the setup options These options allow configuring properly the CPU board Note The Setup Program can be improved to match the technical requirements ...

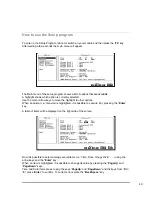
Page 40: ... to other options When an option i e General is highlighted it is possible to execute it by pressing the Enter key A table of items will be displayed on the right side of the screen Now it is possible to select among several items i e Time Date Floppy Disk 1 using the arrow keys and the Enter key When an item is highlighted it is possible to change its value by pressing the PageUp and PageDown key...

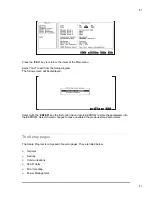
Page 41: ...ayed Select with the ENTER key the first option Save data to EEPROM to store the parameters into the EEPROM Select Discard changes to leave unaltered the previous stored parameters The Setup pages The Setup Program is composed of several pages They are listed below General Devices Communications ATAPI Units Error Handling Power Management ...

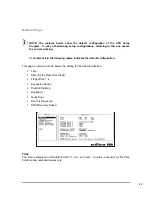
Page 42: ...k in the following tables indicates the default configuration This page contain as shown below the setting for the following devices Time Date for the Real Time Clock Floppy Disk 1 4 Expansion Socket DiskOnChip Map Keyboard Quick Boot Boot Try Sequence DRAM memory Speed Time The time is displayed in standard format hh mm ss hours minutes seconds all the three fields contain numerical values only ...

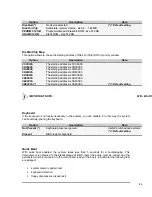
Page 43: ...s Common used size Integrated SSD On board Flash EEPROM Always available on all boards The following one is the default configuration as shown in the previous picture Floppy Disk 1 Integrated SSD Floppy Disk 2 None Floppy Disk 3 None Floppy Disk 4 None Note with the previous default configuration the Integrated SSD that is a READ ONLY MEMORY is seen with the DOS letter A and the system bootstraps ...

Page 44: ... 0E4000h The starting address is 0E4000h 0E8000h The starting address is 0E8000h Default setting IMPORTANT NOTE With Win NT Keyboard If the keyboard is not really necessary in the system you can disable it In this way the system can bootstrap ignoring the keyboard Option Description Note Not Present Keyboard presence ignored Useful for embedded systems Default setting Present BIOS look for keyboar...

Page 45: ...otstrap starts from the FD1 then try with HD1 Default setting HD1 FD1 Bootstrap starts from the HD1 then try with FD1 DRAM Memory Speed The working speed of the DRAM memory can set as follows Option Description Note Low Low speed whit minimal power consumption Default setting High High speed for maximum performance Devices Page This page controls all the on board system devices in particular Flopp...

Page 46: ...ort is automatically disabled even if was already enabled in the Setup The parallel port can be used again after disabling the floppy disk controller EIDE Port This option enables or disables the on board EIDE hard disk controller For example if an external hard disk controller needs to be used the internal one must be disabled Option Description Note Disabled Disable the on board hard disk contro...

Page 47: ... 12 for ISA network controller PS 2 Mouse If not used the PS 2 mouse can be disabled In this way the interrupt IRQ 12 normally reserved for mouse is free for PCI bus or other devices Note the interrupt reserved for mouse is fixed IRQ 12 it is displayed for information only Option Description Note Disabled Disable the on board mouse controller Enabled Enable the on board mouse controller Default se...

Page 48: ...MA 3 selected 16 bit DMA channel Option Description Note None No DMA channel selected Default setting 5 DMA 5 selected 6 DMA 6 selected 7 DMA 7 selected MPU 401 This option allows enabling and disabling the MIDI emulator Option Description Note Disabled Enable the MIDI emulator Default setting 0300h MIDI emulator address selected at 300h 0330h MIDI emulator address selected at 330h Communications ...

Page 49: ... 422 RS 422 Mode selected Default setting RS 485 RS 485 Mode selected Serial Port1 Addresses Option Description Note Disabled Disable the serial port 3F8h Serial Port address selected at 3F8h Default setting 2F8h Serial Port address selected at 2F8h 3E8h Serial Port address selected at 3E8h 2E8h Serial Port address selected at 3E8h Serial Port1 IRQ Option Description Note None No IRQ selected 3 IR...

Page 50: ...rial Port address selected at 2F8h Default setting 3E8h Serial Port address selected at 3E8h 2E8h Serial Port address selected at 3E8h Serial Port2 IRQ Option Description Note None No IRQ selected 3 IRQ 3 selected Default setting 4 IRQ 4 selected 5 IRQ 5 selected 7 IRQ 7 selected 9 IRQ 9 selected 10 IRQ 10 selected 11 IRQ 11 selected See Note below 12 IRQ 12 selected Note IRQ 11 can t be used by p...

Page 51: ...cription Note Printer Standard mono directional printer interface Default setting Bidirectional Bidirectional printer interface EPP 1 9 and SPP EPP and SPP mode EPP 1 7 and SPP EPP and SPP mode ECP ECP mode ECP and EPP 1 9 ECP and EPP mode ECP and EPP 1 7 ECP and EPP mode ATAPI Units Page This option concerns about mass storage devices using a standard EIDE interface The CPU board has two EIDE con...

Page 52: ...Gbytes For both modes you have to know the physical hard disk structure in terms of Cylinders Heads and Sectors So for an easy use of any kind of disk the Auto option is preferable Note to speed up the bootstrap select the option None for unused ATAPI devices PIO Mode PIO is a special data transfer system between two or more EIDE devices where all the data pass through the processor There are five...

Page 53: ...e is ignored by the BIOS Option Description Note 0 65536 Number of cylinders 0 is the default setting for both ATAPI Units Master1 Slave1 Heads Number of hard disk heads normally written on the disk label If the autodetection is used suggested method the heads value is ignored by the BIOS Option Description Note 0 64 Number of heads 0 is the default setting for both ATAPI Units Master1 Slave1 Sect...

Page 54: ...he user can decide to ignore one or more of errors that could be encountered during the boot Error on Keyboard The user can decide for himself if a keyboard error must stop the boot process or not Option Description Note Ignore The keyboard error is ignored Prompt User When a keyboard error occurs the system stops and waits for the user Default setting Error on Video The user can decide for himsel...

Page 55: ...cription Note Ignore The fixed disks error is ignored Prompt User When a fixed disks error occurs the system stops and waits for the user Default setting Error on Real Time Clock The user can decide for himself if a Real Time Clock RTC error must stop the boot process or not Option Description Note Ignore The RTC error is ignored Prompt User When a RTC error occurs the system stops and waits for t...

Page 56: ...56 ...

Page 57: ...SD This chapter explains how to use the BTOOL Program and gives information about the Integrated Solid State Disk Warning The BTOOL Program can be different for each CPU and each BIOS version For the last versions visit the site www parvus com ...

Page 58: ...sary create a bootable floppy disk with the command FORMAT S The diskette must be formatted as a 1 44 MB disk Power supply must be assured during all the program execution Please run AUTOEXEC BAT and CONFIG SYS without any parameters Please don t run any memory manager If HIMEM SYS or EMM386 are running the BTOOL program doesn t work It will be useful if the BTOOL program is stored in a Floppy Dis...

Page 59: ...e new version stored in the file named FILENAME BIN BTOOL U FILENAME This option updates the Emergency BIOS Firmware with the new version stored in the file FILENAME BIN this option is not used in the SpacePC 1232 BTOOL DA This option creates the image of the Floppy A in the Integrated SSD BTOOL DB This option creates the image of the Floppy B in the Integrated SSD all these files are in binary BI...

Page 60: ...d the directories you need During this copying process don t delete any file data on the floppy because this will create empty sectors that will be mirror like stored into the SSD wasting space Restart over again with the format procedure if you have any troubles or mistakes occur Data stored on floppy mustn t go above 640 KB which is the effective Flash size dedicated to be used as Solid State Di...

Page 61: ... module with I O devices keyboard monitor and floppy disk The SpacePC 1232 module can operate in a specific modality called Virtual Peripheral mode Thanks to this modality the CPU can use the peripherals of another PC compatible computer called Host computer which are not directly connected to the module s PC 104 bus To enable this modality the SpacePC 1232 module must be connected to the Host com...

Page 62: ...vided with the SpacePC 1232 module A PC or AT compatible computer the Host computer with a serial port working at 115Kbaud or a parallel bi directional port and the possibility to boot in ROM DOS OS Not in NT or Win95 98 2000 A VP cable parallel or serial cable Parvus doesn t supply any VP cable You must make it according to the tables on the following pages If you are using a serial cable you mus...

Page 63: ...VP cable connections PC 104 serial interface HOST PC serial interface J5 SERIAL1 PIN Nr DB25 PIN Nr DB9 PIN Nr Signal Function Signal DB25 PIN Nr DB9 PIN Nr 3 3 2 RX Receive Data TX 2 3 5 2 3 TX Transmit data RX 3 2 9 10 7 5 GND Signal Ground GND 7 5 For VP mode connect RTS1 with CTS1 or DTR1 with RI1 Pins not included in the table above are not connected Table 23 Parallel VP cable connections Fro...

Page 64: ... Serial Port at 2F8H IRQ 3 COM 3 Use Serial Port at 3E8H IRQ 4 COM 4 Use Serial Port at 2E8H IRQ 3 LPT 1 Use Parallel Port at 378h LPT 2 Use Parallel Port at 278h 7LPT 3 Use Parallel Port at 3BCh The COM ports listed above refer to the serial port on the Host computer V Redirect Video K Redirect Keyboard D Redirect Diskette A C Redirect Console Video Keyboard A Redirect All Video Keyboard Diskette...

Page 65: ...ug a program and edit files using the host computer s peripherals Pressing the printscreen key will terminate the VP2000 program returning the CPU module to DOS To re connect the SpacePC 1232 module to the host computer run the VP2000 EXE program again This message will appear Connection on serial port at 3F8H COM1 Use PrintScreen KEY to EXIT VP2000 Important note While the VP2000 program is runni...

Page 66: ... the configuration of the Watchdog Timer with some examples The watch dog is a part of the on board SUPER I O device SMSC FDC 37B782 The Super I 0 watchdog allows managing time outs in order to seconds or minutes depending on the Super I O programming ...

Page 67: ...unction 0Dh watchdog erasing Counting is interrupted and watchdog disabled INT 52h function 0Eh watchdog refresh Every call to this function restarts the counting from the initial value When the watchdog is activated the countdown starts immediately If no refresh occurs when the default timeout expires the board reset is executed So the watchdog must be enabled and continuously refreshed avoiding ...

Page 68: ...eserved bits and set time in minutes MOV BL AL Save new WDT_UNITS value MOV DX 3F0h SPIO Index Port MOV AL F1h Watchdog timer units register WDT_UNITS OUT DX AL Point to register WDT_UNITS INC DX SPIO Data Port MOV AL BL WDT_UNITS value OUT DX AL Write the new WDT_UNITS value Select the watchdog timer timeout value MOV DX 3F0h SPIO Index Port MOV AL F2h Watchdog timeout value WDT_VAL OUT DX AL Poi...

Page 69: ...software can reset this signal by setting and resetting bit 2 of the I O port 110h This signal is also initialized by hardware at power on The following example shows how to reset the watchdog time out pin MOV DX 110h Control Port IN AL DX Read actual value OR AL 04h Mask reserved bits and set bit 2 OUT DX AL Write new value AND AL FBh Mask reserved bits and reset bit 2 OUT DX AL Write new value ...

Page 70: ... 1232 module are due to common errors like bad connections or wrong settings in the Setup Program This chapter will help you for getting your system operating properly It contains Common problems and solutions Troubleshooting a PC 104 system How to obtain technical support How to return a product ...

Page 71: ...rmat the device using the Format s option Device not formatted Format drive using Format s option Power not connected to boot drive Connect the power cable to floppy or hard drive Floppy HardDisk cable connected backwards floppy drive light always on Verify that all cables are properly connected SpacePC 1232 Module will not boot from DiskOnModule DiskOnModule is not the only hard drive in system D...

Page 72: ...keyboard is an AT type or switch to AT mode Two hard drives will not work but one does Both drives configured as master Set one drive as master and the other as slave operation consult drive documentation Date and time not saved when power is off No backup battery Connect a backup battery to the multifunction connector Troubleshooting a PC 104 System If you have reviewed the preceding table and st...

Page 73: ...ement to you Your company name and address for invoice Shipping address and phone number Product I D number The name of a technically qualified individual at your company familiar with the mode of failure on the board A detailed description of the problem and of the current configuration including OS and software loaded If the unit is out of warranty service is available at a predesignated service...

Page 74: ...ckup characteristics Absolute maximum ratings MTBF Power Consumption Operating Characteristics Electrical Operating Characteristics Table 25 DC Operating Characteristics Supply Voltage Vcc 5V 5 4 75V to 5 25V Battery current draw board off without any device on the SSD 7 uA Note This CPU module is not warranted against damage caused by overheating due to improper or insufficient cooling or airflow...

Page 75: ... supply Absolute Maximum Ratings Table 26 Absolute Maximum Ratings Supply Voltage Vcc 0 00 to 7 00V Storage Temperature Range 40 C to 85 C 40 F to 185 F Non Condensing Relative Humidity 95 at 40 C 104 F Operating Temperature Range 0 C to 60 C 32 F to 140 F A SpacePC 1232 CPU module with an extended Operating Temperature Range 40 C to 85 C is also available Warning Stressing the device beyond the A...

Page 76: ...ensions CPU Dimensions The SpacePC 1232 module s mechanical dimensions are shown in the following picture Dimensions 90 X 96 mm 3 6 X3 8 height 15 mm 0 6 Dimensions are in millimeters Figure 24 SpacePC 1232 Board dimensions ...

Page 77: ... dimensions of ISA and PCI buses please refer to the pc104 consortium site www pc104 org FDD Adapter Dimensions In the following picture are shown the FDD Adapter mechanical dimensions Dimensions are in inches 1 5 43 6 1 4 4 7 13 0 2 4 6 5 41 5 3 0 12 7 6 3 ...

Page 78: ...ions USB Audio CODEC Dimensions In the following picture are shown the USB Audio CODEC mechanical dimensions Dimensions are in inches 95 3 10 9 22 0 91 3 4 0 4 0 15 3 26 7 32 1 37 1 3 8 3 1 14 9 13 1 75 6 82 6 91 2 1 5 13 1 13 1 2 0 Dimensions are in millimeters ...

Page 79: ...s Figure 26 USB Audio CODEC Dimensions Ethernet Adapter Dimensions In the following picture are shown the Ethernet Adapter mechanical dimensions Dimensions are in inches 49 0 31 0 43 4 10 5 3 0 3 0 11 9 Dimensions are in millimeters ...

Page 80: ...mensions Figure 28 Figure 29 Recommended Mounting Hole Locations for Ethernet Adapter Module Multifunction Adapter Dimensions In the following picture are shown the Multifunction Adapter mechanical dimensions Dimensions are in inches ...

Page 81: ...s of certain dangers of which Parvus is aware You as the user of the product should follow these warnings and all other safety precautions necessary for the safe operation of the equipment in your operating environment Ground the Instrument To minimize shock hazard the equipment chassis and enclosure must be connected to an electrical ground The equipment is supplied with a three conductor ac powe...

Page 82: ...compliance with the above mentioned requirements A proper installation in a CE marked system will maintain the required EMC safety performance Disclaimer of Warranty THIS MANUAL IS PROVIDED AS IS WITHOUT WARRANTY OF ANY KIND EITHER EXPRESS OR IMPLIED INCLUDING BUT NOT LIMITED TO THE IMPLIED WARRANTIES OF MERCHANTABILITY AND FITNESS FOR A PARTICULAR PURPOSE The laws of some states and countries do ...

Page 83: ...us has taken extra care of product design in order to ensure reliability The two major ways in which reliability is achieved are The product is designed in top down fashion utilizing the latest in hardware and software techniques so unwanted side effects and unclean interactions between parts of the system are eliminated Parvus Eurotech tests each board by exercising its functions burns it in unde...

Page 84: ......

Page 85: ...ture KB Kilobyte Kbps Kilobits per Second KHz Kilohertz LAN Local Area Network LBA Logical Block Addressing LCD Liquid Crystal Display LPT Line Printer LVD Low Voltage Differential MB Megabyte Mbps Megabits per second MHZ Megahertz MIDI Musical Instrument Digital Interface MPEG Moving Picture Expert Group NIDS Network Driver Interface Specification NMI Nonmaskable Interrupt NTSC National Televisio...

Page 86: ...uential indirect or punitive damages even if Parvus has been advised of the possibility of such damages Parvus is not responsible for lost profits or revenue loss of the use of software loss of data costs of recreating lost data or the cost of any substitute equipment or program This Warranty shall be governed by the laws of the United States of America and the State of Utah and any claim brought ...

Page 87: ...87 87 For further information contact Parvus Corporation 3222 S Washington St Salt Lake City Utah USA 84115 801 483 1533 FAX 801 483 1523 Web site http www parvus com Email parvus parvus com ...

Reviews: