


10
11
Binding is the process of programming the receiver of the control unit to recognize the GUID (Globally
Unique Identifier) code of a single specific transmitter. It will be necessary for you to ‘bind’ your chosen
Spektrum DSM2 technology-equipped transmitter to the receiver for proper operation.
The transmitter you select must be a DSM2 full range (high power) transmitter. The following is a list of
some of the Spektrum DSM2-equipped full range transmitters and modules that will bind to the receiver of
the Habu:
Spektrum DX5e
JR X9303 2.4
Spektrum DX6i
JR 12X 2.4
Spektrum DX7/DX7se
All SPM Module systems
The following steps outline the binding process
• Confirm the process of entering the bind mode for your chosen transmitter by reviewing the instruction
manual included with the transmitter.
• Make sure the flight battery is disconnected from the receiver unit and the transmitter is turned off.
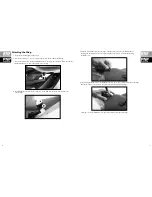
• Plug the bind plug into the Batt/Bind port on the AR500 receiver.
• Plug the flight battery into the battery lead of the ESC. The LED on the receiver unit will begin flashing.
• After verifying the LED is flashing on the receiver, follow the steps that allow your chosen transmitter
to enter bind mode.
• If you entered bind mode correctly, you will see a solid LED approximately 5–10 seconds later on the
receiver. You should now be bound to the transmitter, and have full control and function.
• Remove and store the bind plug in a safe place.
If you encounter any problems, repeat the binding process again, see the troubleshooting guide or call the
Horizon Support Team at 1-877-504-0233, United Kingdom at +44 (0) 1279 641 097
or Germany at +49 4121 46199 66.
Transmitter and Receiver Binding
Dx5e:
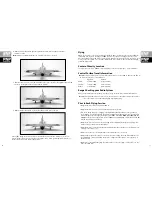
A. To bind your Habu to the DX5e, plug the bind plug into the Batt/Bind port on the AR500 receiver.
B. Plug the battery into the ESC of the airplane. The LED on the receiver will begin flashing.
C. Move the sticks and switches on the transmitter to the desired failsafe positions (low throttle and
neutral control positions).
D. Pull and hold the Trainer Switch on the transmitter while turning the transmitter on. Release the
trainer switch once the LEDs on the front of the transmitter flash.
E. The LED on the receiver will go solid amber and the system will connect after several seconds.
F. Remove and store the bind plug in a safe place.
Dx6i:
A. Start with a blank model memory, or the one you have selected for the Habu.
B. To bind your Habu to the DX6i, plug the bind plug into the Batt/Bind port on the AR500 receiver.
C. Plug the battery into the ESC of the airplane. The LED on the receiver will begin flashing.
D. Move the sticks and switches on the transmitter to the desired failsafe positions (low throttle and
neutral control positions).
E. Pull and hold the Trainer Switch on the transmitter while turning the transmitter on. Release the trainer
switch once the word BIND flashes on the LCD screen on the front of the transmitter.
F. The LED on the receiver will go solid amber and the system will connect after several seconds.
G. Remove and store the bind plug in a safe place.
Dx7 (includes Dx7se):
A. Start with a blank model memory, or the one you have selected for the Habu.
B. To bind your Habu to the DX7, plug the bind plug into the Batt/Bind port on the AR500 receiver.
C. Plug the battery into the ESC of the airplane. The LED on the receiver will begin flashing.
D. Move the sticks and switches on the transmitter to the desired failsafe positions (low throttle and
neutral control positions).
E. Press the bind button on the back of the transmitter while turning the transmitter on. The bind button
on the back of the transmitter will flash. Release the button after 2–3 seconds.
F. The LED on the receiver will go solid amber and the system will connect after several seconds.
G. Remove and store the bind plug in a safe place.
Transmitter-Specific Binding Instructions
Summary of Contents for Habu BNF
Page 20: ...38 39...


