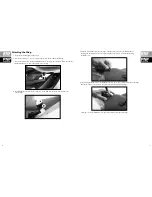
PARKZONE Habu BNF Instruction Manual Download Page 18

34

35

Repair Request is available at www.horizonhobby.com on the “Support” tab. If you do not have internet access, please 

include a letter with your complete name, street address, email address and phone number where you can be reached 

during business days, your RMA number, a list of the included items, method of payment for any non-warranty expenses 

and a brief summary of the problem. Your original sales receipt must also be included for warranty consideration. Be sure 

your name, address, and RMA number are clearly written on the outside of the shipping carton.

Warranty Inspection and Repairs

To receive warranty service, you must include your original sales receipt verifying the proof-of-purchase date. Provided 

warranty conditions have been met, your Product will be repaired or replaced free of charge. Repair or replacement 

decisions are at the sole discretion of Horizon Hobby.  

Non-Warranty Repairs 

Should your repair not be covered by warranty the repair will be completed and payment will be required without notification 

or estimate of the expense unless the expense exceeds 50% of the retail purchase cost.  By submitting the item for repair 

you are agreeing to payment of the repair without notification.  Repair estimates are available upon request.  You must 

include this request with your repair.  Non-warranty repair estimates will be billed a minimum of ½ hour of labor. In addition 

you will be billed for return freight. Please advise us of your preferred method of payment. Horizon accepts money orders 

and cashiers checks, as well as Visa, MasterCard, American Express, and Discover cards. If you choose to pay by credit 

card, please include your credit card number and expiration date. Any repair left unpaid or unclaimed after 90 days will be 

considered abandoned and will be disposed of accordingly. Please note: non-warranty repair is only available on electronics 

and model engines.

United States

Electronics and engines requiring inspection or repair should be shipped to the following address:

Horizon Service Center 

4105 Fieldstone Road 

Champaign, Illinois 61822 

USA

All other Products requiring warranty inspection or repair should be shipped to the following address:

Horizon Product Support 

4105 Fieldstone Road 

Champaign, Illinois 61822 

USA

Please call 877-504-0233 or e-mail us at [email protected] with any questions or concerns regarding this 

product or warranty.

United Kingdom

Electronics and engines requiring inspection or repair should be shipped to the following address:

Horizon Hobby UK 

Units 1-4 Ployters Rd 

Staple Tye 

Harlow, Essex 

CM18 7NS 

United Kingdom

Please call +44 (0) 1279 641 097 or e-mail us at [email protected] with any questions or concerns regarding this 

product or warranty.

Germany

Electronics and engines requiring inspection or repair should be shipped to the following address:

Horizon Technischer Service 

Hamburger Strasse 10 

25335 Elmshorn 

Germany

Please call +49 4121 46199 66 or e-mail us at [email protected] with any questions or concerns regarding this 

product or warranty.

Summary of Contents for Habu BNF

Page 1: ...Hobby Inc The Spektrum trademark is used with permission of Bachmann Industries Inc Spektrum radios and accessories are exclusively available from Horizon Hobby Inc Futaba is a registered trademark o...

Page 2: ...ng skills not your building skills Warning Although your ParkZone Habu comes almost ready to fly this aircraft is for experienced RC pilots only and is not a toy Misuse of the plane can cause serious...

Page 3: ...1 5mm Hex Wrench Fin Mount Plates Left and Right 3200mAh 4 cell 30C Li Po battery Left Main Landing Gear Right Main Landing Gear Nose Gear PNP Contents Fuselage includes the following 60 Amp Pro Switc...

Page 4: ...k with a Li Po specific charger only such as the included charger Never leave the battery and charger unattended during the charge process Failure to follow the instructions properly could result in a...

Page 5: ...sure all wires are clear of the hatch and that the hatch attaches firmly in place before flight Note Only plug in your flight battery once you have bound the receiver BNF or after you have installed y...

Page 6: ...he airplane The LED on the receiver will begin flashing C Move the sticks and switches on the transmitter to the desired failsafe positions low throttle and neutral control positions D Pull and hold t...

Page 7: ...sitions E Press the black bind button on the back of the transmitter while turning the transmitter on Release the button after 2 3 seconds F The LED on the receiver will go solid amber and the system...

Page 8: ...lecting a battery for your Habu we recommend the E Flite 3200mAh 30C 4 cell battery EFLB32004S30 or the Thunder Power 3300mAh 30C 4 cell battery THP33004SP30 If using a battery other than those recomm...

Page 9: ...ar of the wing into the two small holes in the rear of the fuselage Attaching the Wing 5 Slide the aileron leads inside the fuselage so that they will not become pinched in between the wing and the fu...

Page 10: ...r leads into the horizontal stabilizer 3 Place the horizontal stabilizer on the fuselage making sure it is resting on the fuselage without any gaps Attaching the Tail 3 Screw the horizontal stab onto...

Page 11: ...eattach rudder pushrod on second outermost servo arm hole and outermost rudder control horn hole 8 Power on transmitter and airplane and adjust clevis so rudder is centered 9 Once rudder is centered s...

Page 12: ...10 Slide tailcone on to the rear of the fuselage Press firmly in place to make sure tailcone is fully seated Secure in place with the included 4 pieces of tape at the locations shown in the following...

Page 13: ...x wrench Installing the Landing Gear The Habu was intentionally designed to provide the choice to fly with or without landing gear If you prefer to fly at the highest speed or in the most precise mann...

Page 14: ...nd skid in front of the exhaust nozzle This will help protect the bottom of the airframe for belly landing Configuring without Landing Gear Control Direction Test 1 Move the elevator stick on the tran...

Page 15: ...mm 3 4 inch 19mm After you have finished the final assembly it is time to range check the radio system within the Habu Note Before flying after all control surfaces have been centered it is advisable...

Page 16: ...n just remember that because there is no prop blast blowing air over the control surfaces the controls will not be as responsive at low speeds The Habu is easy to fly but because it can reach high spe...

Page 17: ...gation hereunder shall be that Horizon will at its option i repair or ii replace any Product determined by Horizon to be defective In the event of a defect these are the Purchaser s exclusive remedies...

Page 18: ...ght Please advise us of your preferred method of payment Horizon accepts money orders and cashiers checks as well as Visa MasterCard American Express and Discover cards If you choose to pay by credit...

Page 19: ...environment For more information about where you can drop off your waste equipment for recycling please contact your local city office your household waste disposal service or where you purchased the...

Page 20: ...38 39...

Reviews: