Preparing for first use / Operation
9
GB/IE
Wear a dust mask.
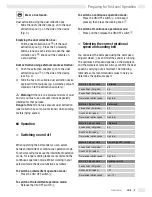
Dust extraction using the dust collection box:
j
Slide the dust collection box
P
on to the dust
extraction spout
T
on the side of the device
(Fig. C).
Emptying the dust collection box:
j
Pull the dust collection box
P
off the dust
extraction spout
T
. Press the 2 unlocking
buttons (one on each side) and open the dust
collection box
P
, knock out the contents on
a solid surface.
Dust extraction using external vacuum extraction:
1) Push the extraction adapter
{
on to the dust
extraction spout
T
on the side of the device
(see Fig. C).
2) Slide the hose of a suitable dust extraction device
approved for that purpose (e.g. a workshop vacuum
cleaner) on to the extraction adapter
{
.
m
Warning!
If there is an explosive mixture of dust
and air you must use a vacuum device especially
intended for that purpose.
Danger of fire!
Do not use vacuum dust extraction
(dust collection box or vacuum cleaner) when sanding
metals (flying sparks).
L
Operation
L
Switching on and off
When operating the belt sander you can select
between intermittent or continuous operation mode.
For short sanding tasks use the intermittent operation
mode. For longer sanding tasks we recommend the
continuous operation mode. Whilst working in your
selected mode the device functions as follows:
To switch on intermittent operation mode:
j
Press the ON / OFF switch
E
To switch off intermittent operation mode:
j
Release the ON / OFF switch
E
To switch on continuous operation mode:
j
Press the ON / OFF switch
E
, and keep it
pressed, then press the locking knob
W
To switch off continuous operation mode:
j
Press and then release the ON / OFF switch
E
L
Selecting the correct rotational
speed and sanding belt
You can select the belt speed using the belt speed
adjuster wheel
Q
even whilst the sander is running.
The optimum belt speed depends on the workpiece
and the workpiece material. Always confirm the best
speed by carrying out a small test. The following
table lists some recommended values to help you
determine the optimum speed.
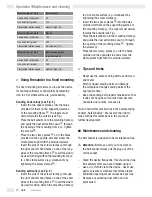
Material / type of work
Softwood
Coarse finish (Grit grade)
60
Coarse finish (Grit grade)
240
Preselected rotation speed
high (5-6)
Material / type of work
Hardwood
Coarse finish (Grit grade)
60
Fine finish (Grit grade)
180
Preselected rotation speed
high (5-6)
Material / type of work
Chipboard
Coarse finish (Grit grade)
60
Fine finish (Grit grade)
150
Preselected rotation speed
high (5-6)
Material / type of work
Removing paint / varnish
Coarse finish (Grit grade)
60
Fine finish (Grit grade)
––
Preselected rotation speed
high (5-6)
Material / type of work
Sanding varnish
Coarse finish (Grit grade)
150
Fine finish (Grit grade)
320
Preselected rotation speed
low (1-2)


