


20
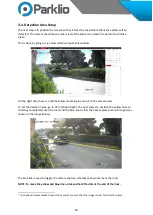
3.4. Detection Area Setup
The next step is to position the camera so that it faces the road where the license plates will be
detected. The camera should have a clear view of the entire lane where the detection will take
place.
1
This is done by going to
Live View
which will open this window.
On the right side, there is a tab that allows zooming in and out on the camera view.
To set the detection area, go to
VCA
→
Road traffic
. The next step is to position the yellow lines so
that they completely cover the road, and the blue line so that the license plate passes through it (as
shown on the image below).
The blue line is used to trigger the camera capture, whereas yellow lines mark the road.
NOTE: To move the yellow and blue lines, click and hold the dots at the end of the lines.
1
It is optional/recommended to set the camera's zoom so that the image is clear for better accuracy.
Summary of Contents for ANPR
Page 1: ...PARKLIO ANPR USER MANUAL...
Page 9: ...8 Wall Mount Option To install the camera on a wall follow the instructions illustrated below...
Page 11: ...10...
Page 13: ...12...


