background image

Parker Hannifin Corporation     •     Electromechanical Automation Division     

Beams #4

762.0 mm

Beam #1

858.4 mm

Beams #2

1163.2 mm

Beams #3

1381.1 mm

*

*

*

*

*

*

   M8 Tapped End

   7 mm Access Hole

Beams #4

762.0 mm

Beam #1

1163.2 mm

Beams #3

 1381.1 mm

Beams #2

1772.8 mm

*

   M8 Tapped End

   7 mm Access Hole

*

*

*

*

*

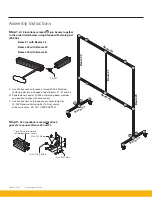
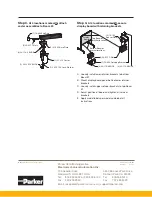
Assembly Instructions for 70-134-xx & 70-146-xx Kits: 

Parts

Beam Sets

Qty Beam # / Length

Part 

Number Description

1

#1 / 858.4 mm

12-028

PFL 28 x 28 Quad Slot CLR

2

#2 / 1163.2 mm

2

#3 / 1381.1 mm

2

#4 / 762.0 mm

Qty Beam # / Length

Part 

Number Description

1

#1 / 1163.2 mm

12-028

PFL 28 x 28 Quad Slot CLR

2

#2 / 1772.8 mm

2

#3 / 1381.1 mm

2

#4 / 762.0 mm

Beam lengths and hole locations differ between the 70-134-xx 
and 70-146-xx models, but assembly instructions are identical. 
Beam #s refer to assembly instructions.

4’ x 6’ Display Beam Set (70-146-xx)

3’ x 4’ Display Beam Set (70-134-xx)

Qty

Part 

Number

Description

10

18-808

End Cap 28 x 28

14

20-003

Standard Fastening Set, 28/30S

24

20-055

Standard T-Nut, M6, 28 Series

10

20-057

Standard T-Nut, M8, 28 Series

4

20-101

Gusset Bracket, 80 x 28

4

21-005

Base Plate 28 x 56, M10

4

21-310

Total Lock, Swivel Caster  
3” King Pin

4

24-110-6

BHCS, M6 X 1.0 x 10 mm

4

24-114-6

BHCS, M6 X 1.0 x 14 mm

8


24-114-8

BHCS, M8 X 1.25 x 14 mm

16

24-116-6

BHCS, M6 X 1.0 x 16 mm

4

24-120-10

BHCS, M10 X 1.5 x 20 mm

4

24-707-10

Lock Washer M10

2

70-100

Spacer Plate

1

70-402 
70-403

3’ x 4’ Dry Erase White Board 
3’ x 4’ Black Push Pin Board

70-400
70-401

4’ x 6’ Dry Erase White Board  
4’ x 6’ Black Push Pin board

4

70-404

Retaining Bracket

1

70-000-XX
70-000-XX
70-000-XX
70-000-XX
70-000-XX
70-000-XX

70-134-WK Label Kit
70-134-PK Label Kit
70-134-NK Label Kit
70-146-WK Label Kit
70-146-PK Label Kit
70-146-NK Label Kit

Summary of Contents for 70-134 Series

Page 1: ...ess Park Drive Rohnert Park CA 94928 Phone 800 358 9070 Fax 707 584 8029 Recommendations Time to assemble 1 2 hours Assembly area 10 x 10 or larger open floor space To prevent scratching use cardboard or other protective underlayment Required Tools 4 mm hex wrench 5 mm hex wrench 6 mm hex wrench ball end Phillips screwdriver Flat head screwdriver Rubber mallet Size ft H x W Display Board Material ...

Page 2: ...embly instructions 4 x 6 Display Beam Set 70 146 xx 3 x 4 Display Beam Set 70 134 xx Qty Part Number Description 10 18 808 End Cap 28 x 28 14 20 003 Standard Fastening Set 28 30S 24 20 055 Standard T Nut M6 28 Series 10 20 057 Standard T Nut M8 28 Series 4 20 101 Gusset Bracket 80 x 28 4 21 005 Base Plate 28 x 56 M10 4 21 310 Total Lock Swivel Caster 3 King Pin 4 24 110 6 BHCS M6 X 1 0 x 10 mm 4 2...

Page 3: ...d 3 B Slide fastener head of 20 003 onto joining beam member and position to align with access hole C Use M5 hex wrench through access holes to tighten 20 003 Standard Fastening Set to firmly secure all beam sections DO NOT OVERTIGHTEN Step 2 At 4 locations marked 2 attach gussets to connect Beam 3 and 4 4 20 055 T Nuts Place T Nuts into slot and roll into position as shown 1 20 101 Gusset 4 24 11...

Page 4: ... 808 End Cap 1 21 005 Base Plate 1 21 310 Caster 1 24 707 10 Lock Washer 1 24 120 10 BHCS 2 24 114 8 BHCS Step 4 At 4 locations marked 4 secure display board with retaining brackets 1 70 404 Retaining Bracket 2 24 114 6 BHCS 2 70 100 Spacer Plate 2 24 110 6 BHCS 2 20 055 T Nut Bottom Beam 2 bracket locations Top Beam 2 bracket locations Display Board A Loosely install lower retainer brackets to bo...

Reviews: