background image

”Á>UÁ¿É¸¿t”µ¿>¸¸ƒ¸Á>Ug[¿ £lÙÙ¤¿u½š‚uuuÙ¿ N¿¿UɸÁ”gµU>µgJˆµ”g¦U”¿

¿¿¿¿¿¿u

ASSEMBLY

*Optional 

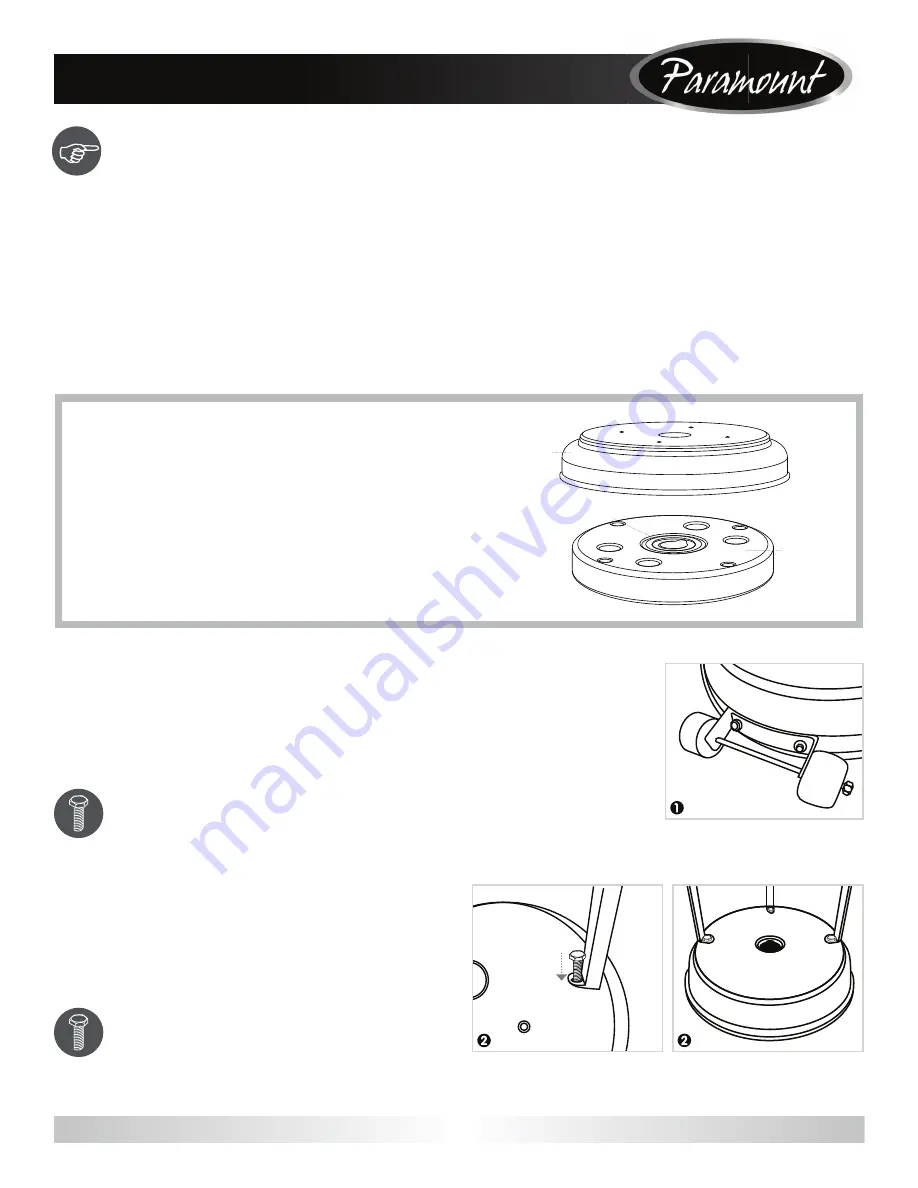
Sandbox

: For models that come with a sandbox, the

¸>_L”ҿуŠŠ¿Lg¿¡µg‚>¸¸gLŠg_¿Á”¿Ág¿L>¸g¦¿/”¿ÚŠŠ¿Ág¿¸>_L”Ò\

remove the 4 

Large Screws

 and 

Large Nuts

 that secure the

base to the sandbox. Pull open the plastic cap on top of the

¸>_L”Ò¿>_¿ÚŠŠ¿Ág¿¸>_L”ҿуÁ¿Ñ>Ágµ¿”µ¿¸>_¦¿,g¡Š>Ug¿Ág

plastic cap. Slide 

Base

 back over the sandbox and align the

holes in the base with the holes in the sandbox. Insert 

Large

Screws

 through the holes in the base and secure by tightening

Large Nuts 

”¿g_¸¿”t¿Ág¿L”ŠÁ¸¦¿9”É¿>ӿڐ_¿ƒÁ¿g>¸ƒgµ¿Á”¿ÚŠŠ¿Ág

sandbox prior to attaching wheels.

1

ÁÁ>U¿

Wheel Assembly

¿

K

¿Á”¿

Base

¿

J

¦¿Šƒy¿”Šg¸¿ƒ¿

Wheel Assembly

¿ÑƒÁ¿U”µµg¸¡”_ƒy¿”Šg¸¿ƒ¿

Base

\¿¿

>_¿ƒ¸gµÁ¿Ç¿

Small Bolts

¿Áµ”Éy¿Ág¿”Šg¸¿>_¿tƒyg

ÁƒyÁg¦¿

 g¿¸Éµg¿Á>Á¿Ág¿

Wheel Assembly

¿ƒ¸¿¡>µ>ŠŠgŠ¿Á”¿Ág¿

Base

¿

J

¿¿

>_¿ÁƒyÁg¿ÑƒÁ¿Ág¿

Wrench

¦

Hardware Used:

¿ÇÒ¿->ŠŠ¿ ”ŠÁ¸

2

ÁÁ>U¿Ág¿

Post Supports

¿

I

¿Á”¿Ág¿

Base

¿

J

¦¿Šƒy¿Ág¿”Šg¸¿

ƒ¿Ág¿L”ÁÁ”¿”t¿g>U¿

Post Support 

уÁ¿Ág¿”Šg¿”¿Ág¿

Base

¦¿¸gµÁ¿š¿

Small Bolt 

Áµ”Éy¿Ág¿”Šg¿ƒ¿Ág¿¸É¡¡”µÁ¿>_¿

ƒÁ”¿Ág¿

Base

¿>_¿>_¿ÁƒyÁg¦¿,g¡g>Á¿ÑƒÁ¿Ág¿”Ágµ¿Ç¿

Post 

Supports 

>_¿Ág¿ÁƒyÁg¿>ŠŠ¿L”ŠÁ¸¿ÑƒÁ¿Ág¿

Wrench

¦

Hardware Used:

¿ÃÒ¿->ŠŠ¿ ”ŠÁ¸

Plastic Cap

Sandbox

Base

PREPARATION

 gt”µg¿Lgyƒƒy¿>¸¸gLŠÓ¿”t¿Áƒ¸¿>¡¡Šƒ>Ug\¿>‰g¿¸Éµg¿>ŠŠ¿¡>µÁ¸¿>µg¿¡µg¸gÁ¦¿”¡>µg¿>ŠŠ¿¡>µÁ¸¿ÑƒÁ¿¡>U‰>yg¿U”ÁgÁ¸¿Šƒ¸Á¿
>_¿>µ_Ñ>µg¿U”ÁgÁ¸¿>¸¿Šƒ¸Ág_¿”¿¡>yg¿w¿”t¿Áƒ¸¿>É>Š¦¿t¿>Ó¿¡>µÁ¿ƒ¸¿ƒ¸¸ƒy¿”µ¿_>>yg_\¿_”¿”Á¿>ÁÁg¡Á¿Á”¿>¸¸gLŠg¿
Áƒ¸¿¡µ”_ÉUÁ¦¿”Á>UÁ¿UɸÁ”gµ¿¸gµÐƒUg¿t”µ¿µg¡Š>UggÁ¿¡>µÁ¸¦

ESTIMATED ASSEMBLY TIME:

¿½Ù¿ƒÉÁg¸

Tools Required for Assembly (NOT included):

T *ƒŠŠƒ¡¸¿¸UµgÑ_µƒÐgµ¿Ñ¾g_ƒÉ¿LŠ>_g¿¿¿¿¿T¿g>‰¿Ág¸Á¿¸”ŠÉÁƒ”¿£¸gg¿¡>yg¿šÙ¤

Summary of Contents for KLD7002S

Page 1: ...t _ _ U L _g y g U _g _ _ t g U _ g g Ug g g WARNING g g y g g U t g Ug U _g U gU g_ t g Lg g_ g U t g Ug WARNING g _ g g g Ug g Ug U U g g _ yg _g g _ g g _ g Ug U y Lgt g y g U y g g WARNING 1 1 9r...

Page 2: ...7 Page 1u BEFORE YOU BEGIN g g g _ _ _g _ g g Lgt g g y g L g g g Ug t g g gy _ y g _ U g g U t gg 8 u uuu Monday Friday a m w p m ST g c g U gJ g U U t L g g L g _ g Ug t g g g g tg t g g g_ g t tg y...

Page 3: ...AUTION 1 _ U g g _ U t _g_ g _g g g g _ yg WARNING g g g g g_ _g g g g Lg L gU _ g _ U _ Lg g _ yg_ WARNING T _ U t g g_ L g y g y L g _ g _ t L g _ __g_ g _g gU g _ U Lg _g U Lg_ y g gyy g g _ U t _g...

Page 4: ...orts A B D E F G H J K L I Some models come with an optional sandbox feature See page 5 for details on sandbox assembly Large Bolt Qty 6 Step 3 Small Bolt Qty 5 Step 1 2 Small Bolt w Lock Washer Qty 4...

Page 5: ...ightening Large Nuts g _ t g L 9 _ g g g sandbox prior to attaching wheels 1 U Wheel Assembly K Base J y g Wheel Assembly U g _ y g Base _ g Small Bolts y g g _ t ygr y g g g g Wheel Assembly g g Base...

Page 6: ...Flange Nut g g g u g y g g n t g U Post Support gUg _ y g g y g g Wrench g L g Lgg g g_ Hardware Used yg N yg 4 U Upper Post F Lower Post G L U g y g gUg t g yg g 5 _g Tank Housing D g g g L g_ Upper...

Page 7: ...LECTOR PIECES PRIOR TO ASSEMBLY Ass sections loosen each screw prior to further assembly and retighten after sections are aligned _g A yg g g g Small Screw U g Cap Nut g g g g g A _g B g L g_ Panels A...

Page 8: ...uts g g g g y Hardware Used yg 7 g N 7 y 10 gU g g _ gy g g _ g g 1 g _ _ L g only t g Tank Housing D _ g g t g g L g_ Post Supports I U g Regulator H Gas Hose E U g _ U g Regulator g g g _ _ y g gU g...

Page 9: ...g g_ g U t U U _g g L g Ug t U U _g t g y U _g uw y _ g _g w g yg _ _ y U _g w _g g_ g_ _ yg_ g U _g Lg _ _ _ Lg U gU g_ L U U _g g g g g g U _g _ yg_ g U gU g g U _g Lg U U g_ _ g_ UU _ Ug g gU t U t...

Page 10: ...liance until you have read and understand all Safety Information in this manual and all assembly is complete and leak tests have been performed OPERATING INSTRUCTIONS WARNING T g t g g _ T y g t g T 6...

Page 11: ...U y L U t t o y g L g g t g _ Lg L g y g t g Ug g g t g _g gU g_ tt g g _ U L g y yg w RE LIGHTING Note For your safety the control knob cannot be turned OFF _g g y g control knob and then rotating to...

Page 12: ...g U g y g gU g g _ Lg y t g g g Ug_ g g g g y _ g gU g _g Ug g g_ t g U y g g g Lg g Ug_ g y g g g _ g _ Lg _ g L t g_ g cg g g g g _ Lg gU g_ Lgt g g U g _ g L t g_ g cg g OPERATION INFORMATION AND S...

Page 13: ...L g g L y g _ g U g g g g_ g U g g U g T L _g U g g t rg _ g _ g _ L g U gg g t U L _g _g g Note In a salt air environment such as near an ocean corrosion occurs more quickly than normal Frequently c...

Page 14: ...yg t g g y g _ _g g U L t g g U gU gU y y g t 1 g U y g y g g g g t g Ug U _g gy g U _g y yg t g _g g y g Ug g gy g L L g g g g g Ug t g g g_ gU _ y g g Ug g L g gU _ g g U gg g U g gg_g_ U L U g U yg...

Page 15: ...produit pour vous pr valoir de la garantie Afin de faire valoir la garantie communiquez avec J R Home Products l adresse et aux num ros indiqu s ci dessous dans les 30 jours suivant la date d achat A...

Reviews: