of 18
5
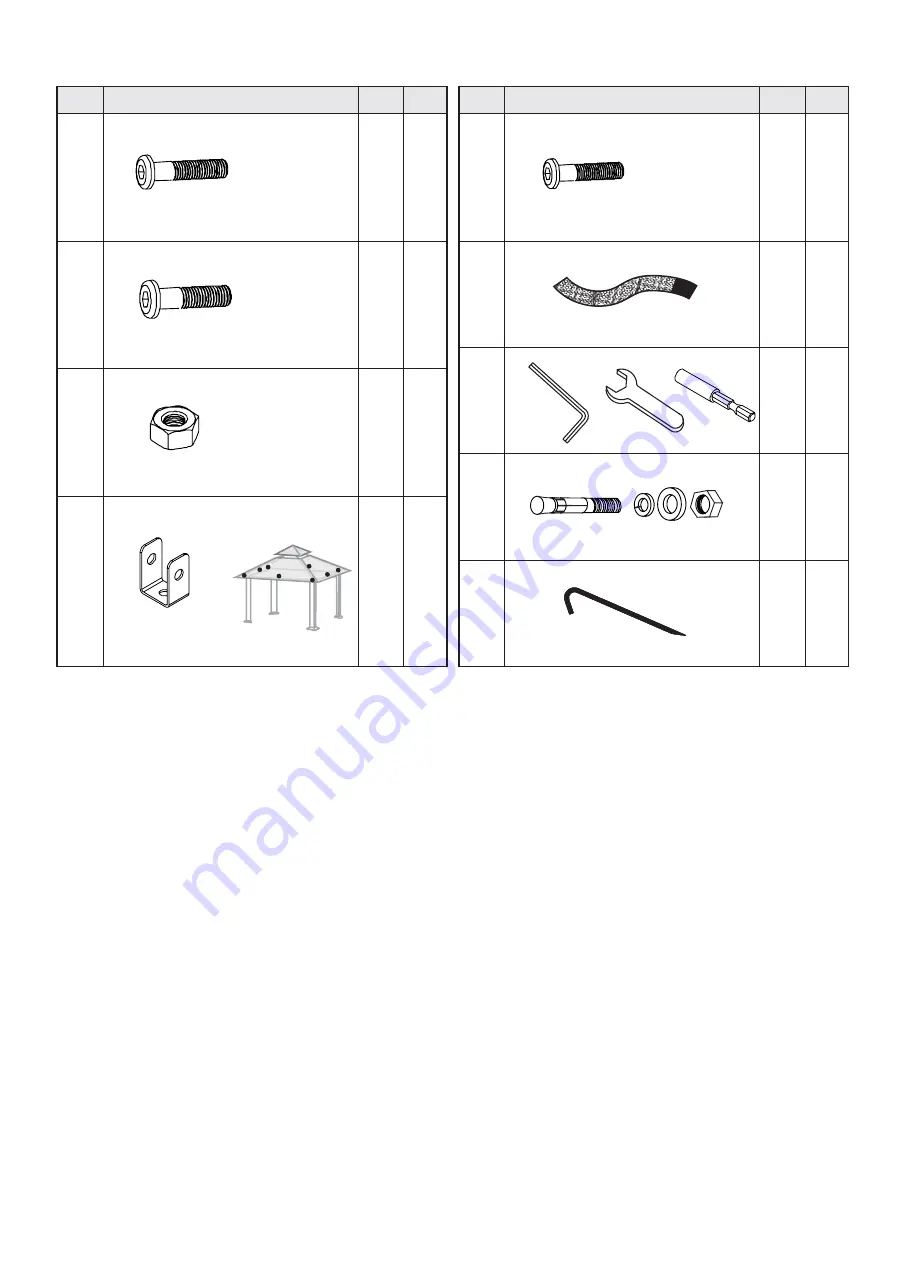
1/4” x 30
8.0 x 70mm
1/4” x 15
1/4”
1/4” x 35
No.
Part
Qty Step
17
16 1,5,6
18
4
2
19
1
20
12
21
13
32
3
14
24
1,2,5
15
8
5,6
16
1,2
We included some extra screws and bolts for your convenience.
Page 1: ...10 08 9 7 10 08 9 7 6 10 max 10 Assembly Instructions 6 FABRIC Gazebo GZ634 Paragon Group USA Customer Service 877 782 4482 Email cs outdoors paragongroupusa com ...
Page 2: ...ntial and if possible with proper water drainage and easy access to power and water if neccessary Choose a sunny level position away from overhanging trees and power lines and protected from the wind as much as possible Locate under ground pipes or cables before preparing the site or anchoring the gazebo Note You may assemble the gazebo on a hard level surface and move it to its final location whe...
Page 3: ...fety instructions Hot items such as recently used grills blowtorches etc must not be stored in the gazebo Make sure the gazebo complies with local building codes General Order of Assembly Step 1 Step 2 Step 3 Step 4 Securing the gazebo to the ground Step 5 Attaching the Corner Roof Gables Step 6 Attaching the Center Roof Gables Step 7 Placing the Canopy Table of Contents Introduction 2 Table of Co...
Page 4: ...s These cartons are heavy Be careful when lifting them Wear proper safety gear including work shoes gloves and goggles The partsare identified by removable stickers Place all the parts for each step in staging areas checking that you have all parts as you go If any parts are missing or damaged contact customer service before beginning assembly Customer Service 877 782 4482 Email cs outdoors parago...
Page 5: ...x 30 8 0 x 70mm 1 4 x 15 1 4 1 4 1 4 x 35 No Part Qty Step 17 16 1 5 6 18 4 2 19 1 20 12 4 21 12 4 No Part Qty Step 13 32 3 14 24 1 2 5 15 8 5 6 16 8 1 2 We included some extra screws and bolts for your convenience ...
Page 6: ...d goggles Place corner profiles 1 parallel to each other the ground Attach roof connectors 16 to each corner profile using bolts 14 Prepare all four profile STEP 1 Components x 4 1 1 Corner 1 Bottom view facing the ground has two screw holes to connect to support plate 3 Corner Profile 1 Top view facing the roof has protrusion to connect to roof connector 16 Corner 1 x 4 Support plate 3 x 4 Roof c...
Page 7: ... 1 B Slide support frames 2 over lower end of corner profiles 1 Attach support plates 3 to corner profiles as shown using two bolts 17 for each plate Leave support frames 2 about 10 over lower end of corner profiles 1 until step 4 x 4 ...
Page 8: ...th bolts 14 STEP 2 Roof 4A x 4 Roof 4B x 4 Wicker strap 18 x 4 Attach roof connectors 16 to each roof 4A through hole in wicker strap as shown using bolts 14 Create four sets Wrap wicker strap 18 around connection edges of roof 4A 4B as shown and fasten Bolt 14 x 12 Roof connector 16 x 4 Components 4A 4A 4B 4A 4B 4B 14 16 14 4B 4A 18 18 18 4A 4B x 4 16 2 A ...
Page 9: ...hown Fasten with four bolts 13 on each side Repeat step 3 A to create two sets 3 A STEP 3 NOTE The end of 4B protrudes from corner 1 the distance of it s own width Bolt 13 x 32 Components 13 13 x 2 NOTE The end of 4B protrudes from corner 1 the distance of it s own width ...
Page 10: ... step you should place the gazebo frame in its desired location Make sure all corners are squared at 90degrees Using at least 3 people attach the two other roof profile sets 4A 4B to corner profiles 1 connecting all four corner profiles 1 Fasten with four bolts 13 on each side ...
Page 11: ...2 Insert concrete bolts 20 into the holes and hammer into place using a mallet 3 Fasten concrete bolts with washers and nuts Wood Deck 1 Using an electric wood drill drill holes into the wood corresponding to the holes in support plates 2 2 Insert wood screws with washers not supplied into the holes and fasten using an electric screw driver NOTE After securing the gazebo to the ground we highly re...
Page 12: ...four sets 5 A Roof gable connector 7 x 4 Roof gable profile 5 x 4 Roof gable extension 6 x 2 Roof gable extension 6A x 2 Roof gable extension 9 x 2 IMPORTANT x 4 Bolt 15 x 4 Bolt 14 x 8 Bolt 17 x 4 6A Components The roof gable profiles 5 have small protrusions springbuttons underneath The end with the protrusions is connected to the top gable connector 10 The roof gable extension 6A has a small pr...
Page 13: ...mall protrusion on their undersides snap into the holes on the underside of top gable connector 10 Using at least two people connect the two roof gable profiles 5 6 and 5 6A to roof connectors 16 on opposite corner profiles 1 Fasten with bolts 17 15 as shown 5 B 5 C ATTENTION The tunnels of top gable connector 10 are marked in order to avoid mistakes when inserting the roof gable profiles ...
Page 14: ...of gable profiles 5 E 5 D 6A Using at least two people slide the other two roof gable profiles 5 6 5 6A into tunnels of top gable connector 10 until the small protrusion on their undersides snap into the holes on the underside of top gable connector 10 Connect the two roof gable profiles 5 6 to roof connectors 12 on opposite corner profiles 1 Fasten with bolts 17 15 as shown ...
Page 15: ...ables STEP 6 Bolt 17 x 4 Bolt 15 x 4 Roof gable profiles 8 x 4 Insert ends with push buttons of roof gable profiles 8 into marked tunnels of top roof connector 10 until they snap into place 6 A Components NOTE You will need to extend profile 9 outwards to stretch the roof canopy into its final position IMPORTANT The roof gable profiles 8 have small protrusions springbuttons underneath The end with...
Page 16: ...ng the roof profiles in to the fabric pockets of the canopy you MUST use both hands holding the large piece of roof fabric in order to stretch it Don t try to stretch it and pull it just by pulling the pockets It will tear the pockets as Sunbrella fabric is not elastic by nature Place the upper fabric canopy 11 carefully over the higher part of roof gable profiles 5 stretch and slide profiles into...
Page 17: ... pull the roof fabric by pulling the pocket only This will tear the pocket as Sunbrella fabric is not elastic by nature VIEW FROM BELOW VIEW FROM BELOW Using at least two people place the large canopy 12 carefully over the small canopy 11 and two roof gable profiles 5 6 as shown Stretch the canopy and slide profiles into fabric pockets in large canopy rim 12 Use TWO hands to pull the fabric backwa...
Page 18: ...s damage due to manufacturing defects only Warranty does not cover weather inflicted damage Force Majeure and or damages caused by not following assembly instructions and adhering to warnings in manual WARNING In order to prevent possible damage to fabric and or structure fabric roof should be removed before wind storms or major inclement weather events ...