background image

Wireless Data Gateway

B-4

November 1996

3981-A2-GN31-20

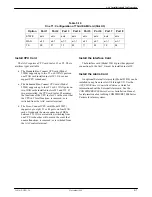
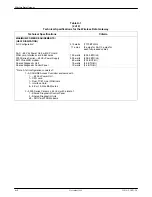
Table B-4

50-Pin Amphenol to Eight RJ48C Adapter Pin Assignments

Amphenol

Pin Number

Signal Name

Direction

RJ48C Pin Number

1

R1

W4-2 #1

2

R

W4-2 #4

4

R1

W4-1 #1

5

R

W4-1 #4

7

R1

W3-2 #1

8

R

W3-2 #4

10

R1

W3-1 #1

11

R

W3-1 #4

13

R1

W2-2 #1

14

R

W2-2 #4

16

R1

W2-1 #1

17

R

W2-1 #4

19

R1

W1-2 #1

20

R

W1-2 #4

22

R1

W1-1 #1

23

R

W1-1 #4

26

R1

W4-2 #2

27

R

W4-2 #5

29

R1

W4-1 #2

30

R

W4-1 #5

32

T1

W3-2 #2

33

T

W3-2 #5

35

T1

W3-1 #2

36

T

W3-1 #5

38

R1

W2-2 #2

39

R

W2-2 #5

41

R1

W2-1 #2

42

R

W2-1 #5

44

T1

W1-2 #2

45

T

W1-2 #5

47

T1

W1-1 #2

48

T

W1-1 #5

Summary of Contents for WIRELESS DATA GATEWAY

Page 1: ...WIRELESS DATA GATEWAY INSTALLATION AND OPERATION MANUAL Document No 3981 A2 GN31 20 November 1996 ...

Page 2: ...in are the trademarks service marks registered trademarks or registered service marks of their respective owners COPYRIGHT 1996 Paradyne Corporation All rights reserved This publication is protected by federal copyright law No part of this publication may be copied or distributed transmitted transcribed stored in a retrieval system or translated into any human or computer language in any form or b...

Page 3: ...product must comply with the applicable Safety Standards and regulatory requirements of the country in which it is installed If necessary consult with the appropriate regulatory agencies and inspection authorities to ensure compliance 8 A rare phenomenon can create a voltage potential between the earth grounds of two or more buildings If products installed in separate buildings are interconnected ...

Page 4: ...Wireless Data Gateway C November 1996 3981 A2 GN31 20 Notices ...

Page 5: ...n Mounting Equipment 2 1 Power 2 1 T1 Interface 2 1 Call Routing 2 1 3 3000 Series Carrier Installation Carrier Installation 3 1 4 Modem Installation and Configuration Modem Installation 4 1 6700 Series NMS 4 10 5 AAC Installation and Configuration AAC Installation 5 1 6 Testing the System Introduction 6 1 Normal Operation 6 1 System Checkout 6 1 Problems and Solutions 6 2 ...

Page 6: ...Wireless Data Gateway ii November 1996 3981 A2 GN31 20 Appendices A Technical Specifications A 1 B Pin Assignments B 1 C Equipment List C 1 Glossary Index ...

Page 7: ...er Source and One Input Power Cable for Basic shown or Redundant Mode 3 11 3 12 Using Two Separate Power Sources for Independent Mode or Redundant Mode 3 12 3 13 Using One Power Source and Two Input Power Cables for Independent Mode or Redundant Mode 3 13 3 14 SDU Connections 3 14 4 1 Rear Connector Plate 4 2 4 2 Installing a 3811Plus Modem 4 3 4 3 3811Plus Modems with DTE Crossover Cables 4 4 4 4...

Page 8: ... 3 Two T1s Configuration of Second E M Card Slot U2 5 4 5 4 Two T1s Configuration of Third E M Card Slot U3 5 5 5 5 Two T1s Configuration of Fourth E M Card Slot U4 5 5 5 6 Two T1s Configuration of Fifth E M Card Slot U5 5 5 5 7 Two T1s Configuration of Sixth E M Card Slot U6 5 5 5 8 One T1 Configuration of First E M Card Slot U1 5 6 5 9 One T1 Configuration of Second E M Card Slot U2 5 6 5 10 One...

Page 9: ...g and configuration of the AAC and its adapter cards Chapter 6 describes the operation of the WDG and offers solutions to common problems Appendix A provides the technical specifications of the WDG Appendix B provides the pin assignments for the DTE loopback cable the 8 pin modular to DB 25 cable and the E M card to NIM connectors Appendix C lists equipment associated with the WDG The Glossary def...

Page 10: ...Wireless Data Gateway 1 0 November 1996 3981 A2 GN31 20 496 14628 02 Paradyne ACCULINK Access Controller 3000 Series Carriers 3811Plus Modems Wireless Data Gateway ...

Page 11: ... of echo clipping and cell handoff impairments to provide greater reliability in mobile to host communications Calls originating from a cellular data user identified with a special prefix such as DATA are routed through the WDG The WDG allows call information to be passed through the system unimpaired When the WDG detects that the destination has answered with a data tone the WDG intercepts the da...

Page 12: ...als from the Network Switch Interface with paired analog modems in a carrier Modems are either idle or active When Then When two paired modems are idle The modems act as an E M pass through circuit Transmit signals from one E M port on the AAC are routed to the receive path of the next E M port When fax calling tone is detected The detecting modem signals its partner not to answer The modems are i...

Page 13: ...r the Microsoft Windows environment The AAC is directly controlled by VT100 terminal emulation software running on a personal computer The AAC supports SNMP and can be placed under the control of an SNMP manager such as SunNet Manager or HP OpenView Audio Timeout The WDG can be used for voice calls However this diminishes the number of connections available for data calls The Audio Timeout feature...

Page 14: ...eratures in the normal operating range for the equipment See Appendix A Power The WDG requires 48 Vdc power and the maximum configuration uses 519 watts Calculate fuse requirements according to the following 2 amps for the AAC 3 amps for each fully loaded carrier T1 Interface A fully configured WDG requires two T1 lines Either DSX or CSU operation is supported controlled by the type of plug in car...

Page 15: ...ed installers may wish to follow this checklist Checklist Attach the NIM to the carrier backplane Set up a static free work area Attach the PBX cable to the carrier backplane Attach the NIM card to the backplane Attach the PBX cable to the NIM card Install the SDCP ribbon cable Install the carrier into the rack Configure the power tray and power unit straps Attach the grounding strap to the power ...

Page 16: ...h the 26 position mini D sub connector into the socket numbered J1 on the right side of the backplane or J2 on the left side See Figure 3 1 4 Carefully align the connectors on the side of the NIM opposite the steel cover with connectors P23 and P24 on the right side of the backplane or connectors P25 and P26 left side Press the NIM into place and fasten it to the carrier with the four screws furni...

Page 17: ...the AAC but this is not a requirement CAUTION An unmounted carrier may flex and damage installed modem cards Never install cards in the carrier until the carrier is mounted in a rack Remove all cards from the carrier before removing a carrier from a rack Built in Retainer Clips SDCP Ribbon Cable Space Between CO Power Tray and Power Module SDCP Ribbon Cable Left Power Module CO Power Tray Flanges ...

Page 18: ...ings for Basic Mode Strap Setting for the Power Module Strap Setting for the CO Power Unit s Backplane S1 Lowered S1 Lowered S2 Lowered S3 Lowered S2 Lowered S4 Lowered S2 Lowered S5 Lowered Table 3 2 Settings for Independent Mode Strap Setting for Each Power Module Strap Setting for the CO Power Unit s Backplane S1 Raised S1 Lowered S2 Raised S3 Raised S2 Lowered S4 Raised S2 Lowered S5 Raised Ta...

Page 19: ... GN31 20 November 1996 S2 S1 S2 S1 494 13696 01 Figure 3 3 Option Straps S1 and S2 on a 48 Vdc CO Power Unit S1 S2 S3 S4 S5 CO Power Tray 496 13695 01 CO Power Unit Backplane Figure 3 4 Option Straps S1 through S5 on the CO Power Unit s Backplane ...

Page 20: ...the backplane 3 Secure each connector with its captive screw do not overtighten 4 Connect the power cable This cable has three connectors Plug the connector that terminates the shorter of the two cable arms into P19 right side or P20 left side Plug the other connector on the same end of the cable assembly into the 48 Vdc power supply Plug the connector on the long arm of the cable assembly into th...

Page 21: ...carrier Slot 0 you must first set the carrier address The SDU has two sets of DIP switches labeled S2 and S1 See Figure 3 7 495 14812 SDU Circuit Card CC IN CC OUT FP IN FP OUT S2 S1 S2 4 3 2 1 S1 4 3 2 1 ON OFF S1 Protocol Strap S2 Carrier Address Figure 3 7 SDU Switches S2 Use the top DIP switch to specify the carrier address 1 8 so that each device in a cabinet configuration has a unique identi...

Page 22: ...e carrier Off is to the right Next install the SDU into its carrier Procedure 1 Using a Phillips screwdriver loosen the screw holding the circuit pack lock and rotate the lock to the open position See Figure 3 8 2 At the front of the carrier hold the SDU vertically with the faceplate latch in the open position 3 Insert the circuit card into the top and bottom card guides of the slot labeled SDU 4 ...

Page 23: ...ow many power units you have installed and how you have strapped them The back of the power tray has two power input connectors labeled P1 and P5 See Figure 3 9 J1 P6 P3 P1 48VDC A P5 48VDC B ALARM B ALARM A P4 P2 1 1 8 1 1 1 1 8 1 Network Management Connector P6 Connector P3 Connector 48 Vdc A Connector Alarm A Alarm B 48 Vdc B Connector 496 13699 01 48 Vdc Common 48 Vdc Common Figure 3 9 Power T...

Page 24: ...e you will need a hand crimping tool AMP part number 90296 2 or equivalent to press the contacts AMP part number 350550 1 onto the wires Push the finished wires into the connector housing noting the orientation of the 48 Vdc lead and the Common See Figure 3 10 Contact Contact Connector Housing 496 13674 01 Common 48 Vdc Figure 3 10 Building the Power Input Cable ...

Page 25: ...endent mode or Redundant mode See the COMSPHERE 48 Vdc Central Office Power Unit Installation Guide for detailed information about the different modes 496 13755 01 48 Vdc Power Source A 48V GRD Ground Return Optional Fuse 48 Vdc B 48 Vdc A AMP Connectors Figure 3 11 Using One Power Source and One Input Power Cable for Basic shown or Redundant Mode ...

Page 26: ...20 496 13675 01 48 Vdc Power Source A 48V GRD Ground Return Optional Fuse 48 Vdc B 48 Vdc A AMP Connectors 48 Vdc Power Source B 48V GRD Ground Return Optional Fuse 48V 48V Figure 3 12 Using Two Separate Power Sources for Independent Mode or Redundant Mode ...

Page 27: ...3 3981 A2 GN31 20 November 1996 496 13676 01 48 Vdc Power Source A 48V GRD Ground Returns Optional Fuses 48 Vdc B 48 Vdc A AMP Connectors Figure 3 13 Using One Power Source and Two Input Power Cables for Independent Mode or Redundant Mode ...

Page 28: ...DU s CC IN Continue the connections until the last carrier in the cabinet is connected 4 For a cabinet configuration with multiple carriers use an 8 pin to 8 pin modular cable to connect the FP OUT jack of the bottommost carrier to the FP IN jack of the topmost carrier Use an 8 pin to 8 pin cable to connect the FP OUT jack of the topmost carrier to the FP IN jack of the carrier immediately beneath...

Page 29: ... 3000 Series Carrier Installation Manual For detailed installation and operation instructions see the COMSPHERE 3800Plus Modems User s Guide Experienced installers may wish to use this checklist Checklist Fasten the 3811Plus rear connector plates to the carrier Install the 3811Plus modems into the carrier Connect the DTE cables Connect the modem in each odd numbered slot to the modem in the next e...

Page 30: ...811Plus modem into the carrier perform the following steps Procedure CAUTION Always use a ground strap when handling a modem Always store a 3811Plus modem in an antistatic bag when it is removed from the carrier 1 At the rear of the carrier install the rear connector plate Make sure the plate uses the same slot position as that intended for the modem See Figure 4 1 Loosely fasten the plate This al...

Page 31: ... the carrier press the faceplate latch until a click is heard 3 If the carrier is connected to power the Power LED on the faceplate of the 3811Plus lights up After several seconds the modem completes its power up self test in which all faceplate LEDs light up If the modem fails or an alarm condition exists the Alrm LED on the faceplate lights up or flashes It may be possible to run a diagnostic se...

Page 32: ... modem in an even numbered using DTE crossover cables 1 to 2 3 to 4 and so on The crossover cable is reversible the pin assignments are the same at both ends See Appendix B Attach the cable to the DTE A top port of the modems See Figure 4 3 DTE Crossover Cables 496 14642 01 Figure 4 3 3811Plus Modems with DTE Crossover Cables ...

Page 33: ...elected modem In addition the Front Panel LED on the modem s faceplate lights up 4 Once you have determined that the modem is installed properly and has completed its power up self test rotate the circuit pack lock until it covers the faceplate latch Figure 4 4 This prevents the modem from accidently being removed once it is installed in a carrier 5 Press the F1 or F2 key until the slot number 1 1...

Page 34: ...figure comes into view F1 Idle 28 8 Test Configure F2 F3 3 Press the function key below Configure to select the Configure branch The LCD now displays Ld EditArea frm 4 Press the key until Factory comes into view then press the F1 key to display the factory preset configurations 5 Factory preset configurations for the WDG are WDG Mobile and WDG PSTN Which configuration you select depends on whether...

Page 35: ...a modem in an odd numbered slot which communicates with Mobile cellular modems or a modem in an even numbered slot which communicates with a PSTN TYPE AT Fn W0Z Where n is one of the following Factory configurations 7 for WDG Mobile odd numbered slots when the WDG is used as a standalone system 8 for WDG PSTN even numbered slots when the WDG is used as a standalone system PRESS Return Enter 2 The ...

Page 36: ...ÁÁ ÁÁÁÁÁÁÁÁÁ ÁÁÁÁÁÁÁÁÁ BreakForceEscap ÁÁÁÁÁÁÁÁÁÁÁÁÁ ÁÁÁÁÁÁÁÁÁÁÁÁÁ Disable ÁÁÁÁÁÁ ÁÁÁÁÁÁ K1 ÁÁÁÁÁÁÁÁ ÁÁÁÁÁÁÁÁ ÁÁÁÁÁÁÁÁÁ ÁÁÁÁÁÁÁÁÁ CommandCharEcho ÁÁÁÁÁÁÁÁÁÁÁÁÁ ÁÁÁÁÁÁÁÁÁÁÁÁÁ Disable ÁÁÁÁÁÁ ÁÁÁÁÁÁ E0 ÁÁÁÁÁÁÁÁ ÁÁÁÁÁÁÁÁ ÁÁÁÁÁÁÁÁÁ ÁÁÁÁÁÁÁÁÁ CarriageRtn Char ÁÁÁÁÁÁÁÁÁÁÁÁÁ ÁÁÁÁÁÁÁÁÁÁÁÁÁ 013 ASCI ÁÁÁÁÁÁ ÁÁÁÁÁÁ S3 13 ÁÁÁÁÁÁÁÁ ÁÁÁÁÁÁÁÁ ÁÁÁÁÁÁÁÁÁ ÁÁÁÁÁÁÁÁÁ Backspace Char ÁÁÁÁÁÁÁÁÁÁÁÁÁ ÁÁÁÁÁÁÁÁÁÁÁÁÁ 008 ASCI...

Page 37: ... ÁÁÁÁÁÁ ÁÁÁÁÁÁ ÁÁÁÁÁÁ N4 N5 ÁÁÁÁÁÁÁÁ ÁÁÁÁÁÁÁÁ ÁÁÁÁÁÁÁÁÁ ÁÁÁÁÁÁÁÁÁ V42bis Compress ÁÁÁÁÁÁÁÁÁÁÁÁÁ ÁÁÁÁÁÁÁÁÁÁÁÁÁ Enable ÁÁÁÁÁÁ ÁÁÁÁÁÁ IH3 ÁÁÁÁÁÁÁÁ ÁÁÁÁÁÁÁÁ ÁÁÁÁÁÁÁÁÁ ÁÁÁÁÁÁÁÁÁ MNP5 Compress ÁÁÁÁÁÁÁÁÁÁÁÁÁ ÁÁÁÁÁÁÁÁÁÁÁÁÁ Enable C1 EC Negotiate Bfr Disable F8 Even slots only ÁÁÁÁÁÁ ÁÁÁÁÁÁ C0 ÁÁÁÁÁÁÁÁ ÁÁÁÁÁÁÁÁ ÁÁÁÁÁÁÁÁÁ ÁÁÁÁÁÁÁÁÁ Flw Cntl of DTE ÁÁÁÁÁÁÁÁÁÁÁÁÁ ÁÁÁÁÁÁÁÁÁÁÁÁÁ CTS_to_DTE ÁÁÁÁÁÁ ÁÁÁÁÁÁ Q3 ÁÁÁÁ...

Page 38: ...part of the NMS addressing plan NetMngmtAddress must be set for each modem Modem Repair and Maintenance When a modem is removed from the carrier a switch is activated in the 4 Wire E M NIM which puts the M lead in the off hook or active state This removes the port from service In addition when a modem is removed from a slot its partner modem detects this on its DTE crossover cable This causes the ...

Page 39: ... M cards in the AAC set these cards for E M Type V signaling using the procedure in the ACCULINK Access Controller Reference Guide 2 Install the six E M cards in user slots U1 through U6 Do not populate slots U7 and U8 3 Configure the cards as shown in this chapter Configure the AAC using a VT100 compatible terminal attached to the TERM port on the AAC following the instructions in the ACCULINK Ac...

Page 40: ... block at the back of the chassis require Size 6 0 3 inch insulated ring type connectors See the ACCULINK Access Controller Reference Guide for more information Install the Plug In Module The Dual T1 E1 Link WAN card Model 25812 or 25813 contains two separate line interface modules that are connected to the T1 looparound trunks on the mobile switch WAN1 1 is the T1 looparound trunk from the mobile...

Page 41: ...in slot W4 provides redundancy for up to three WAN cards in slots W1 through W3 Using the AAC control terminal set the options on the WAN cards to match the T1 options of the mobile switch Install the E M Card E M cards Model 25894 are installed in slots U1 through U6 Each 4 Wire E M card must be configured to support Type V E M signaling See Table 5 1 and Figure 5 2 Table 5 1 Switch Settings for ...

Page 42: ... a ÁÁÁÁ ÁÁÁÁ n a ÁÁÁÁÁ ÁÁÁÁÁ ÁÁÁÁÁ RX TLP ÁÁÁÁ ÁÁÁÁ ÁÁÁÁ 0 0 ÁÁÁ ÁÁÁ ÁÁÁ 0 0 ÁÁÁÁ ÁÁÁÁ ÁÁÁÁ 0 0 ÁÁÁÁ ÁÁÁÁ ÁÁÁÁ 0 0 ÁÁÁÁ ÁÁÁÁ ÁÁÁÁ 0 0 ÁÁÁÁ ÁÁÁÁ ÁÁÁÁ 0 0 ÁÁÁ ÁÁÁ ÁÁÁ 0 0 ÁÁÁÁ ÁÁÁÁ ÁÁÁÁ 0 0 ÁÁÁÁÁ ÁÁÁÁÁ TX TLP ÁÁÁÁ ÁÁÁÁ 0 0 ÁÁÁ ÁÁÁ 0 0 ÁÁÁÁ ÁÁÁÁ 0 0 ÁÁÁÁ ÁÁÁÁ 0 0 ÁÁÁÁ ÁÁÁÁ 0 0 ÁÁÁÁ ÁÁÁÁ 0 0 ÁÁÁ ÁÁÁ 0 0 ÁÁÁÁ ÁÁÁÁ 0 0 ÁÁÁÁÁ ÁÁÁÁÁ CODING ÁÁÁÁ ÁÁÁÁ u law ÁÁÁ ÁÁÁ u law ÁÁÁÁ ÁÁÁÁ u law ÁÁÁÁ ÁÁÁÁ u law ÁÁÁÁ...

Page 43: ... 14 ÁÁÁ ÁÁÁ ÁÁÁ 14 ÁÁÁÁ ÁÁÁÁ ÁÁÁÁ 15 ÁÁÁÁ ÁÁÁÁ ÁÁÁÁ 15 ÁÁÁÁ ÁÁÁÁ ÁÁÁÁ 16 ÁÁÁÁ ÁÁÁÁ ÁÁÁÁ 16 ÁÁÁÁÁÁÁÁÁÁÁÁÁÁÁÁÁÁÁÁÁÁÁÁÁÁÁ ÁÁÁÁÁÁÁÁÁÁÁÁÁÁÁÁÁÁÁÁÁÁÁÁÁÁÁ ÁÁÁÁÁÁÁÁÁÁÁÁÁÁÁÁÁÁÁÁÁÁÁÁÁÁÁ Table 5 6 Two T1s Configuration of Fifth E M Card Slot U5 ÁÁÁÁ ÁÁÁÁ ÁÁÁÁ Option ÁÁÁÁ ÁÁÁÁ ÁÁÁÁ Port 1 ÁÁÁÁ ÁÁÁÁ ÁÁÁÁ Port 2 ÁÁÁÁ ÁÁÁÁ ÁÁÁÁ Port 3 ÁÁÁ ÁÁÁ ÁÁÁ Port 4 ÁÁÁÁ ÁÁÁÁ ÁÁÁÁ Port 5 ÁÁÁÁ ÁÁÁÁ ÁÁÁÁ Port 6 ÁÁÁÁ ÁÁÁÁ ÁÁÁÁ P...

Page 44: ...ÁÁÁÁ ÁÁÁÁ ÁÁÁÁ 0 0 ÁÁÁ ÁÁÁ ÁÁÁ 0 0 ÁÁÁÁ ÁÁÁÁ ÁÁÁÁ 0 0 ÁÁÁÁ ÁÁÁÁ ÁÁÁÁ 0 0 ÁÁÁÁ ÁÁÁÁ ÁÁÁÁ 0 0 ÁÁÁÁ ÁÁÁÁ ÁÁÁÁ 0 0 ÁÁÁ ÁÁÁ ÁÁÁ 0 0 ÁÁÁÁ ÁÁÁÁ ÁÁÁÁ 0 0 ÁÁÁÁÁ ÁÁÁÁÁ TX TLP ÁÁÁÁ ÁÁÁÁ 0 0 ÁÁÁ ÁÁÁ 0 0 ÁÁÁÁ ÁÁÁÁ 0 0 ÁÁÁÁ ÁÁÁÁ 0 0 ÁÁÁÁ ÁÁÁÁ 0 0 ÁÁÁÁ ÁÁÁÁ 0 0 ÁÁÁ ÁÁÁ 0 0 ÁÁÁÁ ÁÁÁÁ 0 0 ÁÁÁÁÁ ÁÁÁÁÁ CODING ÁÁÁÁ ÁÁÁÁ u law ÁÁÁ ÁÁÁ u law ÁÁÁÁ ÁÁÁÁ u law ÁÁÁÁ ÁÁÁÁ u law ÁÁÁÁ ÁÁÁÁ u law ÁÁÁÁ ÁÁÁÁ u law ÁÁÁ ÁÁÁ u law ...

Page 45: ...AN card installed in slot W1 It does not support CPU redundancy The Enhanced Bus Connect CPU card Model 25888 supports up to four T1 or E1 WAN ports on two WAN cards installed in slots W1 and W3 If two are installed the CPU card in slot C2 assumes the functions of the CPU in slot C1 in the event that the CPU in C1 malfunctions is removed or is switched from the AAC control terminal The Cross Conne...

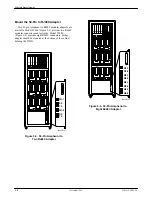
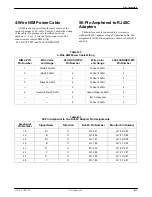
Page 46: ... 5 4 provides eight RJ48C connectors Either adapter should be mounted at the bottom of the cabinet holding the WDG 496 14795 01 U2 U1 IF U3 U4 U5 U6 U7 U8 R4 R5 R3 R2 R1 W1 1 W1 2 RX TX RX TX W1 1 W1 2 RX TX RX TX Figure 5 3 50 Pin Amphenol to Two RJ48C Adapter W1 1 W1 2 W2 1 W2 2 W3 1 W3 2 W4 1 W4 2 W1 1 W1 2 W2 1 W2 2 W3 1 W3 2 W4 1 W4 2 496 14794 01 U2 U1 IF U3 U4 U5 U6 U7 U8 R4 R5 R3 R2 R1 Fig...

Page 47: ...ÁÁ ÁÁÁÁÁÁÁÁÁÁÁÁÁÁÁÁ ÁÁÁÁÁÁÁÁÁÁÁÁÁÁÁÁ Table 5 11 Cabling of E M Cards to NIMs ÁÁÁÁ ÁÁÁÁ ÁÁÁÁ ÁÁÁÁ E M Card Slot in AAC ÁÁÁÁÁÁ ÁÁÁÁÁÁ ÁÁÁÁÁÁ ÁÁÁÁÁÁ COMSPHERE 3000 Series Carrier ÁÁÁÁÁÁÁÁ ÁÁÁÁÁÁÁÁ ÁÁÁÁÁÁÁÁ ÁÁÁÁÁÁÁÁ NIM Connected To ÁÁÁÁ ÁÁÁÁ ÁÁÁÁ U1 ÁÁÁÁÁÁ ÁÁÁÁÁÁ ÁÁÁÁÁÁ First top ÁÁÁÁÁÁÁÁ ÁÁÁÁÁÁÁÁ ÁÁÁÁÁÁÁÁ Ports 1 8 P21 right side ÁÁÁÁ ÁÁÁÁ U2 ÁÁÁÁÁÁ ÁÁÁÁÁÁ First top ÁÁÁÁÁÁÁÁ ÁÁÁÁÁÁÁÁ Ports 9 16 P22 ...

Page 48: ...inal Port on the Interface card to a VT 100 terminal or to the serial port of a PC running VT 100 emulation software Connect the Adapter to the Mobile Switch The cables and adapter used to connect to the mobile switch depend on whether a redundant WAN card was installed in the AAC If a redundant WAN card was not installed use two standard 8 position modular cables to connect to the mobile switch S...

Page 49: ...t asserts the Off hook state on its M lead to prevent the switch from selecting it in a hunt group The WDG always attempts to match the modulation and error correction EC protocol of the remote cellular and PSTN modems In addition the WDG rejects calls on the cellular connection which attempt to connect without an EC protocol Calls on the PSTN however are allowed to connect without an EC protocol ...

Page 50: ...modems are steadily lit Use the SDCP to check that the modems display the current VF rate Select the carrier and modem Then select Status and VF The SDCP displays Online rate where rate is a VF rate in kbps for active modems NOTE The VF rate displayed on the SDCP can help you spot modems that have not been properly configured The display should say Idle 19 2 for inactive modems in odd numbered slo...

Page 51: ...onnections Make sure that your PSTN destination modem supports V 32 data rates The throughput of the call is limited by the data rate of the slowest link If the PSTN destination modem only supports 1200 bps then your throughput will only be 1200 bps even though you are connected at 9600 bps to the gateway Fax calls are being treated as data calls The WDG does not support fax protocols However it d...

Page 52: ...tive Humidity Storage Temperature Shock and Vibration 32_F 0_C to 122_F 50_C 5 to 90 noncondensing 4_F 20_C to 158_F 70_C Withstands normal shipping and handling APPROVALS FCC Underwriters Laboratories Inc UL Recognized Component Canadian Standards Association Certified Component Part 15 Class A UL Standard for Safety UL 1950 Second Edition CSA Standard C22 2 No 950 M89 COMPATIBILITY MODULATIONS A...

Page 53: ...ared Diagnostic Unit Shared Diagnostic Control Panel 519 watts 1770 BTU Hr 11 amps 2 amps for AAC 3 amps for each fully loaded carrier 75 0 watts 256 0 BTU Hr 50 0 watts 409 2 BTU Hr 6 0 watts 20 5 BUT Hr 1 5 watts 5 2 BTU Hr 1 0 watts 3 4 BTU Hr Note A full configuration consists of 1 ACCULINK Access Controller enclosure with 1 48 Vdc Power Unit 1 CPU card 1 Dual T1 E1 Link WAN card 1 Interface C...

Page 54: ...back Cable The DTE loopback cable is used to connect 3811Plus modem pairs in the WDG Each cable connects the EIA232 V 24 ports of two modems Figure B 1 shows the pin assignments and circuitry of the cable assembly 2 TXD TXD 3 RXD RXD 4 RTS RTS 5 CTS CTS 6 DSR DSR 7 GND GND 8 LSD LSD 12 CI CI 20 DTR DTR 23 CH CH 18 LL LL 2 3 4 5 6 7 8 12 20 23 18 PIN PIN Figure B 1 DTE Loopback Cable B ...

Page 55: ...Assignments Port Number Designation Pin Number 1 R 1 1 T1 27 1 R1 2 1 E 28 1 M 3 2 T 29 2 R 4 2 T1 30 2 R1 5 2 E 31 2 M 6 3 T 32 3 R 7 3 T1 33 3 R1 8 3 E 34 3 M 9 4 T 35 4 R 10 4 T1 36 4 R1 11 4 E 37 4 M 12 Table B 1 2 of 2 4 Wire NIM E M Connector Pin Assignments Port Number Designation Pin Number 5 T 38 5 R 13 5 T1 39 5 R1 14 5 E 40 5 M 15 6 T 41 6 R 16 6 T1 42 6 R1 17 6 E 43 6 M 18 7 T 44 7 R 1...

Page 56: ... are shown in Tables B 3 and B 4 Table B 2 4 Wire NIM Power Cable Wiring NIM 4 PIN Pin Number Wire Color and Gauge 48 VDC SUPPLY Pin Number Wire Color and Gauge 3000 CARRIER B P Pin Number 1 White 22 AWG 1 White 18 AWG 4 3 Red 22 AWG 2 White 18 AWG 2 3 White 16 AWG 3 2 Black 22 AWG 4 White 18 AWG 1 5 White 16 AWG 8 4 Green Yellow 22 AWG 6 Green Yellow 22 AWG 6 7 No Connection 7 8 White 16 AWG 5 Ta...

Page 57: ...4 2 1 2 R W4 2 4 4 R1 W4 1 1 5 R W4 1 4 7 R1 W3 2 1 8 R W3 2 4 10 R1 W3 1 1 11 R W3 1 4 13 R1 W2 2 1 14 R W2 2 4 16 R1 W2 1 1 17 R W2 1 4 19 R1 W1 2 1 20 R W1 2 4 22 R1 W1 1 1 23 R W1 1 4 26 R1 W4 2 2 27 R W4 2 5 29 R1 W4 1 2 30 R W4 1 5 32 T1 W3 2 2 33 T W3 2 5 35 T1 W3 1 2 36 T W3 1 5 38 R1 W2 2 2 39 R W2 2 5 41 R1 W2 1 2 42 R W2 1 5 44 T1 W1 2 2 45 T W1 2 5 47 T1 W1 1 2 48 T W1 1 5 ...

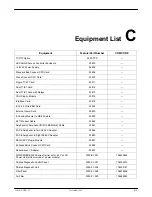
Page 58: ...4 External Alarm Card 25830 8 Position Modular to DB 25 Cable 25852 RJ11 Modem Cable 25854 Amphenol to Amphenol NIM to E M card Cable 25861 50 Pin Amphenol to Two RJ 48C Adapter 25866 50 Pin Amphenol to Eight RJ 48C Adapter 25880 DSX CEPT Plug In Module 25887 Enhanced Bus Connect CPU Card 25888 Redundancy Y Adapter 25897 COMSPHERE 3000 Series Carrier with 48 Vdc CO Power Unit which includes 1 powe...

Page 59: ...bbon Cable 4 Wire NIM PBX Connector Cable Screw Phillips head For right angle 50 position telco connector mounting Tie Mount Screw 4 40 x 3 16 Phillips head Cable Tie For vertical 50 position telco connector mounting Washer flat 4 DTE Crossover Cable Modem to Modem 3980 F1 020 107508038 COMSPHERE 72 Inch Cabinet 4000 B2 200 106063571 50 Position Male to Female Cable AAC to NIM 5 foot length 10 foo...

Page 60: ... Agent WDG Cable for 6700 Series NMS 6700 Series NMS System Remote Cable 4400 F1 512 4400 F1 594 6700 C4 001 6700 C4 002 6700 D4 001 6700 D4 002 6700 D4 003 6700 D4 006 6821 F1 518 6821 F1 519 COMSPHERE 3000 Series Carrier Installation Manual 3000 A2 GA31 COMSPHERE 48 Vdc Central Office Power Unit Installation Manual 3000 A2 GB41 COMSPHERE 3800Plus Modems User s Guide 3980 A2 GB30 ACCULINK Access ...

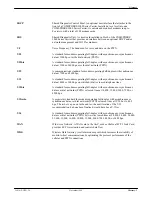
Page 61: ...em standard Under Class 1 computer software handles most of the protocol compression and conversion tasks Class 2 fax A fax modem standard Under Class 2 the modem handles most of the protocol compression and conversion tasks as well as modulation leaving the computer free for other work DC Diagnostic Channel The diagnostic interface between two network devices used to extend the NMS diagnostics to...

Page 62: ...modems loaded in an individual carrier modem pool A number of modems grouped logically such that individual modems are accessible according to availability by addressing the group NI Network Interface The junction of the Wireless Data Gateway system with the network switch NIM Network Interface Module The hardware interface between the WDG and the network switch NMS Network Management System A set...

Page 63: ... V 32 A standard for modems operating full duplex with asynchronous or synchronous data at 4800 or 9600 bps on switched dial or leased telephone lines V 32bis A standard for modems operating full duplex with asynchronous or synchronous data over dial networks PSTN or leased lines at 14 400 12 000 9600 7200 or 4800 bps V 32terbo A proprietary standard for modems operating full duplex with asynchron...

Page 64: ...WAN card 5 3 WAN card plug in module 5 2 address DIP switches table 3 8 Alarm card 5 7 approvals A 1 AT commands using 4 7 Audio Timeout feature 1 3 6 3 B backplane 3 5 Basic mode strap setting 3 4 using one power source one cable 3 11 C cabling E M card to NIM 5 9 B 2 modems 4 4 NIM to carrier 3 6 NMS 3 14 pinouts B 1 call routing using DATA 2 1 carrier address DIP switches table 3 8 installation...

Page 65: ...ries NMS 4 10 AAC 5 1 CO power unit 3 3 E M card 5 1 NIM 3 2 SDCP 3 7 SDU 3 7 Interface card 5 7 cabling 5 10 L loopback cables 4 4 M MNP 10 6 3 modem installation checklist 4 1 modem bank 1 2 modulations supported A 1 mounting equipment 2 1 N Network Interface 1 2 Network Management System 1 3 connection 3 14 NIM Network Interface Module 1 3 3 1 cabling 3 6 installation 3 2 O one power source 3 1...

Page 66: ...uration options 4 6 shock vibration A 1 storage temperature A 1 strap settings 3811Plus modems 4 8 Basic mode 3 4 carrier power units 3 4 DSX CEPT plug in module 5 2 Independent mode 3 4 Redundant mode 3 4 switches E M card 5 3 SDU 3 7 T T1 interface requirements 2 1 technical specifications A 1 testing the system 6 1 troubleshooting 6 2 two power sources 3 12 V VF rates supported A 1 voice calls ...

Reviews: