background image

 20

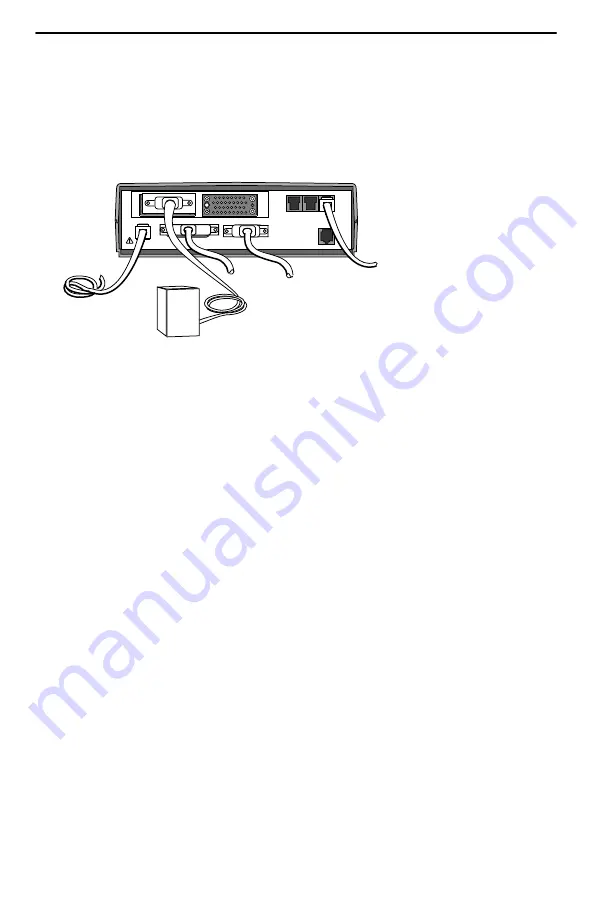
Connecting to a DTE (Router or FRAD)

1. Connect one end of the DTE’s V.35 cable to the data port.

2. Plug the other end of the cable into the DTE.

3. Tighten the screws on each side of the connector to secure the cable.

DSX

COM

POWER

MODEM

NET

DBM

P
O
R
T

2

P
O
R
T

1

ENET

00-16845

DTE

4. Repeat Steps 1– 4 of this procedure for Port-2.

5. Verify that the Port OK LED is on. If not, make sure both ends of the cable are

properly seated and secured. Then, check the DTE; RTS or DTR could be down
on the DTE.

– The FrameSaver SLV 9128 has a Port OK LED for each port.
– The FrameSaver SLV 9128-II has one Port OK LED for both ports. If either port

is enabled and active, the LED is on. If both ports are enabled and one of the
ports is inactive, the LED is off.

6. Check Health and Status messages in the left column of the System and Test

Status screen for messages.

Main Menu 

Status 

System and Test Status

– If 

System Operational

 appears, the port interface is set up correctly and

is operational.

– If not, refer to 

Status Information in the User’s Guide.

NOTE:

When any error conditions are detected, a status message appears along the
bottom right corner of the screen.

Summary of Contents for FrameSaver SLV 9128

Page 1: ...lable at www paradyne com Select Library Technical Manuals FrameSaver Frame Relay Devices Select the following document 9128 A2 GB20 FrameSaver SLV Models 9126 9128 and 9128 II User s Guide To order a paper copy of a Paradyne document Within the U S A call 1 800 PARADYNE 1 800 727 2396 Outside the U S A call 1 727 530 8623 Package Checklist Verify that your package contains the following FrameSave...

Page 2: ... FrameSaver unit being installed or replaced Appropriate cables DSX cable Data port cables COM port to terminal or COM port to PC cable Modem cable Ethernet cable if applicable See the User s Guide for additional information on Troubleshooting Technical Specifications Connectors Cables and Pin Assignments Cables You May Need to Order If connecting to a Order a Model Feature Number T1 line interfac...

Page 3: ...2 P O R T 1 ENET POWER P O R T 1 00 16841 Power Cord Transformer Insert the 3 prong plug into an AC outlet O K A L M The front panel OK LED lights 2 3 3 Prong Grounded AC Outlet Locking Tab on Top 3 4 Plug the power cord into the grounded power outlet and check the LEDs If any LEDs light you have power If not refer to Troubleshooting in the User s Guide for possible explanations NOTE The rear pane...

Page 4: ...M Port 00 16842 3 Insert the other end of the cable into the terminal or PC 4 Tighten the screws on each side of the connector to secure the cable 5 Press Enter on the keyboard to display the Main Menu If the Main Menu does not appear recheck the terminal or PC settings see Step 1 or press the Enter key Refer to Troubleshooting in the User s Guide for other possible explanations Verifying that Sel...

Page 5: ...rom the Main Menu press the down arrow key twice so the cursor is on Configuration 2 Press Enter to display the Configuration menu The Load Configuration From menu appears 3 Press Enter to select Current Configuration the cursor is already on this selection The Configuration Edit Display menu appears This sequence of steps would be shown as the menu selection sequence Main Menu Configuration To sa...

Page 6: ...tallation and Setup An Easy Install screen is provided to simplify installation and setup It can be used for the first part of the installation when one person is installing and setting up the unit from beginning to end Easy Install Screen Example main easy_install 9128 II Device Name Node A 5 26 2000 23 32 EASY INSTALL Service Type Frame Relay Node IP Address 000 000 000 000 Clear Node Subnet Mas...

Page 7: ... will be on a different subnet than the unit enter Yes at the Would you like to set the Node s Default IP Destination to Ethernet prompt Otherwise enter No If the IP Address and Subnet Mask are unique to the interface enter them for the port otherwise the Node IP Address and Subnet Mask will be used Enter the Default Gateway Address the IP Address that will be used for packets without a route Enab...

Page 8: ...s and Trap Dial Out on page 16 15 Save the configurations 16 Verify the entire path from the remote unit to the NMS is functioning see Verifying the End to End Path on page 18 17 If the DSX 1 interface will be used install the DSX 1 cable see Connecting to the DSX on page 19 Time slots for the DSX 1 interface will need to be assigned to the network interface see Assigning DSX 1 Time Slots to the N...

Page 9: ...he unit in Frame Relay mode the FrameSaver SLV 9128 is always in Frame Relay mode 1 Follow Steps 1 through 8 of Full Installation and Setup on page 7 2 If the DSX 1 interface will be used install the DSX 1 cable see Connecting to the DSX on page 19 3 Install the DTE cables see Connecting to the DTE Router or FRAD on page 20 4 Install the modem cable see Connecting the Modem on page 21 5 If the uni...

Page 10: ... packets without a route Enable Proxy ARP if the unit will proxy for downstream FrameSaver units learned via the proprietary RIP Routing Information Protocol feature Press the Esc key to return to the Easy Install screen 5 Select the Time Slot Assignment screen to manually assign the user data port to network interface time slots see Assigning Time Slots Cross Connections in Configuration of the U...

Page 11: ...rface according to the local management interface LMI and assigned line conditions supplied by the service provider Configuration Network Frame Relay Configuration Data Ports Frame Relay 4 If SNMP traps are wanted set up managers select the desired traps and configure trap dial out if desired see Configuring SNMP Trap Managers and Trap Dial Out on page 16 5 Set up the modem and if trap dial out is...

Page 12: ...r Port 1 data and the other for management a Port 1 DLCI with the same number and a management PVC then cross connects them NOTE When auto configuration creates a multiplexed DLCI but a standard DLCI is needed change the DLCI to Standard from the network DLCI Records screen Configuration Network DLCI Records Other modes can be selected See Setting Up Automatic Configuration in Configuration of the...

Page 13: ...SCII text B for blind dialing W for wait for dial tone P for pulse dialing unless B specified T for tone dialing unless B specified Space underscore _ comma for a 2 second pause and dash readability characters 4 Save the phone number s Setting Up to Use the Modem PassThru Feature The Modem PassThru feature allows access to the router via a dial up connection to the unit When this feature is set up...

Page 14: ...e the Automatic Backup Configuration to Single_Site_Backup A BRI DBM is already configured for single site backup Modify the HQ_Site Link Profile that Automatic Backup Configuration created to add a phone number Set the criteria by which automatic backup will take place Setting Up the DBM Physical Interface 1 Configure the DBM interface Main Menu Configuration ISDN Physical 2 Minimally set the fol...

Page 15: ...DN Link Profiles select New 2 Add a name and phone number to the ISDN Link Profile s created by Automatic Backup Configuration Name for the destination entered e g Tampa The default setting of HQ_Site Phone numbers entered For Originating a Backup Call For Answering a Backup Call Outbound and Alternate Outbound phone numbers Valid characters include Numbers 0 9 Special characters and Spaces Parent...

Page 16: ...lace 3 Save the configuration Configuring SNMP Trap Managers and Trap Dial Out Once the FrameSaver unit is connected to the network SNMP trap managers SNMP traps and trap dial out can be configured 1 Select SNMP Traps Main Menu Configuration Management and Communication SNMP Traps 2 Configure the following Enable SNMP Traps Identify the total Number of Trap Managers Specify the IP address of the N...

Page 17: ...twork cable are properly seated The FrameSaver SLV 9128 II has a FR Frame Relay LED It will be green when the unit is operating in Frame Relay mode and LMI is up yellow when the unit is operating in Frame Relay mode and LMI is down and it will be off when the unit is operating in Leased Line mode 4 Check Health and Status messages in the left column of the System and Test Status screen Main Menu S...

Page 18: ...ess of the device being pinged then select Start NOTE When running tests the cursor is positioned over the Start command Press Enter to start the test Stop is displayed while the test is running Press Enter again to issue the Stop command While the test is running In Progress appears in the Status field When the test is finished Alive Latency nn ms should appear as the Status nn being the amount o...

Page 19: ...Verify that the DSX signal SIG LED is green and that the DSX out of frame OOF and alarm ALM LEDs are off If so the DSX interface is set up correctly and is operational If not make sure both ends of the DSX cable are properly seated When ALM is on contact the service provider 5 Check Health and Status messages in the left column of the System and Test Status screen Main Menu Status System and Test ...

Page 20: ... could be down on the DTE The FrameSaver SLV 9128 has a Port OK LED for each port The FrameSaver SLV 9128 II has one Port OK LED for both ports If either port is enabled and active the LED is on If both ports are enabled and one of the ports is inactive the LED is off 6 Check Health and Status messages in the left column of the System and Test Status screen for messages Main Menu Status System and...

Page 21: ...Main Menu appears If Port Use is set to Net Link SNMP Telnet FTP and trap dial out Dial the modem s phone number using a PC running PPP or SLIP link protocol From the PC run an IP Ping test to the modem interface If your results using either method are unsuccessful make sure both ends of the modem cable are properly seated and secured Then verify that the modem was configured correctly see Setting...

Page 22: ...meSaver unit with BRI DBM RJ48C for a FrameSaver unit with PRI DBM 3 Setup the unit at the other end of the ISDN circuit DSX COM POWER MODEM NET DBM P O R T 2 P O R T 1 ENET 00 16847 RJ49C or RJ48C Jack 4 Verify the ISDN line by checking the DBM Interface Status Main Menu Status DBM Interface Status Line Status should be Active If an invalid Inv status e g Inv SPID for a BRI DBM is displayed verif...

Page 23: ... Ethernet cable are properly seated Verifying That Data is Being Received 1 Return to the Main Menu and select Status 2 Select Performance Statistics and select an interface s frame relay statistics e g Network Frame Relay Main Menu Status Performance Statistics Network Frame Relay 3 Clear the statistics and see whether the counts for Frames Received and Characters Received under the Frame Relay L...

Page 24: ...onfigured correctly the circuit may be down Verifying That Data Can Be Passed Between DBMs 1 Select Test then ISDN Call PVC Tests Main Menu Test ISDN Call PVC Tests 2 Select the link to be tested 3 Start a Test Call The Status should be Active 4 Wait as the originating DBM places the backup call The originating unit s Test LED is on If the Result is Then Frame Relay Link Up The call was successful...

Page 25: ... qualified electrician to determine another method of grounding the equipment 3 Slots and openings in the cabinet are provided for ventilation To ensure reliable operation of the product and to protect it from overheating these slots and openings must not be blocked or covered 4 Do not allow anything to rest on the power cord and do not locate the product where persons will walk on the power cord ...

Page 26: ...not use the telephone to report a gas leak in the vicinity of the leak UNITED STATES EMI NOTICE This equipment has been tested and found to comply with the limits for a Class A digital device pursuant to Part 15 of the FCC rules These limits are designed to provide reasonable protection against harmful interference when the equipment is operated in a commercial environment This equipment generates...

Page 27: ...ify you in advance But if advance notice is not practical you will be notified as soon as possible You will be advised of your right to file a complaint with the FCC Your telephone company may make changes in facilities equipment operations or procedures that could affect the proper operation of your equipment If so you will be given advance notice so as to give you an opportunity to maintain unin...

Page 28: ...ty Package R for 2B service which supports up to two circuit switched B channels BRI B1 and BRI B2 with two SPID numbers and two local phone numbers Busy Fixed Call Forwarding for the answering system typically the central site system is recommended if getting Capability Package R 2B service This feature is only required if all remote systems will call the same phone number Busy Fixed Call Forward...

Page 29: ...lier Any repairs or alterations made by the user to this equipment or equipment malfunctions may give the telecommunications company cause to request to disconnect the equipment Users should ensure for their own protection that the electrical ground connections of the power utility telephone lines and internal metallic water pipe system if present are connected together This precaution may be part...

Page 30: ...0 870 2221 Outside the U S A call 1 727 530 2340 Document Feedback We welcome your comments and suggestions about this document Please mail them to Technical Publications Paradyne Corporation 8545 126th Ave N Largo FL 33773 or send e mail to userdoc paradyne com Include the number and title of this document in your correspondence Please include your name and phone number if you are willing to prov...

Reviews: