background image

 3

Safety Instructions

Please refer to the 

Important Safety Instructions and EMI Warnings beginning on

page 15.

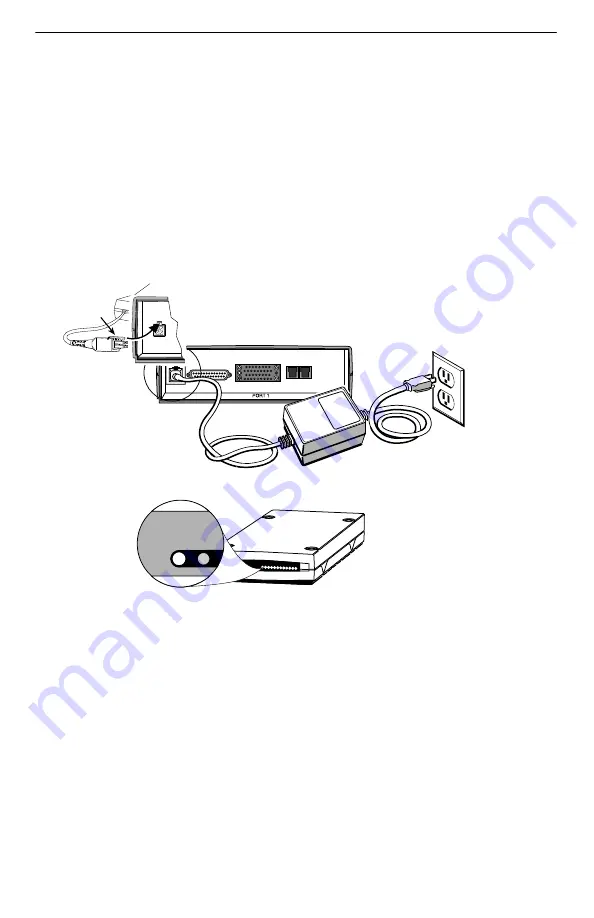
Installing the Power Supply and Cord

1. Insert the 4-prong plug into the POWER jack.

When inserting the plug at the rear of the FrameSaver unit, align the plug with the
notch above the POWER jack. Make sure the locking tab snaps securely into the
jack.

2.

POWER

COM

NET

DSX

99-16347

Power Cord /

Transformer

Insert the 3-prong plug
into an ac outlet.

OK

ALM

The front panel
OK LED lights.

2.

3.

3-Prong

Grounded

AC Outlet

Locking

Tab

POWER

3.

4. Plug the power cord into the grounded power outlet.

Verification Check:

Did any LEDs light?

– If yes, the FrameSaver unit has power.

– If no, refer to 

Troubleshooting in the User’s Guide.

Summary of Contents for FrameSaver SLV 9124

Page 1: ...adyne com Select Library Technical Manuals FrameSaver Frame Relay Devices Select the following document 9124 A2 GB20 FrameSaver SLV 9124 User s Guide To request a paper copy of a Paradyne document Wit...

Page 2: ...adapter cable Data port cables COM port to terminal or COM port to PC cable See the User s Guide for additional information on Troubleshooting Cables Connectors and Pin Assignments Technical Specifica...

Page 3: ...plug with the notch above the POWER jack Make sure the locking tab snaps securely into the jack 2 POWER COM NET DSX 99 16347 Power Cord Transformer Insert the 3 prong plug into an ac outlet O K A L M...

Page 4: ...to 1 Flow Control is set to None 2 Insert the DB25 end of the EIA 232 cable into the FrameSaver unit s COM port POWER COM NET DSX To Connect to a PC or Async Terminal COM Port 99 16348 3 Insert the ot...

Page 5: ...you can start setting up the unit To load a configuration for editing 1 From the Main Menu press the down arrow key twice so the cursor is on Configuration 2 Press Enter to display the Configuration m...

Page 6: ...The results of the self test appear directly under the screen title If any failure messages appear reset the unit by disconnecting then reconnecting the power cord The unit will perform the self test...

Page 7: ...nfigurations Setting Frame Relay Characteristics When installing a FrameSaver SLV NAM frame relay characteristics must be configured for the network and data ports 1 Select the interface s frame relay...

Page 8: ...several automatic configuration features Frame Relay Discovery and configuration is one of these features Main Menu Auto Configuration The default discovery mode is 1MPort In this mode for each DLCI...

Page 9: ...twork interface is set up correctly and is ready to pass data If no check that both ends of the network cable are properly seated then verify that the network physical options are configured correctly...

Page 10: ...the DLCI Type from Multiplexed to Standard The DLCI in connections Update DLCI usage as follows prompt appears 5 Select the Delete EDLCI Connections and Make a Mgmt Only PVC option PVC connections for...

Page 11: ...of the device being Pinged then select Start NOTE When running tests the cursor is positioned over the Start command Press Enter to start the test Stop is displayed while the test is running Press En...

Page 12: ...out of frame and ALM alarm LEDs off If so the DSX interface is set up correctly and ready to communicate If no check that both ends of the DSX cable are properly seated and secured When OOF is on matc...

Page 13: ...able are properly seated and secured Then check the DTE RTS or DTR could be down on the DTE Check Health and Status messages in the left column of the System and Test Status screen for messages Main M...

Page 14: ...aintenance for additional status information and Troubleshooting for additional troubleshooting information Check That Data is Being Received 1 Return to the Main Menu then select Status 2 Select Perf...

Page 15: ...r covered 4 Do not allow anything to rest on the power cord and do not locate the product where persons will walk on the power cord 5 Do not attempt to service this product yourself as opening or remo...

Page 16: ...ainst harmful interference when the equipment is operated in a commercial environment This equipment generates uses and can radiate radio frequency energy and if not installed and used in accordance w...

Page 17: ...fy you in advance But if advance notice is not practical you will be notified as soon as possible You will be advised of your right to file a complaint with the FCC Your telephone company may make cha...

Page 18: ...the above conditions may not prevent degradation of service in some situations Repairs to certified equipment should be coordinated by a representative designated by the supplier Any repairs or alter...

Page 19: ...ll 1 800 870 2221 Outside the U S A call 1 727 530 2340 Document Feedback We welcome your comments and suggestions about this document Please mail them to Technical Publications Paradyne Corporation 8...

Reviews: