


3. Using the Web Interface
3-24
January 2005
6381-A2-GB23-10
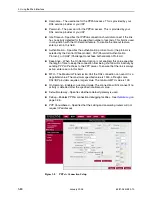
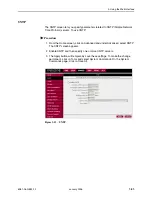
SNMP
Use the SNMP (Simple Network Management Protocol) screen to enable and
configure the SNMP agent and SNMP trap managers.
The SNMP feature generates a trap whenever the IP address of the router
changes (except through the Troubleshooting Management Link). The trap sent
contains the following:
Community (the community name configured for the trap destination, or
“public” if no community name was configured)
sysObjectID for the router
IP address of the agent sending the trap
Time stamp (sysUpTime)
Serial Number of the router
IP address of the router
Interface name
To configure SNMP:
Procedure
1. From the Home screen, click on Advanced and under Advanced, select SNMP.
The SNMP screen appears.
2. Enable the SNMP traps, then enter up to five Destination IP Addresses and
Community names.
The Apply button will temporarily save these settings. To make the change
permanent, click on Tools and select System Commands. On the System
Commands page, click on Save All.
Figure 3-20. SNMP
Summary of Contents for 6381-A3
Page 1: ...6381 A3 Router User s Guide Document No 6381 A2 GB23 10 January 2005 ...
Page 10: ...Contents iv January 2005 6381 A2 GB23 10 ...
Page 28: ...2 Hardware Installation and PC Setup 2 12 January 2005 6381 A2 GB23 10 ...
Page 70: ...3 Using the Web Interface 3 42 January 2005 6381 A2 GB23 10 ...


