background image

• Windows 10 system: When the “DVD RW driver” window pops up from the right top corner

of computer desktop, click anywhere in the window, then click “Autorun.exe” to run the

installation procedure.

Note: 

• Some computers may be unable to auto play the CD beacase of system 

configuration. Please double click "Computer" icon, find "DVD RW driver", then 
double click "DVD RW driver" to run the installation procedure.

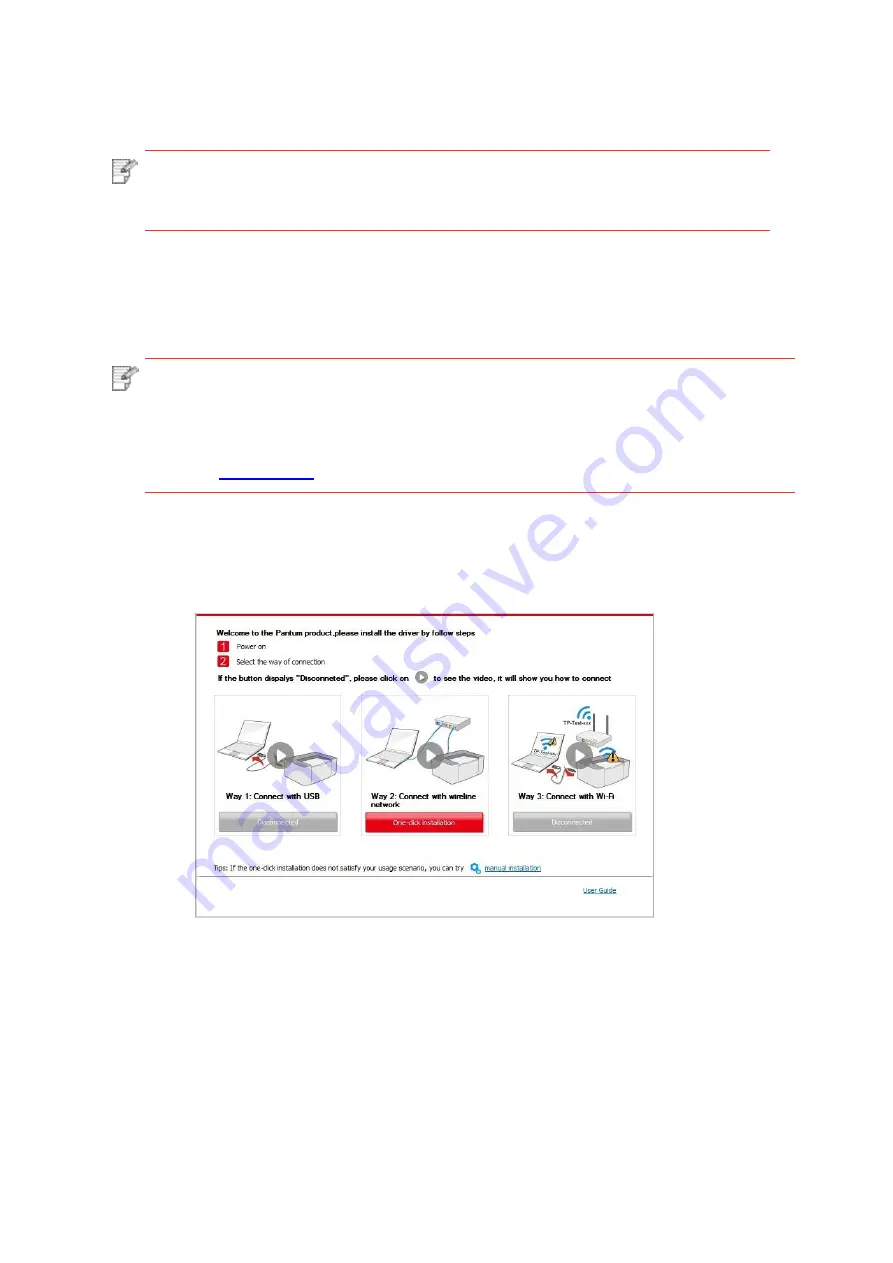
5. Click on the “I agree” button on the right buttom corner after reading the license agreement

and enter into driver installation interface.

6. Please click on the “One-click installation” button in Method II and install driver software.

Note :

• You can put your mouse cursor in the “One-click installation” button to check the 

popup information in order to confirm if the current printer is the one you need to 
install through IP address before you click the button. 
• You can check the printer IP address through “Network configuration page” (Please
see 

Chapter 12.4

 for how to print).

• Click on the “One-click installation” button to enter installation process if your software has

searched only one printer. The process may need some time, and the duration is related to

your computer configuration. Please wait patientl .

23

Summary of Contents for M6700 Series

Page 1: ...Pantum M6700 M6800 Series Pantum M7100 M7200 Series Monochrome Laser MFP User Guide It is recommended that you read this Guide carefully before using the printer ...

Page 2: ...ted Apple AirPrint and macOS are trademarks of Apple Inc registered in the U S and other countries Wi Fi Direct Wi Fi Protected Setup WPS WPA WPA2 and Wi Fi Protected Access are marks of the Wi Fi Alliance The ownership to the names of the software in this User Guide belongs to their respective companies in accordance with corresponding license agreement and they are referred for instructions only...

Page 3: ...e manual or service commitment Zhuhai Pantum Electronics Co Ltd does not make any express or implied warranty or guarantee to this User Guide including composing or words Using this product to copy print scan certain documents or images or make other forms of operations may be prohibited by the local laws If you are uncertain about the legality of using this product for certain documents or images...

Page 4: ...bel is attached to the laser components inside the printer Safety Warning Please note the following safety warnings before using the printer There is high voltage electrode inside the printer Before cleaning the printer make sure the power is turned off Plugging and unplugging the power cord plug with a wet hand can result in an electric shock The fuser unit is attached with a high temperature war...

Page 5: ...rloaded This may reduce performance and could result in fire or electric shock 10 Do not allow pets to chew on the AC power cord or the computer interface cable 11 Do not allow sharp objects piercing equipment slot so as to avoid contact with the high voltage device which otherwise may result in fire or electric shock Take care not to spill liquids onto the equipment 12 Do not disassemble the equi...

Page 6: ...range please refer to the product precautions or call Pantum Aftersales Service Centre if the toner comes off the printed contents or the equipment starts slowly 23 This product is sold as a complete machine The consumers can go to Pantum Aftersales Service Centre to purchase parts they need If the product sold is inconsistent with the package list please go to the specified Aftersales Service Cen...

Page 7: ... could void the user s authority to operate the equipment 30 The power consumption of the product with wireless function is 2 366W without wireless function is 1 888W in networked standby if all wired network ports are connected and all wireless network ports are activated 31 Shielded cables must be used with this unit to ensure compliance with the Class B FCC limits 32 This Class B digital appara...

Page 8: ...at the electrical ground connections of the power utility telephone lines and internal metallic water pipe system if present are connected together This precaution may be particularly important in rural areas Caution Users should not attempt to make such connections themselves but should contact the appropriate electric inspection authority or electrician as appropriate 36 This product meets the a...

Page 9: ... Authorized Representative This product satisfies the Class B limits of EN 55032 and safety requirements of EN60950 A battery is built in the product with the faxing feature When the product battery is scraped it should never be disposed with other household waste In order to protect the natural resources and promote the reuse of materials please separate the battery from other types of waste and ...

Page 10: ...allation 42 3 2 Mac system driver installation 43 3 2 1 Driver installation 43 3 3 Add printer to Mac system 45 3 3 1 Add up the printer via USB 45 3 3 2 Add up the printer via wireline connection 45 3 3 3 Add up the printer via wireless connection 45 3 3 4 Add AirPrint printer 46 4 Wired network setup applicable to wired network models 47 4 1 Set IP Address 47 4 1 1 Automatic Setting 47 4 1 2 Man...

Page 11: ... 8 4 2 Intensity 74 8 4 3 Resizing 75 8 4 4 Multipage 75 8 4 5 Clone 76 8 4 6 Poster 76 8 4 7 Collated copy 77 8 4 8 Duplex copy 77 8 4 9 Paper setting 79 8 5 ID copy setting 79 8 5 1 Arrangement mode 80 8 5 2 Intensity 80 8 5 3 Paper dimension 80 8 6 Receipt setting 81 8 6 1 Intensity 81 8 6 2 Paper setting 81 9 Scan 82 9 1 Pull Scan 82 9 1 1 Pantum Scan Application 82 9 1 2 TWAIN Scan Driver 83 ...

Page 12: ...ow to use AirPrint mobile printing 111 12 General Settings 112 12 1 System Settings 112 12 1 1 Ink saving setting 112 12 1 2 Language Setting 113 12 1 3 Restore Factory Settings 113 12 1 4 Sleep Time Setting 114 12 1 5 Mute printing 114 12 1 6 Print a Page for Clean Fix 115 12 1 8 Sound volume 116 12 1 9 Time date 116 12 2 Network Settings 117 12 3 Network Information 117 12 4 Print information re...

Page 13: ... 140 14 5 Falla de fax 143 15 Menu Structure 145 16 Product Specification 146 16 1 Overview of the Specification 146 16 2 Print Specification 148 16 3 Copy Specification 148 16 4 Scan Specification 148 16 5 Fax Specification applicable to machine with a fax 149 14 3 Error Message 136 ...

Page 14: ...te This product series is subject to additions or changes without prior notice For machine with the fax feature it needs to execute language system and fax settings following instructions on the panel in first startup or after restoring to factory settings For this user manual the ADF is short for automatic document feeder M6700DW M6760DW series M7100DN series M7100DW series M6800FDW M6860FDW seri...

Page 15: ...Note The Pantum Warranty may not be attached in some regions 1 2 Supplied Accessories Name Toner cartridge Parts Drum component USB Interface Cable Power Cord CD Quick Setup Guide Pantum Warranty 2 ...

Page 16: ...r Open the cover of scanner to place the scanned originals on its glass plate 5 Output Bin For storing the printed paper 6 Front USB interface This is used to scan to an U disk without a computer 7 Control Panel Indicate printer status to conduct set operation 8 NFC Near Field Communication label Touch this label on mobile device to download or start Pantum printer App and connect Wi Fi Directly 9...

Page 17: ...Interface 6 Rear Cover 7 Duplex Printing Unit For connecting product to power with power cord For paper release when it gets jammed Telephone line interface used for connection of this product to the telephone circuit Extension interface used for connection with external extension telephone Note Printer appearance may differ because of various models and functions 11 Front Cover 12 Manual feed tra...

Page 18: ...l consumables provided as any damages caused by non original consumables are not covered by the scope of warranty Toner cartridge appearance may differ because of multiple volume and models so the schematic diagram is only for your reference 1 4 Laser Toner Cartridge Laser toner cartridge is composed of drum component and toner cartridge Service life of drum component About 12000 Pages Based on IS...

Page 19: ... 7 Cancel Execute cancel operation Idle state interface under copy mode to reset the Number of Copies to 01 8 Start Button This is used to start relevant operations after finishing operation settings In case of a feed failure please press this key for pick up and printing again 6 Short press Wi Fi button to turn on direct Wi Fi connection of the printer and automatically print out Mobile Device Wi...

Page 20: ...Please see Chapter 1 6 Control panel with the fax feature No Functions 1 LCD Display Display operation interface and product information Dial or input letters numbers or characters Please see Chapter 1 5 2 3 Press this button to enter into the Fax mode 4 Press this button to enter into copy mode Name 5 Press this button to enter into scan mode 6 Speaker This is used to manually receive and send fa...

Page 21: ...4 Menu Open the main menu of control panel 15 Back Return to the previous menu 16 OK Confirm the selection on screen 17 UP Scroll through the menus and options Increase 1 copy on the ready interface of Copy mode 18 Down Scroll through the menus and options Decrease 1 copy on the ready interface of Copy mode 19 Status Light Indicate the status of printer Please see Chapter 1 6 8 Short press Wi Fi b...

Page 22: ...rd the symbol could not be input with the Redial Pause key When inputting a number or name short pressing Cancel could clear the last number or character while to clear all numbers or characters please long press it You may also use the Up key to clear the last number or character Keys Numbers letters and characters distributed 0 0 1 1 2 a b c A B C 2 3 d e f D E F 3 4 g h I G H I 4 5 j k l J K L ...

Page 23: ...on Toner cartridge error uninstalled ink cartridge unmatching ink cartridge invalid toner cartridge Drum unit error the drum units are not installed not compatible or come to the end of their service lives Paper error a paper out paper jam or feed failure occurs Scan error a scanning failure occurs and the ADF has an open cover or a paper jam Fax error or printer error such as the front cover of t...

Page 24: ... B5 A5 A6 B6 Monarch Env DL Env C5 Env NO 10 Env C6 Env Japanese Postcard ZL 16K Big 16K 32K Big 32K Yougata4 Postcard Younaga3 Nagagata3 Yougata2 Custom 60 200 g m 1 pages Media Type Media size Media weight Maximum capacity of the tray Note 80 g m standard paper is recommended for this printer It is not recommended to use special paper extensively which may affect the service life of the printer ...

Page 25: ...ype and size in the print settings so as to get the best print effect Please observe the following standards Types of Print Media Correct Practices Incorrect Practices Label Paper Use labels with no exposed lining paper only Labels shall be put flat when using Use labels of full sheet only There is no guarantee that all the labels in the market can meet corresponding requirements Use wrinkled blis...

Page 26: ...cates the non printing area and non scanning area Usage Paper Size Top and bottom margins A Left and right margins B Printing A4 5mm 0 197inch 5mm 0 197inch Letter 5mm 0 197inch 5mm 0 197inch Scan A4 5mm 0 197inch 5mm 0 197inch Letter 5mm 0 197inch 5mm 0 197inch 13 ...

Page 27: ...eder Tray 1 Slide out the automatic feeder tray from the printer 2 Slide the clip of extended tray of auto feed tray paper length deflector and paper width deflector to the slot suitable for paper size in order to match paper length and width Note Note Do not overly squeeze the paper length guide and paper width guide otherwise it could easily lead to deformation of paper 14 ...

Page 28: ...rinted document after the printing is complete Note If more than 250 pages 80 g m are put inside the auto feed tray at one time paper jam or paper feed failure will be led to If carrying out single sided printing please make sure that the side to be printed the blank side is face down It is recommended that you raise the output tray to prevent the paper from slipping and falling after printing If ...

Page 29: ...r from slipping and falling or immediately remove the printed document after the printing is complete 2 Open manual feed tray 3 Slide the paper deflector of manual feed tray to match the two sides of paper Do not use excessive force otherwise paper will be made jammed or skewed 16 ...

Page 30: ...the second piece inside according to the above steps to continue printing Slow action will lead to the prompt of paper out or paper failure of manual feed tray After paper is put inside printing will be resumed automatically too quick action may make paper caught up in the printer which will easily result in paper jam Note The printer will enter manual feed mode automatically when you put papers i...

Page 31: ... Plain paper thin paper thick paper transparent film carton paper label paper envelope A4 A5 B5 Letter Full Scanning Platen Custom 2 5 1 Scanning With Tablet Note Printer appearance may differ because of various models and functions so the schematic diagram is only for your reference Steps of Use 1 Lift up the scanner cover 2 Load the manuscript face down 18 ...

Page 32: ... printing effect poor Please make sure that there is no dust fluff etc on the paper Paper shall be put on a flat surface and stored under a cool and dry environment To avoid influencing the definition please don t open the scanner cover during scanning with the platen If the manuscript does not match with any size marker please align the upper left corner of the manuscript with the arrow Please pu...

Page 33: ... feeder ADF 1 Put the original into the ADF with its front upward and top fed first 2 Adjust the document guide till it gets close to the paper stack Note The ADF supports feeding 50 pieces of paper at most that should be fed one by one 20 ...

Page 34: ...em Pop up Autoplay interface click Autorun exe to run the installation procedure Windows 8 system When the DVD RW driver window pops up from the right top corner of computer desktop click anywhere in the pop up window then click Autorun exe to run the installation procedure Windows 10 system When the DVD RW driver window pops up from the right top corner of computer desktop click anywhere in the w...

Page 35: ...e of printer to make sure the printer is connected to computer network please refer to Chapter 4 for network setup 4 Place the attached installation CD in the computer CD ROM Windows XP system automatically run the installation procedure Windows 7 Vista Server 2008 system Pop up Autoplay interface click Autorun exe to run the installation procedure Windows 8 system When the DVD RW driver window po...

Page 36: ...into driver installation interface 6 Please click on the One click installation button in Method II and install driver software Note You can put your mouse cursor in the One click installation button to check the popup information in order to confirm if the current printer is the one you need to install through IP address before you click the button You can check the printer IP address through Net...

Page 37: ...has searched several printers click on the One click intallation button and the printer list interface will pop up Please select the printer that you need according to your printer wired network IP address or host ID 24 ...

Page 38: ... 1 The printer is not connected with wireless network 3 1 1 3 1 1 Configure wireless network via USB cable and install driver Since some computers are not provided with wireless network function this section is divided into Connect computer to router via Wi Fi and Connect computer to router via wired connection to introduce installation process I Connect computer to router via Wi Fi 1 Computer is ...

Page 39: ...ork configuration page Please see Chapter 12 4 for how to print 4 Click on the I agree button on the right buttom corner after reading the license agreement and enter into driver installation interface 5 Click the One click installation button in Method III to install driver software Click One click installation button if your software has searched only one printer and enter into installation proc...

Page 40: ...atic network configuration and driver installation Note When the printer IP address changes under printer driver installed with host ID you can also directly print without re installing the driver If you need to install the printer driver with the host ID please check the option Install the printer in the list with host ID 6 After the installation click Print Test Page button If your printer print...

Page 41: ...of computer desktop click anywhere in the window then click Autorun exe to run the installation procedure Note You can put your mouse cursor in the One click installation button to check the popup information in order to confirm if the current printer is the one you need to install through IP address before you click the button You can check the printer IP address through Network configuration pag...

Page 42: ... more than one printers the printer list interface will pop up You need to configure the current printer which is connected via USB cable to wireles network and install driver Please select Configure the print via USB and install on th printer list interface and check the USB printer option Click the Confirm button and th wireless network configuration interface will pop up Input the wireless SSID...

Page 43: ...k without infrastructure mode but it still needs scenario of temporary use of printer via wireless network You can directly connect the computer that has wireless function to the printer to realize printing function 1 Turn the power of printer and computer on Note When the printer IP address changes under printer driver installed with host ID you can also directly print without re installing the d...

Page 44: ... Windows 10 system When the DVD RW driver window pops up from the right top corner of computer desktop click anywhere in the window then click Autorun exe to run the installation procedure Note Some computers may be unable to auto play the CD beacase of system configuration Please double click Computer icon find DVD RW driver then double click DVD RW driver to run the installation procedure 4 Clic...

Page 45: ...ttached installation CD in the computer CD ROM Windows XP system automatically run the installation procedure Windows 7 Vista Server 2008 system Pop up Autoplay interface click Autorun exe to run the installation procedure Windows 8 system When the DVD RW driver window pops up from the right top corner of computer desktop click anywhere in the pop up window then click Autorun exe to run the instal...

Page 46: ... IP address before you click the button You can check the printer IP address through Network configuration page Please see Chapter 12 4 for how to print Click on the One click installation button to enter installation process if your software has searched only one printer The process may need some time and the duration is related to your computer configuration Please wait patientl 33 ...

Page 47: ...please click Refresh button to search again If it is not found please check if the printer and computer are in the same network Please see Chapter 5 3 for how to check When the printer IP address changes under printer driver installed with host ID you can also directly print without re installing the driver If you need to install the printer driver with the host ID please check the option Install ...

Page 48: ...em When the DVD RW driver window pops up from the right top corner of computer desktop click anywhere in the pop up window then click Autorun exe to run the installation procedure Windows 10 system When the DVD RW driver window pops up from the right top corner of computer desktop click anywhere in the window then click Autorun exe to run the installation procedure Note Some computers may be unabl...

Page 49: ...ck Autorun exe to run the installation procedure Windows 8 system When the DVD RW driver window pops up from the right top corner of computer desktop click anywhere in the pop up window then click Autorun exe to run the installation procedure Windows 10 system When the DVD RW driver window pops up from the right top corner of computer desktop click anywhere in the window then click Autorun exe to ...

Page 50: ...ist with host ID If IP address or host name is added manually you need to know the IP address of the printer connected or host name If they are not made clear please print the NetConf Pg and view IP Address and Host name Please refer to Chapter 12 4 8 The software installs the driver automatically and the installation process may need some time The duration is related to your computer configuratio...

Page 51: ...tion procedure Windows 10 system When the DVD RW driver window pops up from the right top corner of computer desktop click anywhere in the window then click Autorun exe to run the installation procedure Note Some computers may be unable to auto play the CD beacase of system configuration Please double click Computer icon find DVD RW driver then double click DVD RW driver to run the installation pr...

Page 52: ... can also directly print without re installing the driver If you need to install the printer driver with the host ID please check the option Install the printer in the list with host ID If IP address or host name is added manually you need to know the IP address of the printer connected or host name If they are not made clear please print the NetConf Pg and view IP Address and Host name Please ref...

Page 53: ...e Windows 8 system When the DVD RW driver window pops up from the right top corner of computer desktop click anywhere in the pop up window then click Autorun exe to run the installation procedure Windows 10 system When the DVD RW driver window pops up from the right top corner of computer desktop click anywhere in the window then click Autorun exe to run the installation procedure Note Some comput...

Page 54: ...re installing the driver If you need to install the printer driver with the host ID please check the option Install the printer in the list with host ID If IP address or host name is added manually you need to know the IP address of the printer connected or host name If they are not made clear please print the NetConf Pg and view IP Address and Host name Please refer to Chapter 12 4 9 The installa...

Page 55: ...lled the driver correctly 3 1 3 Method of driver unistallation Windows 7 is taken as the example in the following operation The information on your computer screen may differ because of multiple operating systems 1 Click the Start menu of computer and then click All programs 2 Click Pantum and then Click Pantum XXX Series Pantum XXX Series where XXX represents product model 3 Click uninstall to de...

Page 56: ...ame of printer Please print the Network setup page to view it Please refer to Chapter 12 4 3 2 1 Driver installation Mac 10 11 is taken as the example in the following operation The information on your computer screen may differ because of multiple operating systems 1 Turn the power of printer and computer on 2 Insert the CD companying with printer in the CD driver of your computer and double clic...

Page 57: ...k Yes you can configure printer s wireless network via wireless network configuration tool refer to Chapter 5 1 1 for how to make configuration When configuration is completed unplug USB cable and then on the pop up Add Printer interface you may add the network connected printer refer to Chapter 3 3 for how to add printer Click No you can add a USB connected printer on the pop up Add Printer inter...

Page 58: ...r is connected to the computer network Please refer to Chapter 4 for network setup 4 Enter the System Preferences Printers Scanners of computer 5 Click button to select Add Printer or Scanner 6 Select printer and then select the corresponding printer mode from the Use menu popping out 7 Click Add 3 3 3 Add up the printer via wireless connection 1 Turn the power of printer and computer on 2 Make su...

Page 59: ...on or network connection 3 Enter the System Preferences Printers Scanners of computer 4 Click button to select Add Printer or Scanner 5 Select printer and select Secure AirPrint data encryption or AirPrint no encryption in the Use option box 6 Click Add Note When the printer is connected to computer with USB cable the system will recognize and add AirPrint automatically If AirPrint printer of netw...

Page 60: ...ill get the link local address assigned by printer automatically 169 254 xxx xxx 4 1 2 Manual Setting 4 1 1 Automatic Setting You can check the IP address of printer by printing Network setup page out please refer to Chapter 12 4 for printing method or check network information by viewing the control panel of printer please refer to Chapter 12 3 for viewing methods If the IP address is not listed ...

Page 61: ...eless network setup and Wi Fi Protected Setup WPS Note The machine with the fax feature supports automatic search of wireless network through the printer s control panel to select the wireless network you desire and then input its password for connection Important Before wireless network installation you must learn about the service set identifier SSID and password of your access point in order to...

Page 62: ...ies Wireless Network Select Yes I have an USB cable that can be used for installation in the following interface Click Next 2 1 The computer has been connected to wireless network 1 The currently wireless network currently connected to computer is selected as wireless network configuration tool by default Complete configuration according to interface prompt Configuration Tool on the computer Finde...

Page 63: ...yption method used 2 WEP Send and receive data via security key by using WEP Wired Equivalent Privacy WEP key is applicable to 64 digit and 128 digit encrypted network and can contain numbers and letters at the same time 3 WPA WPA2 it is the pre shared key PSK of Wi Fi protected access which connects wireless device and access point via TKIP or AES encryption WPS Personal The working length of WPA...

Page 64: ... prompt Note If you do not know the SSID of access point wireless router please click Print Wireless Network Information Page to view the SSID of the needed access point wireless router If the printer cannot be used normally after wireless network setup is finished please install the drive again 3 Use WPS connection Select No I don t have a USB cable in the interface below and then click Next 51 ...

Page 65: ... to Chapter 5 1 2 for detailed WPS configuration 2 Judge if the printer is successfully connected according to the status of Wi Fi indicator on printer If configuration failed please click Previous to configure again if configuration succeeded please click Done to complete configuration 52 ...

Page 66: ...ease install a driver if you want to print via wireless network If the connection is not established after more than 2min the printer will return to its ready state the Wi Fi indicator will be off and Wi Fi Protected Setup WPS connection will fail If it is needed to connect again please repeat steps 3 4 above 53 3 Press Wi Fi button on the printer panel for over 2s until the Wi Fi indicator flashe...

Page 67: ... on direct Wi Fi connection of the printer by short pressing Wi Fi button on the panel 5 2 2 1 Connection method of wireless client that supports Wi Fi Direct feature direct invitation to connect You must use mobile devices that support Wi Fi Direct function for Wi Fi Direct connection The operating steps may differ because of the mobile device you are using 1 Turn on printer power 2 Turn on the m...

Page 68: ...r or mobile device with wireless network function select the SSID of Wi Fi Direct and input password to connect 5 2 3 How to disable the Wi Fi Direct 1 Turn on printer power 2 Press Menu Network Set Wi Fi Direct and then Off on the printer s control panel to disable Wi Fi Direct Note In case of auto connection mode the mobile device will start to connect automatically after initiating connection i...

Page 69: ...d printer are connected in the same network but they cannot be searched the communication might be blocked by firewall software Please refer to the user guide of firewall software to turn firewall off and then try to search the printer again Inspect if the IP address assignment of printer is correct You can inspect IP address by printing the network setup information page of printer out to access ...

Page 70: ...nternet Explorer 8 0 or higher version or Firefox 1 0 or higher version Mac users are suggested to use Safari 4 0 or higher version No matter what kind of browser you are suing please ensure that JavaScript and Cookies are always enabled Please ensure compatibility with HTTP 1 0 and HTTP 1 1 when other network browsers are used 6 2 Use Web server to manage printer You can use the embedded Web serv...

Page 71: ...5 1 6 2 1 1 IPv4 setup 1 Turn on printer power to connect printer to network 2 Log in the embedded Web server please refer to Chapter 6 1 for login method 3 Click Settings Network settings Protocol Settings Wired IP Configuration 4 Set the IPv4 address assignment mode as Manual 5 Input IPv4 Address Subnet Mask and Gateway Address and then click Apply IPv4 address of the printer is divided into DHC...

Page 72: ... in the embedded Web server please refer to Chapter 6 1 for login method 6 2 2 1 Wireless network 1 Click Settings Network settings Wireless setup Wireless Network 1 If you need to set up wireless network please click the SSID of access point wireless router in search list input secret key and click Apply 6 2 2 2 Wireless IP setup Only when the wireless network of printer is turned on the Wireless...

Page 73: ...ss Book 2 Click Add input recipient address and then click Apply III Set up email notification 1 Click Settings Machine settings E mail Notification 2 Click button and select the email addresses you want to add in the list of contacts popping out You can also tick address X such as address 1 and input the email addresses you want to add 3 Tick the email addresses and notification contents you want...

Page 74: ...mail address to be added in the contact name e mail address listbox and then click Apply Note If some groups have been created you may click to check a corresponding group to add the newly created e mail address into it Log in the embedded Web server please refer to Chapter 6 1 for login method Click Settings Machine settings System 1 2 3 Click Create to pop out a window as below and edit the cont...

Page 75: ...can a file to the FTP server you need to configure the FTP address book first When scanning you may send the image scanned to the FTP server Before configuring the FTP address book you may need to ask your network administrator for the server IP address port number login name password and server name 1 Log in the embedded Web server please refer to Chapter 6 1 for login method 2 3 Click Settings M...

Page 76: ...Two Sided Printing Collate Print Reverse Print N in 1 Poster Print for Windows Operation System only Zoom Print Custom Size Note Windows 7 is taken as example in the above description You can realize poster printing feature by selecting 2x2 poster printing in multipage You can enable printing preference and click the help button to view detailed function description Please refer to Chapter 7 9 for...

Page 77: ...to printer setup 7 3 Cancel printing If you want to cancel the operation during printing please press Cancel key on the printer s control panel 7 4 Printing Mode 7 4 1 Printing with the Automatic Feeder Tray Before printing please make sure mediums of corresponding quantity have been installed inside the auto feed tray and there is no printing medium in the manual fed tray The printer can print wi...

Page 78: ...ter 2 for putting papers inside manual feed tray Please refer to Chapter 2 1 for type of mediums that can be printed via manual feed tray 7 5 Automatic Two Sided Printing The printer supports automatic two sided printing of plain paper Paper size supported by the automatic two sided printing A4 Letter Legal Oficio Folio 16K Note Trying the automatic two sided printing may damage the printer if som...

Page 79: ...f duplex printing unit As for duplex printing of A4 and 16K papers the slide should be adjusted to the A4 position as for Letter Legal Folio and Oficio duplex printing the slide should be adjusted to the Letter position 2 Make the backside of duplex unit up 3 Adjust paper size slide to A4 or Letter position to finish setting up 4 Install the duplex unit in the printer 66 ...

Page 80: ...7 5 2 How to carry out auto duplex printing 1 Open the print job to be printed from the application such as a Notepad 2 Select Print from the File menu 3 Select printer of the corresponding model 67 ...

Page 81: ...ingle click Preferences for printing setup 5 Select the Duplex in Basic tab and then select Long Edge or Short Edge 6 Single click OK to finish printing setup Click Print to realize auto duplex printing 68 ...

Page 82: ...6 Fine mode printing The Fine mode is applicable to engineering drawings and fine lines printing Set up fine mode in the basic page of printer preference After setup fine printing mode can be realized 69 ...

Page 83: ...ng to needs 6 Click Print to realize mute printing Note Printers with LCD control panel can be set to mute printing with keys on If the Mute Printing is set the printing noise will be reduced but the printing will slow down to some extent The operating steps of mute printing are as follows applicable to printers that are installed via USB connection Windows 7 is taken as the example in the followi...

Page 84: ...off function through control panel keys Please refer to Chapter 12 1 6 1 Enter computer Start Menu Control Panel View Devices and Printers 2 Right click printer select Printer properties in drop down list 3 Enter Secondary Settings option and set Auto shu off setting 4 Click OK to finish setting Individual countries or regions do not support auto off setting 71 ...

Page 85: ...en Help Document You can open the Printing preferences and click Help button for Windows Operation System only The help document contains the user guide where you can find the information on print settings 72 ...

Page 86: ...ess OK Press cancel key on control panel if canceling copying 8 3 Copying cancel Instructions Print a multi page document to a piece of paper Multipage Copy Common copying Clone Print several identical images to a piece of paper Poster Print a one page original to pieces of paper ID card copying Collated copy Collate copies of an original Duplex copying It supports manual duplex copying for origin...

Page 87: ...e quality intensity resizing and paper setting can keep valid after Select corresponding image quality mode for original document used in order to improve copying effect There are 4 modes in total Auto default mode applicable to text and image originals Text image applicable to originals with mixed text and image Note The image quality mode supports automatic mode only after poster and collated co...

Page 88: ...anual adjustment applies to copying with glass platform only the adjustment scope of which is 25 400 and 5 can be adjusted each time after direction key is pressed once 8 4 4 Multipage With setting on all in one feature a 2 or 4 page document could be copied to one piece of paper Copying with the ADF and the glass platen are both supported The multipage includes 3 modes 1 Two in one Note Multipage...

Page 89: ...e printing of one piece of original document on several pieces of paper The Poster feature supports only copying with the glass platen The poster copying includes 3 modes 8 4 6 Poster Through setting on clone feature you may print multiple original images on one piece of paper Copying with the ADF and the glass platen are both supported The clone copying includes 3 modes 8 4 5 Clone 76 ...

Page 90: ...Copies feature supports only copying with the automatic document feeder ADF The collated copy includes 2 modes 8 4 7 Collated copy You may use the glass platen or the ADF for duplex copying The followings are examples of copying with the ADF There are 4 modes in total for duplex copying 8 4 8 Manual duplex copying 77 ...

Page 91: ...ward and its top fed first meanwhile make sure there are some paper in the carton 2 Operate following steps described in Chapter 8 4 Select Duplex Copying and then press OK to save settings 3 Press Start to begin copying 4 Paper exited should be with the direction as shown in the figure 78 ...

Page 92: ...er dimension supports A4 and Letter only For copying with the ADF only plain paper is available in Paper Type For better copying effect you can enter the ID Card Copy Settings menu to change relevant settings 1 Press ID Card Copy and then Menu on control panel to enter the Menu Settings interface 2 Press OK to enter the ID Card Copy Settings interface 3 Press direction key to select option to be s...

Page 93: ...rd in the blue area in glass platen Note After setting the arrangement mode can keep valid before startup after startup the arrangement mode will recover to default setting 8 5 2 Intensity If arranged in modes of Full Page Up and down Half page Up and down and Half page Left and right the paper size supports A4 and Letter only if arranged in mode of A5 Long Edge the paper size supports A5 only Ple...

Page 94: ...ing interface 3 Press direction key to select option to be set and press OK key to set option For intensity setting see 8 4 2 The receipt copying supports A4 Letter B5 A5 A6 and Executive paper dimension 8 6 1 Intensity 8 6 2 Paper setting For better copying effect of bills you can enter the Bill Copy Setting menu to change relevant settings 81 ...

Page 95: ... installed in the computer 9 1 1 Pantum Scan Application You may scan with the scanning application in PC via USB wired or wireless connection Please be sure the printer has been properly connected before scanning 3 Set Scan in the right list Click Scan on the bottom right corner and start scan You may click Help F1 to open the help document of the scanning application to learn more scanning setti...

Page 96: ...ages to the open application The handbook requires Office Software Word and Excel and Photoshop for example to show the operation Operation Steps 1 Open the Office software Word or Excel 2 Keyboard shortcuts Alt I P S to open the application s window 3 Click on Device option and select TWAIN Scan click the Custom Insert button below 9 1 2 TWAIN Scan Driver 9 1 2 1 Office Software Word and Excel 83...

Page 97: ...can information in the right list of Basic Setting and Advanced Setting Click on Scan and start scan If you desire to change a scanning port please click Port at the lower part of above picture to select a scanning port as shown below 84 ...

Page 98: ...lease refer to Step 4 of 9 1 2 1 to see the specific operation steps 1 Office Software Word and Excel Operation Steps 1 Open the Office software Word or Excel 2 Keyboard shortcuts Alt I P S to open the application s window 9 1 3 WIA Scan Driver 9 1 3 1 WIA1 0 Scan Windows XP Windows Server 2003 9 1 2 2 Photoshop Operation Steps 85 ...

Page 99: ... is shown below set the scan information 5 Click on Adjust the Scanned Image Quality on the bottom left corner of the above picture the advanced properties interface will pop up then users can set the scan After finishing the settings click on the OK button then Scan button to start scan 86 ...

Page 100: ...r the window pops up please refer to Step 4 and Step 5 of 9 1 3 1 to see the specific operation steps 1 Launch Photoshop click File Import on the top left conrner and select WIA Scan as is shown below Operation Steps 87 ...

Page 101: ...select the printer you want to use and right click the mouse 1 Click on Start All Programs Device and Printer on the left bottom of the desktop 9 1 3 2 WIA2 0 Scan Windows Vista Windows Server2008 and later versions Operation Steps 88 ...

Page 102: ...4 After the window pops up set the scan and click Scan on the bottom right corner and start scan 3 Click on Start Scan in the above option bar 89 ...

Page 103: ...er driver click System Preferences icon on the bottom left corner of the computer desktop 2 After the window pops up click on Print and Scan 9 2 Mac System Scan 9 2 1 ICA Scan 9 2 1 1 Open ICA via Print and Scan Operation Steps 90 ...

Page 104: ...3 After the window pops up click on Scan 4 Click on Open Scanner and the scan window will pop up 91 ...

Page 105: ... Click on Finder icon on the bottom left corner of the computer desktop or use keyboard shortcuts command shift C to open the window Find Image Capture in Applications or conduct keyboard shortcuts command shift A to directly switch to Applications and click to launch the application 9 2 1 2 CallCIA throughapplications Operation Steps 92 ...

Page 106: ...n the bottom right corner and start scan 2 After the window pops up please refer to Step 4 of 9 1 2 1 to see the specific operation steps 9 2 2 TWAIN Scan Take Photoshop as an example 1 Launch Photoshop click on File Import on the top left corner and select TWAIN Scan as is shown below Operation Steps 93 ...

Page 107: ...us scanning is available if scanning with the ADF 4 Press Menu and then OK to enter the Scan Setting interface 5 Press or to select Scan To options then press OK 1 Be sure the printer and the computer are both switched on and connected with each other properly 2 Put an original on the glass platen or into the ADF please see Chapter 2 5 for how to put an original 3 Press Scan and then or on control...

Page 108: ...to enter the Scan Setting interface 7 Press or to select Scan To options then press OK 8 Press or to select Scan to E mail and press OK button 9 Press or to select E mail Address Book or Group Mail and press OK button 10 Press or to select address or group and then press OK button press Start button to start scan 11 For merge scan please put files to be scanned on the glass platen and then press S...

Page 109: ...ss Menu and then OK to enter the Scan Setting interface 6 Press or to select Scan To options then press OK 7 Press or to select Scan to FTP and press OK button Be sure the user is in an Internet connected environment in scanning files to FTP server If you want to scan large files you may need to input the server address user name and password to log in the server with specific operation steps as b...

Page 110: ...to select Scan to USB and then press OK press Start to begin scanning 7 9 3 4 Scan to U disk For merge scan please put files to be scanned on the glass platen and then press Start to scan the next page directly continuous scanning is available if scanning with theADF The printer will create a folder named PantumScan in which all scanned files are saved in PDF or JPG 1 Press Cancel button on the co...

Page 111: ... analog phone service PSTN Public Switched Telephone Network in connecting telephone line If a digital environment for examples DSL PBX ISDN or VoIP used please be sure to use a proper filter and configure digital settings correctly For more information please contact your digital service provider 2 Press OK button to enter the Fax setting interface 10 2 Fax Settings You may follow the steps below...

Page 112: ... supports inputting several numbers to be faxed one by one with the ability of up to 20 fax numbers sent to at the same time 7 With the feature of delay in sending you may set the fax number and delay time of sending within 24 hours making the fax sent upon the time set 30 fax jobs at most supported now Forward the Received After enabling Forward to Fax please set the number to be forwarded upon r...

Page 113: ...buttons to enter the Fax number 3 Press the Start button to start scanning the document 4 If the original is put on the glass platen the printer will give a prompt of Scan the Next Page after scanning one page If the next page exists please remove the original scanned and put the next page on the glass platen then press Start After all pages have been scanned please press OK To adapt to different ...

Page 114: ...ive Fax and the default for the printer is Fax mode Telephone mode determine each call from the calling party as a call With this mode you may need to pick up the receiver manually and then press Start on control panel to receive the fax 5 After all scanning complete activate the fax to send Note In order to prevent damage to this product do not use a manuscript with correction tape correction flu...

Page 115: ...leted perfectly Please replace with a new toner cartridge or find out the Low in Toner Continue to Print option among the fax receiving setting options and then set it as On for continuous printing 1 Switch to VOIP Compatible mode with panel setting Please follow steps below to set 1 After the machine is ready press Fax and then Menu to enter the Menu Settings interface 2 Press OK to enter the Fax...

Page 116: ...ument to the memory and get back to Ready state You can forward the Fax you receive When you receive a Fax job it will be stored in memory at first Then the printer dials the Fax number you have specified and send the Fax If a fax fails to be forwarded due to busy line or line failure This printer will print a copy of fax contents to be forwarded for backup If the Redial feature is set it will pri...

Page 117: ...nu key then press OK button enter the fax parameter setting interface select Contacts Group calls enter the group call interface select the group dial to enter the group dial interface select one of the groups and press the Start button to begin group Faxing You can set a maximum of 10 groups for Group Dial with up to 99 numbers in each group 10 4 PC Fax PC Fax function allows you to send a docume...

Page 118: ...ace 5 Enter the Name and Fax Number then click Add to recipient list If you want to send the Fax to multiple addresses you can continue to enter their Name and Fax Number then click Add to recipient list 6 Click Send to start sending the Fax 105 ...

Page 119: ...lication has been installed and connected to wireless network properly before use 11 1 1 Operating systems supported Pantum Print APP is applicable to Android OS 4 4 9 0 and iOS 6 0 or later 11 1 2 How to download Pantum App How to download it for Android mobile device 1 You can download it from its official website http www pantum com Service support Driver download Select printer model Download ...

Page 120: ...mands Note If failure of operation please check if your Android mobile device has access to the wireless network into which your printer is connected If the Android device cannot detect any printer please inspect if power of the printer is turned on and if the printer is turned on habit to add theprinter For more details please refer to the mobile print user guide attached 107 ...

Page 121: ...er 2 Connect the iOS mobile device with wireless network of the printer Please refer to Chapter 5 for how to connect 4 Select the function you want and then do relevant settings to meet your functional demands Note If failure of operation please check if your iOS mobile device has access to the wireless network into which your printer is connected If the iOS mobile device did not detect any printe...

Page 122: ...opria org for downloading and installing this APP 11 2 3 Preliminary preparations 1 A printer that has wireless network function 2 Android mobile device 11 2 4 How to use Mopria mobile printing Before printing please set the Mopria print service as ON 1 Tap the settings of the Home Screen on Android mobile device and select print 2 Set the Mopria print service as ON All other printing plug ins sho...

Page 123: ...tion 2 Android 5 0 or higher version mobile devices support NFC function and Wi Fi Direct function 11 3 2 How to use NFC function to print 1 Inspect if the NFC and Wi Fi Direct function are enabled on the mobile device and if Wi Fi Direct function of printer is enabled Please refer to Chapter 12 2 for how to enable Wi Fi Direct function 2 Knock gently the NFC mark that indicates the NFC antenna on...

Page 124: ...as an example for explanation 1 Turn on printer power 2 Connect the iOS mobile device with wireless network of the printer Please refer to Chapter 5 for how to connect 3 Open the files you need to print in the format of PDF on the iOS device 4 Click 5 Tap print 6 Please make sure the Pantum printer is selected If you select other printers or no printer please click printer option and then select y...

Page 125: ...ngs 12 1 1 Ink saving setting 1 Press Menu to enter the menu setting interface 2 Press or to select System Setting and then press OK 3 Press or to select Toner save set and then press OK to enable disable the Ink Saving mode You can select the save toner mode which can reduce toner consumption and reduce printing cost When save toner mode is on the printed color will be lighter Save toner mode is ...

Page 126: ...ting 1 Press Menu to enter the menu setting interface 2 Press or to select System Setting and then press OK 3 Press direction key or to select the Restore set option and press OK Note Factory settings of network printer can be recovered via embedded Web server please refer to Chapter 6 2 3 5 12 1 3 Restore Factory Settings Restore factory settings is used to recover the default settings of printer...

Page 127: ...the embedded Web server Please refer to Chapter 6 2 3 4 12 1 5 Mute printing Sleep mode can reduce the energy consumption of printer effectively and Sleep time setting can be made in the idle time before the device enters sleep mode Set mute mode to realize low speed printing with low noise When mute mode is on printing will be in a low speed This mode is off by default 1 Press Menu to enter the m...

Page 128: ...ual countries or regions do not support auto off setting 12 1 7 Auto shut off setting Auto shut off setting to set off condition and off delay of printer 115 12 1 6 Print a Page for Clean Fix Print a Page for Clean Fix function can clean the toner paper powder and other inpurities so as to realize better printing effect The printer will start up Print a Page for Clean Fix function automatically af...

Page 129: ...lect Sound Volume and then press OK to do settings on Prompt Tone Ring Tone Fax Tone and Master Volume 12 1 9 Time date applicable to machine with the fax feature You may set the time and date with the Time Date option 1 Press Menu to enter the menu setting interface 2 Press the OK button to select System Settings option 3 Press or to select Time date and then press OK to do settings on Date Time ...

Page 130: ...n 3 Press OK key to set Network set wireless network setting and Wi Fi Direct 12 3 Network Information You can check the network status through Network Information 1 Press Menu to enter the menu setting interface 2 Press direction key or and select Network info option and press OK key to view wired network information wireless network information and Wi Fi Direct information 117 ...

Page 131: ...roduct reports that could be printed include Demo page information page menu structure page network configuration e mail address group e mail FTP address and Wi Fi hotspot Note The product report above is the most complete version and may be different 12 5 Residual amount of toner You may check the current residual amount of toner in cartridge with the printer s control panel 1 Press Menu to enter...

Page 132: ...ministrator 12 7 Configure the FTP address book Applicable to machine with the fax feature 1 Press Scan and then Menu on control panel to enter the Menu Setting interface 2 Press OK to enter the Scan setting interface 3 Press or to select FTP Add book and then press OK to execute operations of Create Edit Check and Delete Note before configuring the FTP address book you may need to consult your ne...

Page 133: ...rt time after use To prevent burns please don t directly touch places labled with high temperature warning in contact with internal components after opening the printer s front or rear cover 1 Use a soft cloth to wipe the outside of the printer clean 2 Open the scanner cover and then wipe the glass platen gently with a soft cloth 13 1 Cleaning the Printer schematic diagram is only for your referen...

Page 134: ...artridge put the toner cartridge in a protective bag or wrap it with thick paper to avoid direct light damaging the toner cartridge 4 Clean the inside of the printer by gently wiping the shaded area as shown in picture with adry and lint free cloth 5 Wipe the LSU lens of printer gently with dry lint cloth 121 ...

Page 135: ... tray and wipe the pickup roller gently with dry lint cloth Note the machine with the ADF should be regularly cleaned removing dirt on the top cover of the ADF Please wipe the place as shown in figure with a soft cloth 122 ...

Page 136: ...es or mouth please wash it with clear water immediately or see a doctor if feeling unwell When placing the cartridge please stay away from children may contact area 2 Service life of toner cartridge The service life of toner cartridge is depending on the toner quantity needed by printing When a prompt that The Toner Cartridge life Expired appears on the display it indicates its service life expire...

Page 137: ...Open the front cover and then remove the laser toner cartridge along the guide rail 3 Press the blue button on the left side of drum component with left hand and lift the toner cartridge handle with right hand at the same time to take the toner cartridge out 124 ...

Page 138: ...toner inside can be uniformly dispersed 5 Pull the seal out and take the toner protection cover out 6 Install the drum component along the inner track to finish installing toner cartridge 7 Take the drum component with toner cartridge installed and install it inside the printer along the inner track of printer to finish installing 125 ...

Page 139: ...wer off the printer 2 Open the front cover and take the laser toner cartridge out along the track 3 Press the blue button on the left side of drum component with left hand and lift the toner cartridge handle with right hand at the same time to take the toner cartridge out 126 ...

Page 140: ... drum component on a horizontal table 5 Install the drum component along the inner track to finish installing toner cartridge 6 Take the drum component with toner cartridge installed and install it inside the printer along the inner track of printer to finish installing 7 Close the front cover 127 ...

Page 141: ...dge is installed correctly The paper is correctly loaded into the tray The interface cable between the printer and the computer is connected correctly The correct printer driver has been selected and installed properly The computer port is properly configured and is connected to the correct printer port 14 1 Cleaning Jammed Paper 14 1 1 Middle jam Note When removing the paper jam please don t touc...

Page 142: ...2 Gently pull the jammed paper out 3 Install paper tray 4 Open the front cover 129 ...

Page 143: ...the protection bag or warp it with thick paper 6 Gently pull the jammed paper out 7 After taking out papers jammed install the laser toner cartridge again and close the front cover then the printer will recover printing 14 1 2 Paper Jam in the Fuser Unit Note When papers jammed in fuser unit are taken out please pay attention and do not touch the shaded area shown below in order to avoid burns 130...

Page 144: ...1 Open the front cover and then remove the laser toner cartridge along the guide rail 2 Open the rear cover 3 Open the fuser door using the handles on both sides 131 ...

Page 145: ...ntly pull the jammed paper out 5 Close the back cover after removing the paper jammed 6 Install a new toner cartridge and then close the front cover then the printer will recover printing automatically 132 ...

Page 146: ... the duplex printing unit from the back of the printer 2 Remove the jammed paper from the duplex unit 3 If the paper does not come out along with the duplex unit open the tray and remove the jammed paper directly from the bottom 133 ...

Page 147: ...air center or send the printer to the nearest Pantum authorized service center for repair Printer appearance may differ because of various models and functions so the schematic diagram is only for your reference 14 1 4 A paper jam occurs on the automatic document feeder ADF 1 Open the ADF s top cover 2 Remove the paper jammed from the ADF 4 After taking papers jammed out install the duplex unit ba...

Page 148: ...g the paper jamed close the top cover and then the printer will be back to the ready state 4 If it is difficult to remove the paper jammed please try to open the scanner cover and remove it from the pressing block 135 ...

Page 149: ...maged The laser toner cartridge is installed correctly or new laser toner cartridge is replaced Toner Low this prompt is displayed together with the standby picture alternately The toner in cartridge runs low Please replace with a new toner cartridge As the toner is low it is not available to accept the printing job this prompt is displayed together with the standby picture alternately If the tone...

Page 150: ... prompt appears when there is a feed jam or feed failure in copying or scanning with the ADF Please remove the paper jam arrange well and put originals into the ADF for scanning again Note If the problem remains please contact Pantum Customer Service 14 4 1 Common Trouble Trouble Type Solution Problems in printing See 14 4 2 Image Defects See 14 4 2 Image Defects Failed to copy The scanner is dama...

Page 151: ... uninstall and then reinstall the printer driver Online printing does not work The cable between the computer and the printer is not connected properly Printer internal failure Please disconnect the printer cable and then connect it again Please uninstall and then reinstall the printer driver Problems in scanning Scanning error Data cable of the device is not properly connected The scan driver is ...

Page 152: ...ere is foreign matter in the feed channel The pickup roller is dirty Internal parts failure Take the excessive papers out from paper tray please print with manual feed tray if special printing medium is used to print Take the excessive papers out from paper tray please print with manual feed tray if special printing medium is used to print Clean the paper path Please clean the pickup roller Print ...

Page 153: ...e the original toner cartridge Please use the print media within the specification range Clean the paper path Clean the platen glass White spots The print media that does not meet usage specification is used For example the media is damp or too rough The paper path is dirty Inner damage of toner cartridge The reflective glass of the laser inside the printer is dirty Please use the print media with...

Page 154: ... platen glass may be dirty Please use the print media within the specification range Clean or replace toner cartridge Clean the paper path inside the printer Please close the cover on the manuscript and then carry out copying and scanning Clean the platen glass Cyclical traces appear Dirty toner cartridge Damaged inner parts of toner cartridge The fuser component is damaged Clean or replace toner ...

Page 155: ...t and then carry out copying and scanning The toner does not adhere to the paper The print media that does not meet usage specification is used For example the media is damp or too rough The inside of the printer is dirty Toner cartridge is damaged The parts inside the printer are damaged Please use printing medium within the specification scope and use manual feed tray for printing in case of spe...

Page 156: ...Chapter 10 3 2 to set the receiving mode as Fax Mode Make sure the fax is set with the correct receiving mode Please see Chapter 10 3 2 to select the receiving mode If the telephone line is interfered please try to set it as VoIP in compatibility For compatibility setting please see Chapter 10 3 3 The toner cartridge comes to the end of its expected service life Please replace it Please see Chapte...

Page 157: ...n A prompt of Communication Failure appears in printing the fax confirmation report Change the audio pulse settings Please set in the fax sending menu with the dialing way supported for telephone line The telephone line may suffer from temporary noise or electrostatic interference Please send the fax again Please try to set as VoIP in compatibility and then send again Please see Chapter 10 3 3 for...

Page 158: ...ter on the panel menu you may know and set various functions The steps of printing are as follows 1 Press Menu to enter the menu setting interface 2 Press or to select Information Report 3 Press OK and then or to select Print Menu Structure 4 Press OK to print 145 ...

Page 159: ... Series 415mm 360mm 352mm Product weight exclusive of the random toner cartridge and packaging M6700 Series 9 5Kg M6800 M7100 M7200 Series 10Kg Print Environment Print temperature range 10 32 5 35 Print humidity range 20 RH 80 RH Power Voltage 110V Model AC100 127V 50Hz 60Hz 9A 220V Model AC220 240V 50Hz 60Hz 4 5A Noise acoustic pressure level Print scan 52dB A Standby 30dB A Mute mode 46 dB A Ent...

Page 160: ...ing Operating System Microsoft Windows XP Windows Vista Windows 7 Windows 8 Windows 8 1 Windows 10 Windows Server 2003 Windows Server 2008 Windows Server 2012 32 64 Bit macOS 10 8 10 9 10 10 10 11 10 12 10 13 10 14 Linux Ubuntu 14 04 Ubuntu 16 04 Ubuntu 18 04 Versions higher than iOS 7 0 excluding iOS 6 0 Communication interface Hi speed USB 2 0 IEEE802 3 10Base T 100Base Tx IEEE802 11b g n suppor...

Page 161: ...Letter FCOT Flatbed 10 seconds ADF 12 seconds Maximum Pages for Successive Print 99 pages Zoom Ratio 25 400 Other Copy Functions ID copy Receipt copy N up copy Clone copy 16 4 Scan Specifications Scan Type Flatbed ADF Maximum Scan Size Flatbed 216 297mm ADF 216 356 mm Chromoscan Yes Scan Output Function Scan to E mail PC FTP and USB Please see Chapter 1 1 148 ...

Page 162: ...Modem Speed 33 6Kbps Fax Memory 650 pages Encoding MH MR MMR JBIG Compatibility ITU T sg3 ECM Other Fax Functions PC FAX Send Fax Filtering Group Sending Fax Forwarding Speed Dial Group Dial Delay Sending Auto Redial Auto Receive Auto Shrink Mobile Fax Environment PSTN PBX VOIP 149 ...

Page 163: ...Company Name Magnell Associate Inc DBA NEWEGG COM Office address 17560 Rowland St City of Industry CA 91748 TEL 626 271 9700 USA Only ...

Page 164: ......

Reviews: