background image

EM

B

R

OI

D

ER

Y

 B

A

S

IC

S

26

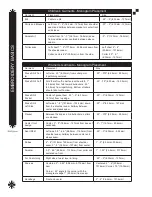
Men’s Garments - Monogram Placement

Garment

Placement

Size

Dress Shirt Collar

Left side, .25" (6.35mm) above buttonhole from 
collar point centered.

.25" - .375" (6.35mm - 
9.52mm)

Dress Shirt Cuff

For top center of wrist, start 1" (25.4mm) from cuff 
center toward buttonhole, .25" (6.35mm) above 
cuff edge. Bottom of letters should fall at cuff bot-
tom. 

.375" - .75" (9.52mm - 
19.05mm)

Dress Shirt Pocket

Center of pocket hem, .25" - .5" (6.35mm - 
12.7mm) from top edge. 

.25" - .375" (6.35mm - 
9.52mm)

Pocket Flap

Center of flap

.25" - .375" (6.35mm - 
9.52mm)

Pocket Flap with 
buttonhole

Right of buttonhole

.25" - .375" (6.35mm - 
9.52mm)

Ties

1.5" - 2.5" (38.1mm - 63.5mm) up from bottom tip. 
If wearing a vest, then 9" - 11" (228.6mm - 
279.4mm) up from tip.  

.25" - .5" (6.35mm - 12.7mm)

Sport Shirts

Left side, 7.5" - 9" (190.5mm - 228.6mm) from 
the shoulder seam, halfway between placket and 
sleeve seam.

.25" - .5" (6.35mm - 12.7mm)

Robes

7" - 10" (177.8mm - 254mm) from shoulder seam,  
3" - 5" (76.2mm - 127mm) from center.

1" - 2" (25.4mm - 50.8mm)

T-shirts

Left chest 7" - 9" (177.8mm - 228.6mm) down from  
the shoulder seam.
Center front - 5" (127mm) down from the collar  
(Make adjustment for large sizes).

2" - 4" (50.8mm - 101.6mm)

Above The Pocket

Customer preference.
Always align with the top
edge of the pocket.

Center Chest

6" to 4" from the bottom
edge of the ribbing to the
top of the design.

Boxers

Find the center front by
matching the seams. 
Then match the center
front with the side seams
to find the spot.

Center of design down

from the shoulder

Women 7" - 8"

Men 8" - 9"

Over 4" - 5" 

from the 

center

of the placket

Summary of Contents for GS1501

Page 1: ...23 24 25 26 The GS1501 Control Panel 27 28 29 Hooping Material on a Round Hoop 30 Installing Forté Embroidery Suite Software 31 How to Load a Job 32 EMBROIDERY BASICS section 2 Stitch Formation 2 1 Needles 2 Thread 4 Bobbins 5 Backing 6 7 Stitch Troubleshooting 8 Needle thread and Stabilizer Chart 9 Tension 11 Hoops 12 Hooping Aids 13 Tools 14 15 Hooping Technique 16 17 Hooping a Structured Cap 18...

Page 2: ... section 5 Pricing 5 1 Stitch Count 2 Digitizing Fees and Decisions 3 Copyright Trademark and Licensing 4 5 Stock Designs 6 GLOSSARY AND RESOURCES section 6 Glossary of Embroidery Terms 6 1 Glossary of Embroidery Machine Terms 4 Fabric Terminology 5 Industry Trade Shows 6 Trade Organizations 6 Industry Publications 6 ...

Page 3: ...and click on support or email support pantograms com You will find a variety of topics related to your machine and software For telephone support call 1 800 872 1555 Monday Friday 8 30 a m 5 00 p m EST If you don t immediately speak with someone please leave a message with your name phone number and message and one of our technicians will return your call All calls received by 4 00 p m EST will be...

Page 4: ...ry machine Thread stand Tabletop Workstation Cap option Tubular hoop holder Tool kit Sample test design Starter kit Owner s manual Hoops per your sales order Blank cap Other accessories you ordered Tolls needed to unpack Scissors or box cutters Note Save the crate for future shipping should service be required ...

Page 5: ...our GS1501 Cut and remove the straps that encircle the box Remove the box lid Remove the inner tray containing the hoops and other accessories Remove the workstation components Replace the lid on the box to assemble the workstation ...

Page 6: ...lf 1 One Table Top 4 Four Casters Assorted fasteners You will need 5mm and 6mm Allen wrenches and a 12mm wrench or socket for the assembly process These tools can be found in the toolbox that was included with your GS1501 IMPORTANT DO NOT TIGHTEN FASTENERS UNTIL ASSEMBLY IS COMPLETE Attach Casters Back Support Table Tops Side of Workstation ...

Page 7: ...GETTING STARTED 5 Step 1 Fasten back support to one side frame Step 2 Fasten other side frame to back support Step 3 Stand workstation frame upright Step 4 Place lower shelf onto supports ...

Page 8: ... holes in both shelf and support and attach nut Step 6 Place table top on workstation Line up holes and insert bolts through both table top and frame and attach nuts Step 7 Flip workstation over so that it is sitting on its table top Step 8 Attach casters with four bolts per caster ...

Page 9: ...side frames Step 10 Tighten bolts holding lower shelf and table top being careful not to over tighten Step 11 Insert plugs to cover bolts holding back support and side frames You have now completed assembly of the workstation and it is ready to receive your GS1501 ...

Page 10: ...box Two people can now lift the machine at its base and place it on the workstation One person should carefully lift the back of the machine while the other inserts the feet into the treaded holes at each corner Your GS1501 is now ready for its initial setup Unpacking the GS1501 ...

Page 11: ...5mm Allen wrench loosen but do not completely remove the set screw in the post then raise the post up to its final position and re tighten the set screw Repeat these steps for the other post Set the thread tree on top of the posts aligning the holes in the thread tree with the holes at the top of the posts GS1501 Setup ...

Page 12: ...GETTING STARTED 10 Using the screws that were previously removed attach the thread tree to the posts and tighten You are now ready to install the thread on your GS1501 ...

Page 13: ... Your GS1501 Unwrap the thread tails from the post on the right and left hand sides of the machine Carefully separate the thread by gently running your fingers through the bundle Attach each of the thread tubes to the thread tree ...

Page 14: ...he top tensioner for each thread Run each thread from the eyelet through the thread tree Open the box containing the thread for your machine Each cone is individually wrapped The following chart shows how each thread corresponding to each needle should be passed through the thread tree ...

Page 15: ...GETTING STARTED 13 To remove the wrapper simply hold the plasic firmly and twist and pull Remove the adhesive label from the bottom of the thread cone by pushing in at the center then discard ...

Page 16: ...ad is completely out of the base Place the colors on whatever needle number you choose Repeat the above steps for the other 14 cones and place on the thread rack Using a modified square knot also known as a surgeon s knot tie the end of thread hanging from the thread tree to the corresponding cone of thread ...

Page 17: ... in front of the needle Once the knot is directly in front of the eye of the needle pull it out so that it lines up with the eye and pull gently and the knot should pass through If the knot does not pass through trim the thread and thread the needle directly Once the needle is threaded make sure the thread passes through the hole at the base of the presser foot How to tie a surgeon s knot ...

Page 18: ...and pull it into the spring at the front of the needle case then trim the thread above the spring Gently pull enough thread from the cone and loop it to the right of the upper tensioner Slide the thread between the tension disks making sure to be inside the tab located at the 3 o clock position ...

Page 19: ...ve steps until the GS1501 is completely threaded Note Plug the power cord into the back of the machine and then into a standard 110 power outlet We do recommend the use of an uninteruptable power supply UPS or a high quality surge protector to help protect your investment Press the power switch to turn on ...

Page 20: ...uring normal embroidery and are very easy to attach Install the left arm as shown below notice which notches should be used and also how the arm is attached to the pantograph Tighten securely with the Allen wrench Repeat the procedure for the right arm once again notice which notches should be used ...

Page 21: ...GETTING STARTED 19 Slide in the pre hooped fabric which you received with your GS1501 and push it forward until it locks in place Press the 1 key on the control panel to move to needle 1 ...

Page 22: ...the hoop you can use a standard ruler to measure from the needle to each side and from the needle to the front and back of the hoop to make sure it is centered Once you have centered the hoop with the possition arrows hit the Home key Arrow down to number three set Start and hit Enter ...

Page 23: ...hat is not covered under warranty To trace press the Home button Press number 4 for Contour Range Check and then press the Enter key see below You will see the message Generate Contour and the hoop will move in relation to the needle showing the outer edge of the design If it appears that needle 1 is outside of the hoop refer back to the centering the hoop step above ...

Page 24: ... of the hoop press the green Start button to begin embroidering The design will take approximately seven minutes to complete and will run through all needles Completed design To remove the hoop from the arms lift up on the hoop while pressing down on the arms and pull it out of the holder ...

Page 25: ...Remove the tubular arms by loosening but not completely removing the Allen screws Set these aside for future use Slide the cap drive into place as shown On the underside of the cap driver there are four rollers these roller should align with the guide rail on the underside of the arm ...

Page 26: ...e smoothly back towards the pantograph The mounting screws will line up as shown Use a Phillips screw driver to tighten the mounting screws on both the left and right sides To load the cap test design you must first exit embroidery mode by pressing the Embroidery Status Button ...

Page 27: ...TTING STARTED 25 Next press Enter to Confirm Now press the Hoop Cap Key to change to cap mode Then Press the Enter Key to confirm Then enter one more time when you see the message Limit Switch work normal ...

Page 28: ... time on the design information screen Press Embroidery Status key Press Enter Press 1 on the key pad Using possition arrows center the active needle in the center of the cap Press Home Arrow down to 3 Set Start Press Enter Press Enter again After Set Start is set press Home Arrow down to 4 Contour Range Check Press Enter Watch trace to make sure needle remains in the design area Press Start ...

Page 29: ...GETTING STARTED 27 GS1501 Control Panel Please refer to the diagram to familiarize yourself with the various buttons and functions ...

Page 30: ...GETTING STARTED 28 ...

Page 31: ...GETTING STARTED 29 The Control Panel Display ...

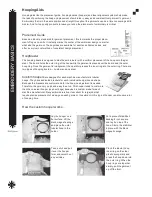
Page 32: ...the tubular hoop top ring and put it on top of the material The double notches on both sides of the arms are towards you With some force press down into the bottom hoop If the bottom ring is too tight loosen the tension adjustment screw with your fingers on the bottom hoop ring until you are able to push the hoops together There should be some force applied The backing material inside the hoop sho...

Page 33: ...oftware Step 3 Exit After installing Forte go to the following Website to install updates www pantograms com machinesupport asp and scroll down to your level of software Drawings Converter Installation 1 Insert Drawings CD 2 Follow the Auto Run instructions 3 To register and activate Drawings you must be online If you are unable to activate via Internet you will need to choose Activate by Fax and ...

Page 34: ...er 12 Confirm correct design 13 Press enter 14 Design parameter press escape 15 Press EMB status key Enter EMB status Yes Press enter 16 Set color change key 17 Press enter 18 Arrow over to one using position arrows 19 Select colors using number key pad 1 9 or 10 15 20 Press enter 21 Press one on number key pad 22 Using position arrows place needle number one in center of the hoop 23 Press the hom...

Page 35: ...tion of the fabric and creates a small loop At that very instant which is set by the timing of the machine the rotary hook comes around and passes its tip between the needle and the loop of thread As the needle continues to move up from the fabric the rotary hook grips the loop as it spins The edge of the hook which is polished extremely smooth pulls the loop down and around the thread coming from...

Page 36: ...11 the first number refers to the European size and the second refers to the American size The first number is the measurement of the blade s diameter in hundredths of a millimeter Sizes range from 60 8 to 110 18 the larger the number the larger the needle Choose needle size by fabric weight The most common size needle for embroidery is 75 11 60 8 lightweight fabrics 70 10 75 11 80 12 medium weigh...

Page 37: ...nd versa tility The shaft gradually tapers to increase the strength and reduce the number of needle breaks It also features a hybrid point that combines benefits of a sharp and ballpoint point In addition the needle is coated with a titanium nitride finish for extra durability All these features make the SAN needle a wise choice for shops that handle both woven and knit gar ments interchangeably N...

Page 38: ...ne speeds Monofilament Nylon is a single strand of nylon Almost invisible it comes clear gray or matte Com mon usage is for cording and quilting or applications where you don t want to see the thread It is also utilized in institutional applications such as uniform emblems where patches may be applied Metallic thread offers sparkle and interest to the embroidery design There are three types of met...

Page 39: ...hread in place Sideless bobbins hold more thread but have a waxy build up The bobbin thread also has a tendency to drop off the sides and can create problems with your machine Spun polyester is the most economical and popular type of thread It is similar to cotton in texture and ap pearance but stronger Filament polyester is very smooth like dental floss and coated with a fine wax Slightly stronge...

Page 40: ...ng to use it If your business does mostly left chest logos on polo shirts it is more cost effective to buy 8 inch squares versus rolls On the other hand if your busi ness does logos and larger embroidery purchasing cut pieces and rolls is best for your business Three Things To Consider When Choosing Backing 1 Stitch Density The higher the density the heavier the backing 2 Stability of Fabric Loose...

Page 41: ...ackings such as Peel n Stick and Hydrostick have an adhesive backing and tear away These are ideal where the fabric or garment is too difficult to hold in a hoop A common usage is with the Fast Frame or window type frames The embroider places the backing in the hoop and the fabric held in place by the adhesive not by the hoop For the Peel n Stick remove the paper backing to reveal a sticky adhesiv...

Page 42: ...d Another simple thing to rule out First pull off a few yards to pass a bad section of thread and if that doesn t work try replacing the thread with a new cone The garment or fabric Stiff Thick Fabric Needles tend to bend slightly as it passes through causing the thread to graze against the needle plate resulting in the thread shredding To fix this problem try a larger needle Hidden Obstructions i...

Page 43: ...erlay Corduroy 75 11 90 14 Sharp or Ball point 40 weight Light to medium tear away or cut away Water soluble if washable Needs good underlay Cotton Sheeting 75 11 Sharp 40 weight Light to medium cut away tear away or wash away None Denim 75 11 90 14 Sharp 30 40 weight Light to medium cut away tear away None Dress Shirt woven 70 10 75 11 Ball point 40 weight Medium to heavy cut away tear away or wa...

Page 44: ...uble tear away None 30 weight thread may be used to minimize the needle penetrations lower the stitch density Lycra or Spandex 70 10 Ball point 40 weight Medium cut away or water soluble tear away None Soap 60 8 80 12 Sharp or Ball point 40 60 weight Tulle and water soluble None Sweater 75 11 Ball point 40 weight Medium to heavy cut away Water soluble Sweatshirt 75 11 Ball point 40 weight Medium t...

Page 45: ...look at the underside In the column fill areas you should see one third top thread on the side one third bobbin thread in the middle and one third top thread on the other side If the design doesn t fit this formula the tension needs to be adjusted Factors Influencing Thread Tension Thread Color The different color dyes affect the texture of the thread which affects how smoothly it glides through t...

Page 46: ...ry strong and have great holding power due to the grain pattern on the hoop itself Keep moisture away from wooden hoops it can cause them to warp and become useless It s best to mark wooden hoops in some way to ensure the original pairs stay together and always store them with the top and bottom joined Specialty hoops like the hoopless frames are made of metal and are the least forgiving of all th...

Page 47: ...lignment the operator presses the inner ring into the outer ring There are two types of hooping boards custom and universal Custom hoopers are designed for each machine manufacturer s tubular hoops They have dedicated brackets for each individual hoop size and shape Because the brackets are custom made for the hoop no adjustment is needed Therefore they are very quick and easy to set up This hoope...

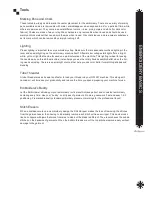
Page 48: ...hine It also helps you see the rotary hook assembly better when the tim ing needs adjusting There are special light sources that help you see color better for matching shades and blending Tube Threader A tube threader makes it easier and faster to load your thread into your GS1501 machine This along with canned air will increase your productivity and reduce the time you spend preparing your machin...

Page 49: ...in an embroidery design opening up seams to have a better access to an area to be embroidered like the lining of a jacket This tool has a sharp pointed metal tip with a hook that has a razor sharp blade that glides under a stitch then cuts the thread Tweezers Tweezers are used for plucking out stray threads from the finished embroidery It also aids in threading the embroidery machine and the remov...

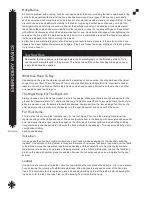
Page 50: ...ll cause registration problems in the design Also check that there is no distortion to the grain of the fabric Adjust the hoop screw before the hoop is applied to the fabric Joining the top and bottom hoops to the mate rial should be snug and require some pressure If the material in the hoop appears too loose tighten the screw and try again likewise if its too hard loosen the screw slightly until ...

Page 51: ...hat are stiff and heavy weight have the best sta bility in a wooden hoop for example jacket back designs Always perform the trace design function on the embroidery machine to make sure the design is in the right placement and does not hit the hoop For Thick Items For items too thick to hoop the traditional way try this technique First hoop the backing material either regular backing or sticky back...

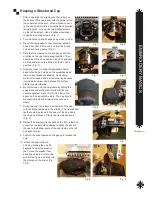
Page 52: ...g material is needed with a structured cap because it contains buckram which makes the surface stable for embroidering 6 Mount the cap onto the cap frame by sliding the sweatband under the silver block with the red center alignment mark Fig 4 Line the center seam on the cap with this mark The cap should be covering the bottom two posts on the cap frame 7 Swing the cap frame band over the bill of t...

Page 53: ...he holder Fig 3 With the black screw cap tighten the frame to the holder Fig 4 Take the item to be embroidered and adhere it to the sticky back tear away Press down and smooth out any wrinkles Snap the holder into place just like tubular hoops Note Heavy or very stiff items may need to be clamped with binders office binders found at office supply stores to better secure the item to the frame Colla...

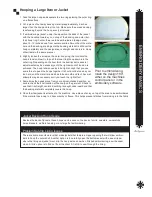
Page 54: ...ot be too easy nor too hard and the material inside has to be smooth and taut Several attempts may be necessary until you reach the right affect 5 Sometimes the hoops move from your original intended position so double check the final location of the hoop on the garment Check to see that it is straight centered nothing is caught underneath and that the backing material completely covers the hoop 6...

Page 55: ...he GS1501 1 Loosen the 3mm nuts on the left arm and right arm and remove arms 2 Now take left arm and attach arm in the last two notches on the pantograph arm Take the right arm and atach in the last two notches on the right side 3 Attach large hoop ...

Page 56: ...t of the design or a photocopy the actual size on top of the marked backing as a guide for placement approximately 9 10 inches down from center collar Pin and machine baste the three layers backing jacket backing together using a long running stitch or just pin them together Fig 2 Make sure you use fine ballpoint straight pins and ballpoint needles in the embroidery machine Basting or pinning thes...

Page 57: ...ncorrect hoop choice Thick fabrics in a low flexible hoop can lead to pop outs For thicker garments such as jackets invest in double high hoops These sturdy hoops have taller sides that grip garments more securely Hoop catching on the machine This can happen with tubular hoops that are not level and with conventional hoops that get snagged on a screw that isn t flush or other machine components If...

Page 58: ...n right side so its readable when folded down over blanket On hem 3 76 2mm Above the hem 3 5 76 2mm 127mm Pillowcase Center on the open side between the edge and the hem s border Make sure the pair of pillowcases are embroidered with the side seams on the top 1 25 2 5 31 75mm 63 5mm Tablecloth Round Anywhere 2 to 3 50 8mm 76 2mm from the edge 3 76 2mm Tablecloth Square One monogram halfway between...

Page 59: ...f letters should fall at cuff bottom 25 75 6 35mm 19 05mm Dress Shirt Pocket Center of pocket hem 25 5 6 35mm 12 7mm from top edge 25 5 6 35mm 12 7mm Dress Shirt Left Side Left side 4 6 101 6mm 152 4mm down from the shoulder seam halfway between center and sleeve seam 25 5 6 35mm 12 7mm Placket Between the 2nd and 3rd buttonhole Letters are stacked 25 375 6 35mm 9 52mm Center front design Center 3...

Page 60: ... placket and sleeve seam 25 5 6 35mm 12 7mm Robes 7 10 177 8mm 254mm from shoulder seam 3 5 76 2mm 127mm from center 1 2 25 4mm 50 8mm T shirts Left chest 7 9 177 8mm 228 6mm down from the shoulder seam Center front 5 127mm down from the collar Make adjustment for large sizes 2 4 50 8mm 101 6mm Above The Pocket Customer preference Always align with the top edge of the pocket Center Chest 6 to 4 fr...

Page 61: ...h c n I d e t t i F e z i S Small Medium Large Extra Large Small Medium Large Extra Large Cap Style Guide 5 Panel Seamless front panel is reinforced with fused cotton buckram to provide sturdy front has four sewn eyelets for ventilation top of front seam is top stitched has smooth wide front area for decoration 6 Panel Pro Style Two front panels are reinforced with fused cotton buckram to provide ...

Page 62: ...EMBROIDERY BASICS 28 Notes ...

Page 63: ...MACHINE BASICS 1 Upper Tensioners Lower Tensioners Operation Panel Safety Cover Pantograph Tubular Hoop Holder Bobbin Presser Foot GS1501 Main Components ...

Page 64: ...MACHINE BASICS 2 ...

Page 65: ...MACHINE BASICS 3 ...

Page 66: ... as rayon After setting the upper tension knobs stitch a 1 inch capital letter I View the underside of the garment to determine if the bobbin tension needs adjusting Thread Tension Adjustments THREAD TYPE SOLUTION Metallic and Polyester Threads Turn tension knob 0 1 turn counter clockwise Light Color Rayon Turn tension knob 1 2 turns counter clockwise White Rayon Turn tension knob 1 turn counter c...

Page 67: ...urrs in the thread guides needle eye thread plate and hook Make sure that the needle is pushed in all the way when cleaning needles Replace bent or damaged needles Excessive backing will apply greater friction to the needle and the thread Thread Breaks Typical Causes Appearance Solution Too much or tool little tension or poor quality thread A small tuft of fiber on the end of the broken thread Loo...

Page 68: ...bin thread should fall smoothly without resistance If the bobbin case hardly moves the tension is too tight if it drops a lot the tension is too loose If the bobbin pops out of the case the adjustment may be too loose or your bobbin drop too violent Note Only one third of the bobbin thread should be showing down the middle of the column If too much bobbin is showing loosen the upper tension slight...

Page 69: ...ensity too tight Less density Dense material Larger needle Elastic or rubbery material Stiffer backing or larger needle Inadequate presser foot clearance Adjust presser foot clearance Low presser foot can pinch thread causing a loop TIP The tension settings above may vary by thread manufacture however all brands are very similar When stitching on caps thick materials or using small lettering the b...

Page 70: ...MACHINE BASICS 8 ...

Page 71: ...MACHINE BASICS 9 ...

Page 72: ...nsion Key Clear Speed Control down Speed Control up Escape Key Enter Key Any selections made must be confirmed by hitting Enter Position Arrows Hoop Movement Speed Switches speed of hoop movement from slow to fast Rotate Design Watch the F on the LCD screen ...

Page 73: ...Colors Order In this setting you have to arrow up and over to needle change and input the color order of the design 2 Replace Needle ND A Replace ND B 3 Modify Needle replace colors inutted with new colors on a design already in machine memory Auto Manual Color Change Key Fully Automatic Yellow Changing to next color and starts embroidery Semi Automatic Blue Changes to next color You will have to ...

Page 74: ...tering active needle with possition arrows set start has to be re set so you don t hit your hoop 4 Contour Range Check traces the outline of the design Contour is recommended 5 Design Range Check traces in a rectangle or square going to the four outermost cor ners of the design Service Technician Key For further assistance contact Pantograms at 1 800 872 1555 ...

Page 75: ...After Oiling Instructions Embroider on two pieces of backing or Place rinse away topping over the first garment Locations That Require Lubrication Every 4 hours of operation Rail on Rotary Hook 1 Locate the Rail on the rotary hook Remove the bobbin and lubricate the rail with a single drop of oil every 4 hours of produc tion Press the Trimming Key 2 3 times Locations That Require Lubrication Every...

Page 76: ... the back of the machine there is an oil spot marked in red Lubricate with a single drop of oil 5 In the front of the machine there are 5 oiling spots marked in red They are between 2 and 3 5 and 6 8 and 9 11 and 12 and 14 and 15 Lubricate each hole with a single drop of oil 6 Place the machine in Needle 1 position To the right of the Needle Case Needle Position 1 are 2 openings Lubricate with a s...

Page 77: ...with a single drop of oil 8 Further back on the arm is a second hole towards the back Lubricate with a singel drop of oil Daily Maintenance Remove bobbin and blow out the rotary hook area with canned air Weekly Maintenance Remove needle plate and blow area out with canned air ...

Page 78: ...MACHINE BASICS 16 Notes ...

Page 79: ...g on the small arrow and then the tool you want Pre set Shape Tools Square Oval 5 Point Star 6 Point Star Starburst Cross Isosceles triangle Diamond Right Triangle 1 Hexagon Octagon Parallelogram Right Triangle 2 Trapezoid Current Color Selected Looking At The Work Area Included with your level of Forté Embroidery Suite is a complete user manual This manual along with the Forté Workbook on the fol...

Page 80: ...right type of backing for material Planning the digitizing process Proper planning the order in which the design will be stitched will help limit fabric movement unnecessary jumps and trims The sewing sequence order working in layers with items in the background being digitized first and then moving to the foreground Also working from the center of the design outwards Proper placement of entry and...

Page 81: ...over the course of a year List fixed expenses that is expenses you know will be constant from month to month and variable expenses which fluctuate from month to month For variable expenses just try to estimate how much you believe it will cost and then keep track of these expenses on a spreadsheet and adjust them if necessary Cost of Business Fixed Expense Variable Expense Machine Payment Labor Lo...

Page 82: ...hes Cost per 1 000 Stitches X 1 000 Stitches Cost per 1 000 stitches should be your minimum charge your dead bottom discount price for large quantity orders Mark the price up from this base price according to quantity job complexity and any additional production costs Additional cost in production time The number of color changes and trims in the design add time to the production so just don t bas...

Page 83: ...oduction time A well experienced digitizer will know how to digitize designs for caps and a variety of different materials Remember if you are unsure of who to use for digitizing you can refer to Stitches Magazine s Annual Digitizer Guide or if you are a member of the Embroidery Trade Association ETA or National Network of Embroidery Professionals NNEP they will give you a list of digitizers to co...

Page 84: ...e is a fee to register and one submission can include multiple designs Mail package to Library of Congress Copyright Office 101 Independence Avenue S E Washington D C 20559 6000 Also add a copyright notice to all your designs even if you haven t registered them yet A copyright notice should include the symbol or the word copyright the year of first publication and the name of the owner For example...

Page 85: ...permission in writing from an authorized agent of the company before reproducing any busi ness logo Most companies aggressively protect their copyrights and trademarks Using Embroidery Stock Designs Stock designs can be purchased from a number of companies Several companies sell stock designs for commercial use Stock designs are generally licensed to one user who can use the designs freely for the...

Page 86: ... designs over the Internet The nice thing about individual designs is that you can purchase a design when you need it but they tend to cost more than design pack or collections Design packs are a group of several designs based on a particular theme i e Christmas Sports etc Design packs usually have designs that go well together and of the same artistic style which helps the embroiderer visualize c...

Page 87: ...zed machine with a hook that functions like a needle Chenille form of embroidery in which a loop moss stitch is formed on the top side of the fabric Uses heavy yarns of wool cotton or acrylic Created by a chain stitch machine that has been adjusted to form this stitch type Also known as loop piling Column Stitch Formed by closely placed zigzag stitches The width of the column is defined by alterna...

Page 88: ... ring and hold it against the machine bed for embroidering Hooping Device device that aids in hooping garments or items for embroidery Especially helpful for hoop ing multi layered items and for uniformly hooping multiple items Lettering embroidery using letters or words Lettering commonly called keyboard lettering may be cre ated using an embroidery lettering program on a PC or from circuit board...

Page 89: ...ng technique that places shorter stitches in curves and corners to avoid unnecessary bulky build up of stitches Specialty Fill a fill stitch capability that produces a fill with a relief or motif design within the fill stitch area Stiehl Stitch closely placed satin zigzag stitches where the width of the column is consistent and is defined by mid line points Stitch Editing digitizing feature that a...

Page 90: ...ce the goods are aligned and placed correctly over the outer hoop the operator inserts the inner portion of the hoop Jump Stitch movement of the frame without trimming and stitching but with take up lever and hook move ment Lock Stitch Machine machine which forms a stitch using a hook and needle Includes home sewing ma chines as well as computerized embroidery machines Memory the amount of stitche...

Page 91: ... rib stitch which resembles two separate 1x1 ribbed fabrics are thicker heavier and more stable than single knit construction Knit Fabrics made from only one set of yarns all running along the length of the fabric while others have their yarns running across the width of the fabric Knit fabrics are held together by looping the yarns around each other Knitting creates ridges in the resulting fabric...

Page 92: ...de Association ETA www embroiderytrade org Industry Publications Printwear Magazine www nbm com printwear Practical how to information on garment screen printing and computerized embroidery for the decorated apparel professionals Stitches Magazine www stitches com Monthly magazine for the commercial embroidery industry who s mission is to help readers by providing technical how to articles busines...

Reviews: