E-mail:
Fax:
(708) 444-6993
For Instructions in Local Languages
and Technical Support:
www.panduit.com/resources/install_maintain.asp
www.panduit.com
INSTALLATION INSTRUCTIONS PN166B
Page 2 of 2
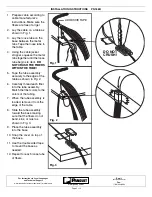
ADHESIVE TAPE
DO NOT
CRUSH!
1. Prepare cable according to
cable manufacturer’s
instructions. Make sure the
fibers are free of all gel.
2. Lay the cable on a table as
shown in Fig. 1.
3. Lay the loose tube on the
base between the metal
tabs. Tape the loose tube to
the table.
4. Using the cable jacket
stripper, squeeze the metal
tabs together until the loose
tube begins to dent.
DO
NOT CRUSH THE FIBERS
WITHIN THE TUBE!
5. Tape the tube assembly
securely to the edge of the
table as shown in Fig. 2.
6. Carefully thread each fiber
into the tube assembly.
Match the fiber colors to the
colors of the tubing.
7. When the tube assembly is
loaded, remove it from the
edge of the table.
8. Slide the tube assembly
toward the base making
sure that the fibers do not
bend, kink, or twist as
shown in Fig. 3.
9. Place the tube assembly
into the base.
10. Snap the cover on top of
the base.
11. Use the double sided tape
to mount the base as
needed.
12. Repeat for each loose tube
of fibers.
Fig. 1
Fig. 2
Fig. 3


