background image

AT-HDVS-SC-RX

10

2

1

3

2

1

3

GND

GND

-

+

Rear View

Rear View

-

+

GND

Side View

Side View

-

+

GND

+

-

Installation

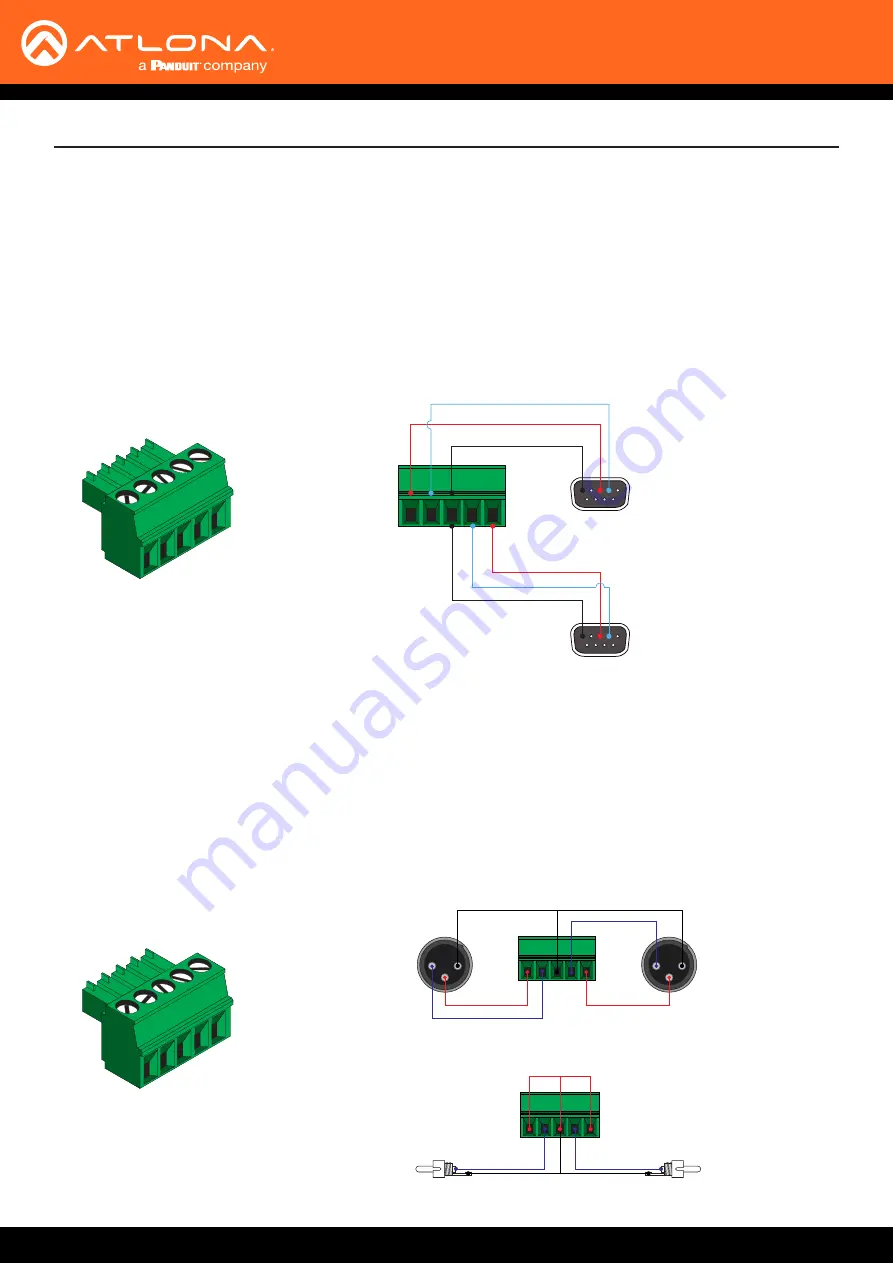
RS-232 Connector

Analog Audio Connector

The AT-HDVS-SC-RX provides RS-232 control between an automation system and an RS-232 device or display 

control.  

RS-232 1

 is for display control and 

RS-232 2

 is used to control the AT-HDVS-SC-RX.  This step is optional.

1. 

Use wire strippers to remove a portion of the cable jacket.

2. 

Remove at least 3/16” (5 mm) from the insulation of the RX, TX, and GND wires.

3.  Insert the TX, RX, and GND wires into correct terminal on the included captive screw connector.

GND

GND

RX

TX

RX

TX

5

3 2

5

3 2

Display control

AT-HDVS-SC-RX control

Balanced Audio using XLR Connectors

Unbalanced Audio using RCA Connectors

The 

AUDIO OUT

 connector on the AT-HDVS-SC-RX provides de-embeded line-level output to an audio amplifier or 

other audio device, using the included 5-pin captive screw connector.  Balanced and unbalanced audio is supported.


Balanced audio connections use two signal wires and a ground to minimize interference in audio signals.


Unbalanced audio connections use one signal wire and a ground and are used if system components don’t support 

balanced signals.

Summary of Contents for Atlona AT-HDVS-SC-RX

Page 1: ...AtlonaManuals Extenders AT HDVS SC RX Scaler for HDBaseT and HDMI 4K UHD ...

Page 2: ...AT HDVS SC RX 2 Version Release Date Notes 1 10 18 Initial release Version Information ...

Page 3: ...voluntary and failure to register will not affect the product warranty To register your product go to http www atlona com registration Sales Marketing and Customer Support Welcome to Atlona Operating Notes IMPORTANT Visit http www atlona com product AT HDVS SC RX for the latest firmware updates and User Manual Main Office Atlona Incorporated 70 Daggett Drive San Jose CA 95134 United States Office ...

Page 4: ...rms New Products 10 years from proof of purchase date for hardware electronics products purchased on or after June 1 2013 3 years from proof of purchase date for hardware electronics products purchased before June 1 2013 Lifetime Limited Product Warranty for all cable products Limited Product Warranty Terms Refurbished B Stock Products and Discontinued Products 3 years from proof of purchase date ...

Page 5: ...cts or states do not allow the exclusion or limitation of relief special incidental consequential or indirect damages or the limitation of liability to specified amounts so the above limitations or exclusions may not apply to you Exclusive Remedy To the maximum extent permitted by law this limited product warranty and the remedies set forth above are exclusive and in lieu of all other warranties r...

Page 6: ... 5 Do not use this product near water 6 Clean only with a dry cloth 7 Do not block any ventilation openings Install in accordance with the manufacturer s instructions 8 Do not install or place this product near any heat sources such as radiators heat registers stoves or other apparatus including amplifiers that produce heat 9 Do not defeat the safety purpose of a polarized or grounding type plug A...

Page 7: ...the OSD 14 Setting the IP Address Using Commands 15 Setting the IP Address using the Web GUI 16 Basic Operation 17 Managing Users 17 Adding Users 17 Editing Deleting Users 18 The Web GUI 19 Accessing the Web GUI 19 Info page 20 Video page 21 Audio page 24 Display page 25 RS 232 page 29 Config page 31 System page 32 Updating the Firmware 34 Using the Web GUI 34 Using USB 36 Default Settings 37 Spec...

Page 8: ...y automated AV system with the convenience of automatic input selection display control remote transmitter powering through Power over Ethernet PoE and 4K UHD scaling Introduction Features Package Contents HDBaseT receiver with local HDMI input Advanced 4K UHD scaling featuring all new Atlona CrystalScale technology Pristine quality downscaling and upscaling Aspect ratio control Image optimization...

Page 9: ...and INPUT 2 LED indicators will toggle based on the selected input 8 LAN Connect an Ethernet cable from this port to the Local Area Network 9 FW Connect a mini USB cable to this port to update the firmware 10 HDBaseT Input Connect an HDBaseT transmitter such as the AT HDVS 210 TX or AT UHD CLSO 840 to this port using an Ethernet cable 11 HDMI Input Connect a UHD HD source to this port using an HDM...

Page 10: ...s 3 Insert the TX RX and GND wires into correct terminal on the included captive screw connector GND GND RX TX RX TX 5 3 2 5 3 2 Display control AT HDVS SC RX control Balanced Audio using XLR Connectors Unbalanced Audio using RCA Connectors The AUDIO OUT connector on the AT HDVS SC RX provides de embeded line level output to an audio amplifier or other audio device using the included 5 pin captive...

Page 11: ... HDVS SC RX provides a RELAY port allowing the control of screens curtains and other devices Use a 48 V DC relay with no more than 1 A current draw When the AT HDVS SC RX is powered on or rebooted C1 and C2 are set to the Normally Open NO state C2 COM C1 ...

Page 12: ...to a UHD HD display 4 Connect an RS 232 control and or display device to the RS 232 port using the included 5 pin captive screw connector Each RS 232 port serves a different function RS 232 1 Used to control an external display device RS 232 2 Used to control the AT HDVS SC RX 5 Connect an amplifier such as the AT GAIN 60 to the AUDIO OUT port using the included 5 pin captive screw connector 6 Con...

Page 13: ... SYSTEMS SPEAKER SYSTEMS Gene ric SPEAKER SYSTEMS SPEAKER SYSTEMS Gene ric SPEAKER SYSTEMS SPEAKER SYSTEMS AT VGW 250 AT HDVS 210U TX WP Laptop AT HDVS SC RX Screen Projector ENTER INPUT MENU AT HD VS SC RX PWR LINK INPUT 1 2 LAN 4K SCALE R ETHERNE T HDMI OUT MDP OUT DC 19V 1 2 AT VGW 250 H D B a s e T C o n t r o l R e l a y E t h e r n e t P o E E t h e r n e t A u d i o H D M I E t h e r n e t ...

Page 14: ...ake sure the AT HDVS SC RX is powered 2 Connect an HDMI cable from the HDMI OUT port on the AT HDVS SC RX to the HDMI input port on a display 3 Press the MENU button on the front panel of the AT HDVS SC RX to display the menu system The Change IP address should be highlighted If not press the UP or DOWN cursor buttons on the front panel to select this option Main menu Change IP address Sys reset S...

Page 15: ...to the AT HDVS SC RX using RS 232 or Telnet 2 At the command line execute the IPDHCP command using the off argument as shown IPDHCP off 3 Execute the IPStatic command This command requires three arguments the desired IP address of the AT HDVS SC RX the subnet mask and the gateway address All arguments must be entered in dot decimal notation The following is an example IPStatic 192 168 1 112 255 25...

Page 16: ...ge 32 in the web GUI allows the AT HDVS SC RX to use either DHCP or static IP mode In order to access the web GUI the IP address of the AT HDVS SC RX must be known 1 Open the desired web browser and enter the IP address of the AT HDVS SC RX 2 Log in using the required credentials The factory default username and password are listed below Username root Password Atlona 3 Click System in the menu bar...

Page 17: ...tials The factory default username and password for the admin user are listed below Username root Password Atlona 3 Click Config in the menu bar 4 Click the Add button under the Edit column 5 Enter the desired username and password in the Username Password Edit dialog box 6 Click the Save Change button to commit changes or click the Cancel button to return to the Config page without adding the use...

Page 18: ...ame root Password Atlona a Click Config in the menu bar b Click the Edit button next to the user to be changed c Enter the new information for the user in the Username Password Edit dialog box d Click the Save Change button to commit changes or click the Cancel button to return to the Config page without making changes a Click the Remove button next to the user to be deleted The username and passw...

Page 19: ...is desired refer to IP Configuration page 14 The default static IP address of the AT HDVS SC RX is 192 168 1 254 Accessing the Web GUI The Web GUI 1 Launch a web browser 2 In the address bar type the IP address of the AT HDVS SC RX 3 The Login page will be displayed 4 Type root using lower case characters in the Username field 5 Type Atlona in the Password field This is the default password and is...

Page 20: ...the Atlona web site for the latest version of firmware VALENS Version Displays the version of firmware used by the Valens chipset Active Input The currently selected input on the AT HDVS SC RX Video Format Displays the output resolution on the HDMI OUT port TX Type The model of the connected PoE compatible transmitter TX that is connected to the AT HDVS SC RX Note that if the AT HDVS SC RX is conn...

Page 21: ...crypt HDCP content Auto Switch Click the Auto Switch mode to the ON position to enable auto switching If the AT HDVS SC RX detects a signal loss at one of the inputs then it will automatically switch to the opposite input Set to the OFF position to disable auto switching Click the Fallback Time drop down list to select the fallback time interval The AT HDVS SC TX will wait until the fallback timer...

Page 22: ...n is used to calibrate color settings on the display device Gray Scale This pattern is used to calibrate brightness and contrast Moving Bar This pattern is can be applied when troubleshooting video walls by making sure all displays are in phase with one another If all displays are in phase there will be no lag in the moving bar Grid This pattern is used mainly for detection of corner convergence p...

Page 23: ... the horizontal and vertical overscan percentage respectively When both slider bars are set to 0 then no horizontal or vertical overscan is applied to the output signal Picture Click and drag each of these slider bars to adjust the Brightness Contrast Saturation and Hue of the output signal The default value for both slider bars is 50 Reset all Picture Click this button to set all picture settings...

Page 24: ...output L R Audio Click this toggle switch to the OFF position to mute only the audio on the AUDIO OUT port Output Click and drag this slider bar to adjust the audio output volume Range 80 to 0 Values are in decibels Output Bass Click and drag this slider bar to adjust the bass of the audio output Range 15 to 15 Output Treble Click and drag this slider bar to adjust the treble of the audio output R...

Page 25: ... current models of Samsung Panasonic and Sony dis plays However it is not guaranteed that CEC will work with all displays Many manufacturers do not support the CEC off command and older displays use proprietary commands Atlona only supports displays that use the CEC command structure defined in HDMI 1 2a It is recommended that dealers request an evaluation product from Atlona before designing a sy...

Page 26: ...terval in seconds between when the loss of A V signal is detected and when the Display Off command is sent Range 5 seconds to 1 hour Control Type Sets the control method for sending commands The following options are available RS 232 IP CEC Feedback Verify Sets the feedback verification state Click the toggle to enable or disable this feature The following options are available Setting Description...

Page 27: ...ick this drop down list to select the login mode Setting Description Non login Does not require a username and password when using TCP IP to control the display RS 232 Requires a username and password to control the display through TCP IP IP Address Enter the IP address of the device in this field Port Enter the listening port of the device in this field Username Enter the username for login If th...

Page 28: ...field CR LF Click this drop down list to select the desired end of line characters to be sent Test Click this button to test the command line and or feedback Save Click this button to save all changes in this window group Setting Description None No end of line characters included CR Carriage return LF Line feed CR LF Carriage return Line feed Space Space character STX Start of text character ETX ...

Page 29: ...X is connected to another HDBaseT device such as the AT UHD CLSO 824 each of these drop down list boxes can be set to the baud rate of the HDBaseT RS 232 settings on the corresponding device Click the Save button to accept the settings Setting Description Baud rate Sets the baud rate The following options are available 2400 9600 19200 38400 56000 57600 115200 Data bit Sets the number of data bits ...

Page 30: ...56000 57600 115200 Data bit Sets the number of data bits used to represent each character of data The following options are available 7 or 8 Parity Sets the parity bit which can be included with each character to detect errors during the transmission of data The following options are available None Odd or Even Stop bit Sets the stop bit Stop bits are sent at the end of each character allowing the ...

Page 31: ...w Password Enter the new password for the admin username in this field Confirm New Password Verify the new password by retyping it in this field All User Login Settings Username Displays the username Password Displays the password for the associated username Edit Click the Add button in this column to edit the username and password in the row Del Click the Remove button to delete the user in the r...

Page 32: ...ay The relays will toggle based on the state of the AT HDVS SC RX For example when the system is powered on the relay will power on the display If the system is powered off then the display will be powered off Manual Relays can be triggered manually using the web GUI or using the RelayAct and RelayAuto commands Refer to the API documentation for more information Type Description Pulse The pulse re...

Page 33: ... ON then the AT HDVS SC RX will prompt for both the username and password Use the same login credentials as the web GUI Telnet Timeout Click this drop down list to select the timeout interval in seconds before the Telnet connection is automatically closed after no activity Range 1 to 3600 Broadcast By default broadcast mode is set to ON When set to ON changes in the web GUI will also be affected o...

Page 34: ... the Web GUI Requirements AT HDVS SC RX Firmware file Computer 1 Connect an Ethernet cable from the computer containing the firmware to the same network where the AT HDVS SC RX is connected 2 Go to the System page page 32 in the web GUI Choose File button Appendix 3 Click the Choose File button under the Firmware Update section 4 Browse to the location of the firmware file select it and click the ...

Page 35: ...MENU AT HDVS SC RX PWR LINK INPUT 1 2 LAN 4K SCALER PWR LED indicator NOTE The firmware update process may take up to five minutes to complete When completed the PWR and INPUT 1 LED indicators will glow solid green and the backlight on the MENU button will glow solid blue Do not disconnect the power during the firmware update procedure 8 After the firmware update process is complete the Login scre...

Page 36: ...DVS SC RX DC 24V 1 C1 COM C2 2 HDMI OUT INPUT RX TX TX RX 2 1 R L RS 232 AUDIO OUT RELAY FW port 3 The USB UPDATE folder will be displayed If this folder is not displayed automatically select the USB UPDATE drive from Windows Explorer 4 Delete all files from the USB UPDATE drive if any are present 5 Drag and drop the firmware file to the drive folder The PWR LED indicator will flash green during t...

Page 37: ...erify Display Mode IP Mode IP Address Port Disabled Disabled 5 seconds 15 seconds 5 seconds RS 232 ON DispSW AVon Non Login 255 255 255 255 65535 RS 232 Zone Baud rate Data bit Parity Stop bit TX RS 232 Baud rate Data bit Parity Stop bit RX RS 232 Zone 1 Baud rate Data bit Parity Stop bit 115200 8 None 1 115200 8 None 1 9600 8 None 1 EDID Input 1 Input 2 Output Default 1920x1080p 60 Hz Default 192...

Page 38: ...25 30Hz 1920x1080p 23 98 24 25 29 97 30 50 59 94 60 Hz 1920x1080i 50 59 94 60Hz 1280x720p 30 50 60Hz 720x576p 50Hz 720x480p 59 94 60Hz 640x480p 60Hz VESA 2560 1600 60Hz RB 2048 1536 60Hz 2048 1200 60Hz 2048x1080 60Hz 1920x1200 60Hz RB 1920x1080 60Hz RB 1680 1050 60Hz 1600 1200 60Hz 1600 900 60Hz 1440 900 60Hz 1400 1050 60Hz 1366 768 60Hz 1360 768 60Hz 1280 1024 60Hz 1280 800 60Hz 1280 768 60Hz 128...

Page 39: ...0 Humidity RH 20 to 90 non condensing Power Consumption 24 75 W Supply Input 100 220 V AC 50 60 Hz Output 24 V 2 7 A DC Dimensions Inches Millimeters H x W x D w o feet 1 02 x 8 40 x 9 17 26 x 213 5 x 233 H x W x D w feet 1 22 x 8 40 x 9 37 31 x 213 5 x 233 Weight Pounds Kilograms Device 2 97 1 35 Certification Device CE FCC Power Supply CE FCC Level VI RoHS cULus RCM CCC Appendix ...

Page 40: ...ng 20 updating using the web GUI 34 using USB 36 G Gateway 33 I Installation 10 M Muting audio 24 O Operating notes 3 P Panel descriptions 9 Password default 19 R Resolution setting 21 RS 232 settings 29 S Safety information 6 Specifications 38 Static IP 33 Subnet mask 33 Switching auto 21 T Telnet listening port 33 login mode 33 timeout 33 Timers auto power off 26 projector lamp cool down 26 Treb...

Page 41: ...d names and trademarks or registered trademarks are the property of their respective owners Pricing specifications and availability subject to change without notice Actual products product images and online product images may vary from images shown here Toll free US International atlona com 877 536 3976 41 43 508 4321 ...

Reviews: