background image


Introduction 

Thank you for purchasing the Pandigital Slide and Negative Scanner. 
Now you can preserve your slides and photo negatives by scanning 
them directly into your computer or onto a memory card as .jpg files. 


What’s in the Box 

Check your package for the following items: 

ƒ

 Scanner 

with 

connected USB cable 

ƒ

  Driver & PhotoImpression Software CD 

ƒ

 Negative 

Film 

Tray 

ƒ

 Positive 

Slide 

Tray 

ƒ

  Quick Start Guide 

ƒ

 User 

Guide 

(on CD) 

ƒ

 Registration 

Card 

ƒ

 Cleaning 

Brush 


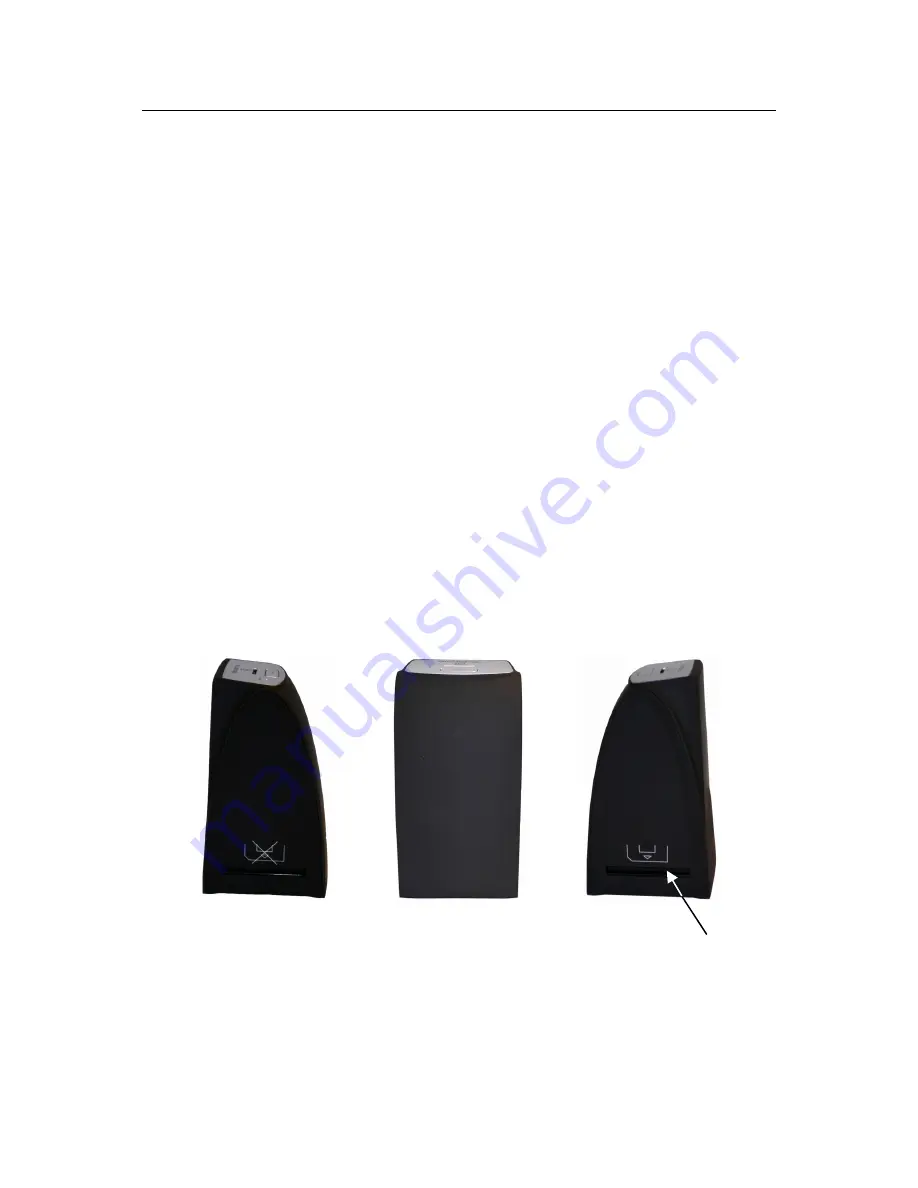
Overview of the Scanner 


Right side 
Negative & Slide tray slot 
(insert only from right side) 

Front 

Left side 

Summary of Contents for PhotoLink PANSCN03

Page 1: ...SLIDE AND NEGATIVE SCANNER User Guide PANSCN03 PANSCN03EU ...

Page 2: ...r 4 Install Driver PhotoImpression Software 5 Loading Negatives 7 Loading Positive Slides 8 Connect Scanner to PC 8 Launch PhotoImpression Software 9 Manage Scanned Images 13 Save Your Results 13 Frequently Asked Questions 13 Technical Specifications 14 Limited Warranty 15 UG E_PANSCN03_PANSCN03EU_V1 0_04 09 ...

Page 3: ...ry non alcohol cotton swab or the included cleaning brush to insert into the scanner slot from the right side and clean the glass surface periodically to produce a clear image Non use The USB cable should be unplugged from the computer when the unit is left unused for a long period of time USB overloading Do not overload the USB connections on your computer If you have other devices connected to y...

Page 4: ...ter or onto a memory card as jpg files What s in the Box Check your package for the following items Scanner with connected USB cable Driver PhotoImpression Software CD Negative Film Tray Positive Slide Tray Quick Start Guide User Guide on CD Registration Card Cleaning Brush Overview of the Scanner Right side Negative Slide tray slot insert only from right side Front Left side ...

Page 5: ...P3 Vista 32 bit Vista 64 bit Not supported on Macintosh 384MB RAM USB 2 0 Port Positive Slide Tray Negative Film Tray Back Memory card slot Power LED Red light indicates scanner is connected to PC Top USB cable connected to scanner SCAN button Used to perform scan Cleaning Brush ...

Page 6: ...ftware windows you are not currently using The ArcSoft PhotoImpression software that is included with the Pandigital Slide and Negative Scanner allows you to scan images directly into the PC or onto a memory card The software can also be used to preview organize edit and share your scanned images Before connecting the scanner to the computer for the first time install the driver PhotoImpression so...

Page 7: ... USB devices connected to your computer 10 To ensure an adequate power distribution to your USB 2 0 port you must restart your computer Loading Negatives Handle negatives with care any dust scratches or finger prints will appear on your scanned images If possible use cotton gloves when handling negatives It is recommended to use compressed air to remove any dust on the negatives not included can b...

Page 8: ...uded Hold up the slide towards light facing the statement this side toward screen away from you Look through the slide it should appear normally not upside down Open the slide tray at the marked spot on the top With the slide tray laid open place the slide into the recessed area in the tray the slide should fit very well Close the tray and press the edges so that it locks into place Connect Scanne...

Page 9: ...ocate and Install driver software option to synch up the hardware with the software 3 Wait until the message displays the driver has been successfully installed Note If multiple USB devices are connected to your computer such as mobile phones media players or other USB powered devices there may be inadequate power for the scanner Safely unplug all unnecessary USB devices before scanning images wit...

Page 10: ...first time you launch the software a calibration must be performed the following message appears Remove the slide film tray if necessary click OK and then wait for the calibration process to complete The following screen will be displayed 5 Select the desired settings and then click Acquire ...

Page 11: ... negative or slide tray into the scanner slot from the right side of the scanner 7 Wait until the colors are stabilized click Color Brightness Adjustment to change colors if desired and then click Snap Shot or press the SCAN button on the scanner 8 When the scan is complete an image thumbnail will be added to the film strip at the top of the window Push the negative slide tray through the scanner ...

Page 12: ...ich you do not want to save and then click Delete to delete the selected image before clicking Transfer After transferring the images the thumbnails will remain visible until you scan your next original NOTE Do not minimize the OVT Scanner window after transferring the images Close the window by clicking Exit x and then you will have access to the scanned images in the main software window File Na...

Page 13: ...ule Frequently Asked Questions Q Why doesn t my computer recognize the scanner after I installed the driver and software A Be sure you are connecting to a USB 2 0 port and make sure you disconnect all other USB devices from the computer that are not currently being used If you are using a laptop make sure it is plugged into AC outlet to ensure sufficient power If you still have trouble restart you...

Page 14: ...Half field Angle 15o Sensor 5 1 mega pixels CMOS sensor Focus Range Fixed focus Exposure Auto Color balance Auto Scan high resolution 3 600 dpi interpolation resolution Data conversion 10 bits per color channel Scan Method Single pass Light source Backlight 3 white LEDs Resolution 2592X1680 Power Powered from USB Interface USB 2 0 only Operating System Windows XP SP2 VISTA Software ArcSoft PhotoIm...

Page 15: ...f the product 4 modification of any part of the product 5 damage due to improper operation improper maintenance or connection to an improper power supply 6 loss of data regardless of value or format that may result through proper and or improper use of the product 7 damage due to an attempted repair of the product by anyone other than a facility authorized by Pandigital to service the product 8 co...

Page 16: ...itations or exclusions may not apply This warranty gives you specific legal rights and you may have other rights which vary from state to state All content included on the Pandigital website as well as Pandigital products including pre loaded demonstration images digital media digital cookbooks text graphics logos designs photographs button icons images audio video clips digital downloads data com...

Reviews: