background image

20


Safely Disconnect the Scanner from PC 


Windows Systems 

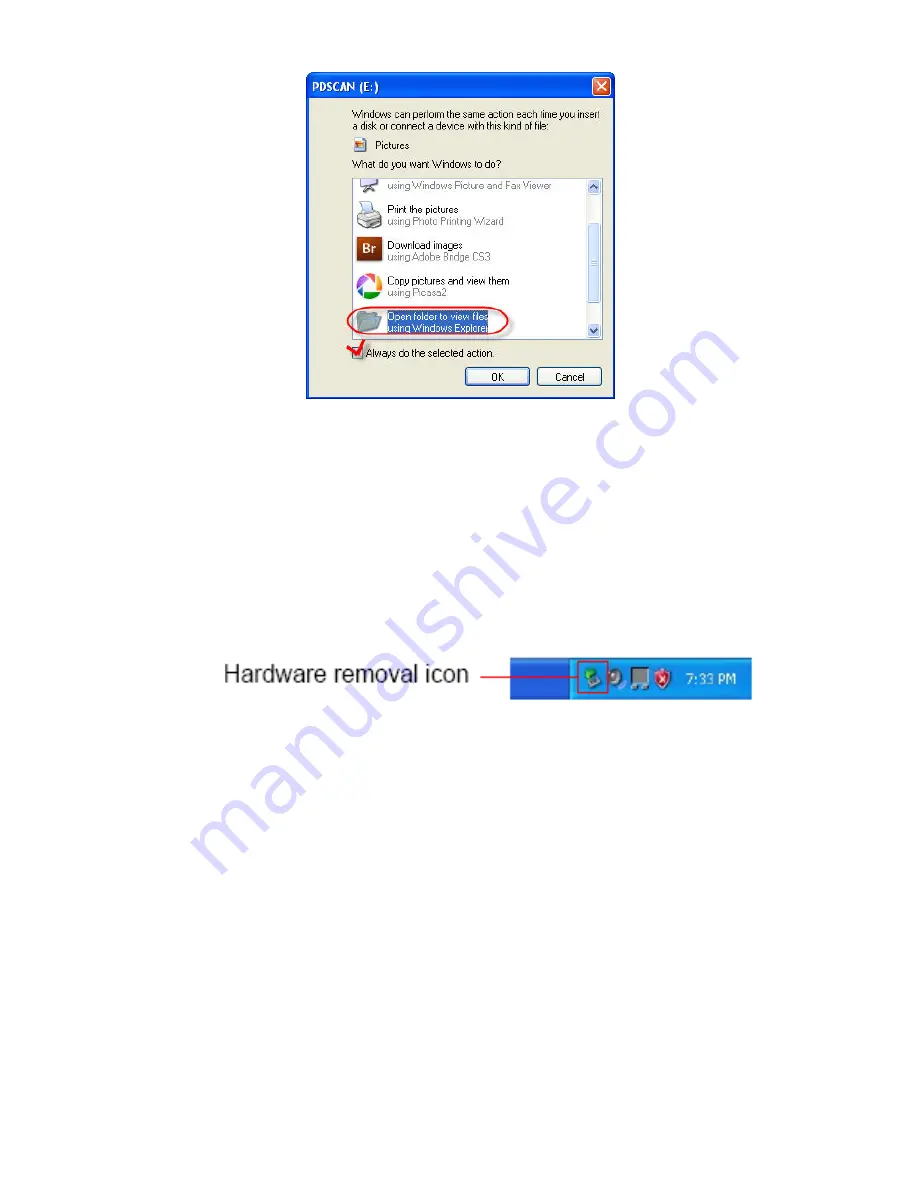
a.  On the Windows System Tray, click the hardware removal 

icon as indicated below.   


b.  Click the ‘Safely remove USB mass Storage device’ message 

with the corresponding Drive. 

c.  When the message ‘Safe to remove Hardware’ displays, you 

can safely remove the scanner’s USB cable. 


Macintosh Systems 

a.  Click and drag the hard disk icon to Trash, which will become 

an eject function. 

b.  Disconnect the scanner USB cable from your computer. 


Summary of Contents for PANSCN01

Page 1: ...1 PhotoLink Scanner User Guide ...

Page 2: ... Image 13 Photo Protection Sleeves 14 Image Crop 15 Connect PhotoLink Scanner to a PC 16 System Requirements for PC 16 Make Connection to PC 16 Windows Explorer with Microsoft Vista View 18 For Windows Vista Users 18 For Windows XP Users 19 Safely Disconnect the Scanner from PC 20 Scan2PC Manager Scanner to PC Utility 21 Installing the Scan2PC Manager 21 System Requirements 21 Using the Scan2PC Ma...

Page 3: ...he Image Sensor 26 Calibrate the PhotoLink Scanner 27 Storing the PhotoLink Scanner 27 Technical Specifications 28 Frequently Asked Questions Troubleshooting 29 Limited Warranty 30 FCC Statement 31 UGEPANSCN01_V1 5 ...

Page 4: ...cated sensors inside may become damaged due to excessive heat Do not use this scanner near water in the rain or allow any liquid to get inside this product Water and moisture may cause short circuit to the electronic components and lead to malfunctions Do not use this scanner in dusty environments Dust grains may cover this scanner and scratch the original to be scanned Do not scan originals that ...

Page 5: ...jects or step on the cable of the power adapter Otherwise the external insulation may be damaged and result in short circuit or fire The power connector and USB port on this scanner are designed solely for connecting to the supplied power adapter and optional USB cable Do not insert any other objects into these sockets If there are strange odors or heat emitting from this scanner or any signs of m...

Page 6: ... of unknown sources Doing so may violate your local copyright laws and related regulations Pandigital cannot be made liable for the losses that may result from breaching the laws described above Disposal of this product To help protect the environment dispose of this scanner properly according to your local regulations regarding the disposal of waste products What s In the Box Check the package fo...

Page 7: ...canner and your pictures will be stored in the memory card It s as easy as that If you do want to store your photos directly into your PC it s just as easy via a USB cable PhotoLink Scanner Diagram Front view No Name Function Description Status Card Indicator Light Indicates the operating status of the scanner and memory card Refer to Indicator Lights on page 9 Power Button Press to power on or of...

Page 8: ...into this slot to begin scanning Orientation guide Indicates the correct position and orientation of the original for proper scanning Rear view No Name Function Description SD xD MMC MS card slot Accepts the following types of memory cards SD xD MMC and MS Refer to Supported Memory Cards on page 23 Output slot The scanned original comes out from this slot CF card slot Accepts a Type I CF card Refe...

Page 9: ...on process is complete before using the scanner Busy scanning and storing image files Please wait until the process is complete before scanning another original Sensor cleaning in progress Please wait until the process is complete before performing any operations Paper jam Press the Power button The scanner will advance the original so you can remove the jammed original from the output slot No mem...

Page 10: ...ard slot If both slots are occupied the scanner will take the following priority when storing the scanned images SD MMC CF xD MS MS Pro MS Duo For example if both SD and CF cards are inserted the scanner will only store the scanned images onto the SD card Notes Always insert a memory card before scanning Be careful when inserting a CF card The pins inside the CF memory card slot are subject to dam...

Page 11: ...dicator is blinking The original photo will not be scanned Scan a Photo 1 Insert your photo into one of the plastic protection sleeves included with scanner 2 With the side to be scanned facing upward and in correct orientation as indicated by the orientation guide place one edge of the photo on the scanner and adjust the guide lever so that the photo aligns against the left side of the feeding sl...

Page 12: ... done Otherwise the scanner will fail to function properly Notes Do not remove the memory card or disconnect the power supply while the indicators are blinking This scanner only supports output images in JPEG jpg format and the date time attribute will not be added For more information on how this scanner stores the scanned image files on the memory card refer to Orientation on page 13 If the memo...

Page 13: ... business cards with either side shorter than 42mm Photos business cards with lots of black or dark colors Photos business cards with dark colors surrounding the edges Transparencies filmstrips celluloid etc Printed images pictures on newspapers magazines etc Soft and thin materials thin paper cloth etc Photos business cards that exceed the following acceptable size Orientation of the Original and...

Page 14: ...plied clear plastic sleeves before scanning your photos Included with your PhotoLink Scanner are two different sized clear plastic protection sleeves Please use the supplied 3 x5 and 4 x6 plastic sleeves for matching size photo scanning 1 Insert the photo into the plastic sleeve as shown below ...

Page 15: ...tos from getting stuck in the sleeves over time remove the photos from the plastic sleeve after scanning If the plastic sleeves are not in use store them in a safe place and keep them protected from accumulating dust Image Crop The PhotoLink Scanner has a built in cropping function that detects and automatically crops dark edges of an original as it is scanned Please refer to the illustration belo...

Page 16: ...nts for PC Operating system Windows Windows 2000 Pro XP Vista or later ver Macintosh Mac OS X or later versions USB Port Supported USB 1 1 or 2 0 port Make Connection to PC 1 Connect the plug on the power adapter cord to the power connector on the scanner 2 Plug the power adapter into an electrical outlet Note The type of power plug and socket illustrated may differ from that of your region 3 Conn...

Page 17: ...rmation refer to Indicator Lights on page 9 The PhotoLink Scanner will be recognized by the computer as a removable disk Windows system You should see a drive named PDSCAN in Windows Explorer see below figure Within the drive there s a folder called Photo1 into which your scanned images are stored Now you are ready to view or edit the files on the memory card Notes If the memory cards are subseque...

Page 18: ...der appears in the right pane For Windows Vista Users When the PhotoLink Scanner is connected with your PC via a USB cable with an inserted SD Card a pop up AutoPlay window will appear To view photos on the PC while scanning change Windows Explorer s setting as follows 1 Select Open folder to view files option 2 Check the Always do this for pictures checkbox ...

Page 19: ...oLink Scanner is connected with your PC via a USB cable with an inserted SD Card a pop up PDSCAN window will appear To view photos on the PC while scanning change Windows Explorer s setting as follows 1 Select Open folder to view files using Windows Explorer 2 Select the Always do the selected action checkbox 3 Click OK ...

Page 20: ... b Click the Safely remove USB mass Storage device message with the corresponding Drive c When the message Safe to remove Hardware displays you can safely remove the scanner s USB cable Macintosh Systems a Click and drag the hard disk icon to Trash which will become an eject function b Disconnect the scanner USB cable from your computer ...

Page 21: ...intosh operating systems Free hard disk space 6MB A Pandigital PhotoLink Scanner that is correctly connected to the PC and is working properly 1 Insert the SD card included with scanner into the SD memory card slot on the Scanner 2 Open My Computer on your desktop locate and double click the SD card folder named Pandigital and then double click the Utility folder 3 Double click the Scan2PC Manager...

Page 22: ...and Settings your username My Documents My Pictures PhotoLink Windows Vista C Documents and Settings your username Documents Pictures PhotoLink You can also click the button to select a different location you prefer 3 Scan your original The scanned image will be saved to the location you selected in step 2 Each scanned image is given a file name with the prefix PD_ followed by a 4 digit serial num...

Page 23: ...an2PC Manager manually double click the icon on the Desktop or right click the icon in the system tray and select Setting If you want to close the Scan2PC Manager temporarily right click on the icon and select Exit Supported Memory Cards ...

Page 24: ...HOTO2 will automatically be created to store subsequent new files and so on If the memory card already contains folders created by the scanner the scanner will store the images in the last folder created There can be up to 9 folders PHOTO1 9 PD_0001 PD_9999 on a memory card If exceeded the Status card indicator blinks Refer to Indicator Lights on page 9 To continue using this memory card delete so...

Page 25: ...he power supply to the scanner 3 With scanner power off press and hold the power button for 5 seconds The scanner will enter cleaning mode The power and status card indicators will be lit 4 Insert the supplied roller cleaning sheet as shown Note the direction of the sponge on the sheet when inserting Note Make sure that there is no visible dust on the sheet before inserting it into the feeding slo...

Page 26: ...ions on page 24 to clean the outer casing of the scanner first 2 With the scanner powered off and disconnected from the power supply insert the sensor cleaning swab into one end of the output slot Note Make sure that there is no visible dust on the swab before inserting it into the output slot 3 Gently slide the sensor cleaning swab to the other end of the output slot 4 Repeat step 3 two or three ...

Page 27: ...nsor and then follow the instruction in Initial Setup on page 10 to prepare the scanner for scanning 2 Insert the calibration card as shown The scanner will scan the pattern on the calibration card and perform calibration to the sensor inside automatically Note Make sure that the calibration card is inserted in the correct direction otherwise the calibration won t work Storing the PhotoLink Scanne...

Page 28: ...0 Pro XP and Vista Apple Macintosh OS 9 X Leopard Document Size Max Up to A6 4 x 6 Output image formats JPEG Resolution Image Up to 1800 x 1200 4x6 photo scanned Optical 300 x 300 dpi dot per inch Interfaces Memory Cards CF I SD MMC MS MS Pro xD USB Mini USB port USB Compatible with the USB 2 0 specification USB Mass Storage Supported Windows 2000 XP Vista Mac OS 9 x OS X Power Input 100 240W Outp...

Page 29: ...and try again Is the SD card locked set to write protect Unlock the card Is the memory card full The indicator blinks when the free space on the memory card is below 1MB Use another card if necessary Make sure the memory cards are in FAT or FAT32 file formats only not NTFS or any other file format Did you insert the next original before the scanning process of the previous one is completed Power o...

Page 30: ...enance or connection to an improper power supply 6 loss of data regardless of value or format that may result through proper and or improper use of the product 7 damage due to an attempted repair of the product by anyone other than a facility authorized by Pandigital to service the product 8 consumables such as fuses and batteries This warranty is valid only in the United States The product must b...

Page 31: ... property of Pandigital or its suppliers and is protected by United States and international copyright laws or other intellectual property laws and treaties Said content shall not be reproduced or used without express written permission from Pandigital and its suppliers respectively Use of this product constitutes acceptance of these terms and conditions of warranty FCC Statement FCC Part 15 Infor...

Page 32: ...quipment to an outlet on a circuit different from that to which the receiver is connected Consult the dealer or an experienced radio TV technician for help WARNING Changes or modification to this unit not expressly approved by the party responsible for compliance could void the user s authority to operate the equipment ...

Reviews: