background image

83

Replacing

Consumab

les

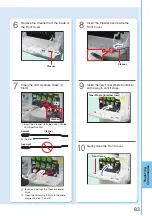
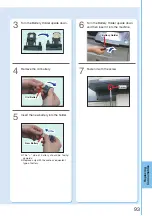
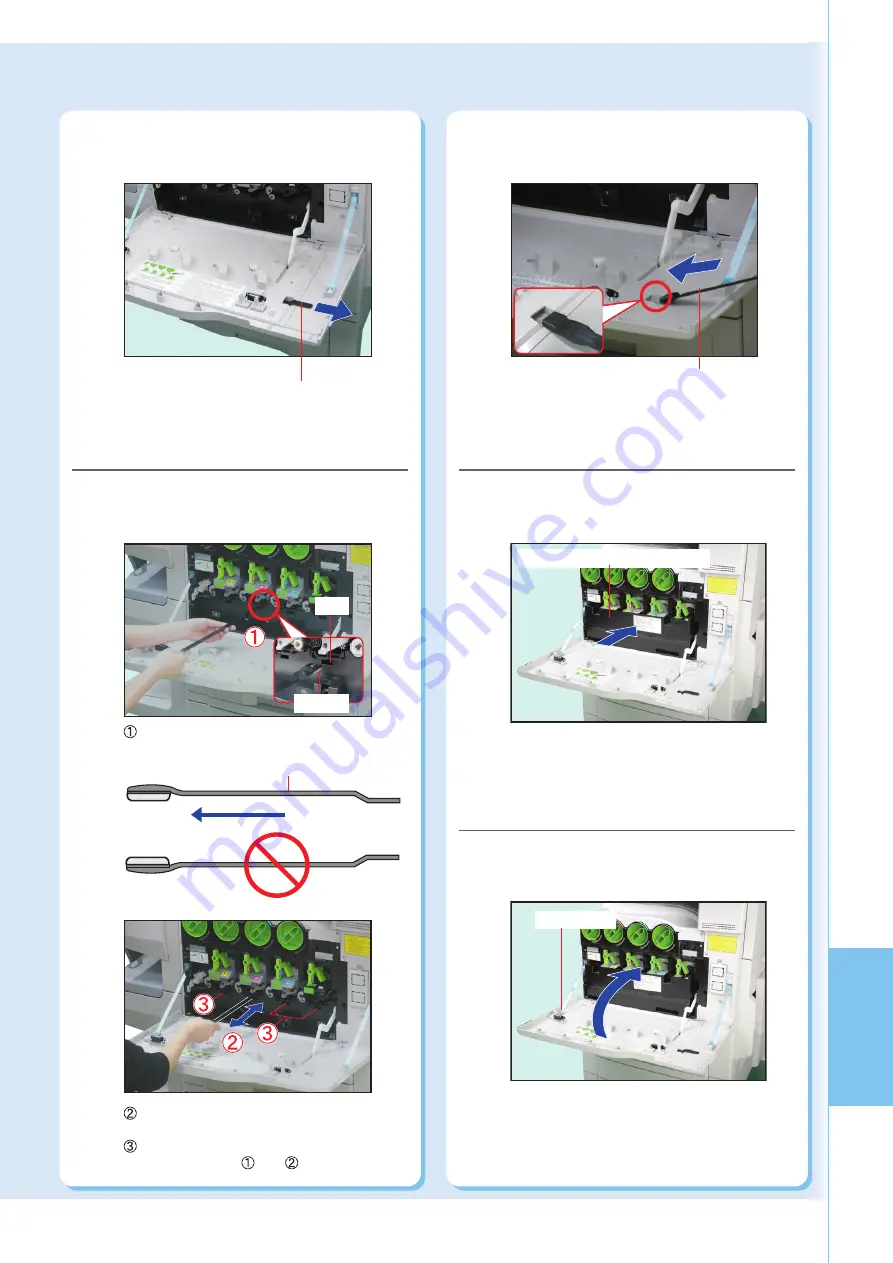
Remove the Cleaner from the inside of
the Front Cover.

6

Insert the new Toner Waste Container
all the way in until it stops.

9

Clean the LSU Aperture Glass (4
Slots).

7

Gently close the Front Cover.

10

Insert the Cleaner back inside the
Front Cover.

8

Toner Waste Container (new)

Front Cover

Insert and pull out the Cleaner several
times.
Clean the remaining 3 Slots in the same
manner as step 

 and 

.

Cleaner

Cleaner

Slot

Cleaner

Insert the Cleaner (felt side down) into the

LSU Aperture Slot.

Correct

Incorrect

Cleaner

To the Slot

Summary of Contents for Workio DP-C305

Page 1: ...es English Operating Instructions For Basic Operations Digital Color Imaging Systems Model No DP C405 C305 C265 Before operating this machine please carefully read this manual and keep this documentat...

Page 2: ...ibes how to use the application software Ex Panafax Desktop Fax Driver Quick Image Navigator Device Monitor Device Explorer Network Config Add Editor Accessories Operating Instructions CD Operating In...

Page 3: ...iles TIFF or PDF or pictures JPEG format only stored on media other than SD Memory Card by using the same selection method See pages 40 to 43 Scan to SD Memory Card The data scanned by this machine ca...

Page 4: ...Exit Section 68 Paper Transport Section 69 Paper Feed Section Paper Tray 2 69 Paper Feed Section Optional Paper Tray 3 or 4 70 1Bin Finisher Section 71 1Bin Saddle Stitch Finisher Section 72 ADF Sect...

Page 5: ...ized Panasonic dealer for more details Replacing Consumables Adding Paper Printing Media Paper Tray 76 Sheet Bypass 76 ReplacingToner Cartridge 78 Replacing the OPC Drum Unit 80 Replacing Toner Waste...

Page 6: ...ways use the power cord provided with your machine When an extension power cord is required always use a properly rated cord 120 V 15 A If you use a cord with an unspecified current rating the machine...

Page 7: ...ls Keep SD Memory Card button battery stamp out of the reach of children If an SD Memory Card button battery stamp is swallowed accidentally get medical treatment immediately For battery disposal or r...

Page 8: ...H TUB WASH BOWL KITCHEN SINK OR LAUNDRY TUB IN A WET BASEMENT OR NEAR A SWIMMING POOL AVOID USING A TELEPHONE OTHER THAN A CORDLESS TYPE DURING AN ELECTRICAL STORM THERE MAY BE A REMOTE RISK OF ELECTR...

Page 9: ...ESULT IN HAZARDOUS RADIATION EXPOSURE Caution Label Precautions Manufacturer s Name and Address Factory ID Rear Cover of the Machine This product has a fluorescent lamp that contains a small amount of...

Page 10: ...from the wall outlet before removing covers The machine should not be installed in areas with the following conditions Extremely high or low temperature and humidity The machine should be installed u...

Page 11: ...to the initial screen of the active function automatically When reaching 20 seconds before resetting the Continue screen is displayed to allow you to extend the auto reset time for another 1 minute If...

Page 12: ...ode 86 HD Drive Lock Settings 6 To prevent illicit use by unauthorized personnel perform the following for ID password settings 1 Use the maximum number of digits 2 Use a variety of the accepted chara...

Page 13: ...Product Overview 13 memo...

Page 14: ...es 78 to 79 Yellow Magenta Cyan Black Toner Waste Container See pages 82 to 83 OPC Drum Units Yellow Magenta Cyan Black See pages 80 to 81 Outer Right Side SD Card PCMCIA PC Card Slot Cover Sheet Bypa...

Page 15: ...Icon Contents Machine Condition LED Print Data Status Active See page 16 Printer On Line LED Lights when the Print function is available Fax On Line LED Lights when sending receiving Facsimile or Int...

Page 16: ...ting for the Scan Email Functions See page 18 Setting for the Printer Function SD Card Print See pages 40 to 43 and Others Refer to the Document Management System Printer Driver of provided CD ROM Fla...

Page 17: ...ut Queue button Displays the active and reserved job s Completion Notice button DisplaystheJobCompletionNoticeviaapop upwindow on your PC when the copy job is completed Refer to Completion Notice in t...

Page 18: ...S is required Touch Panel Display Contents Favorites tab Selects a favorite group from the Address Book SD Card Hard Drive tab Sends scanned data to SD Memory Card PCMCIA PC Card or Hard Disk Drive di...

Page 19: ...Hook Dialing Contents Email button Selects the Internet Fax function Search button Searches the destination s from the Address Book Favorites tab Selects a favorite group from the Address Book Program...

Page 20: ...ght 1 sided 50 105 g m2 14 28 lb 2 sided 64 105 g m2 18 28 lb Acceptable Paper Type Do not use the following type flawed originals Drawing papers Transparencies Labeling paper Heavy weight papers Thin...

Page 21: ...or Landscape Orientation CAUTION When copying with the ADF open do not look directly at the exposure lamp Direct eye exposure can cause eye fatigue or eye injury When copying a thick original do not u...

Page 22: ...to cool down the machine When the desired size of paper is not set in the Paper Tray use the Sheet Bypass See pages 76 to 77 Face down Align with top center Full Size Copy Original Size and Copy Size...

Page 23: ...Press the Start key 5 After finishing copying press the Reset key to return the machine to the initial screen of the currently active mode NOTE Original Size and Copy Size are automatically selected...

Page 24: ...propriate mode Black black and white or Full Color automatically The 2 Color and 1 Color settings must be selected manually Refer to Selecting the Color Mode in the Operating Instructions For Copier o...

Page 25: ...function install the Panasonic Document Management System and PCL Printer Driver and then set up each software Refer to Completion Notice Function in the Operating Instructions For Setting Up of prov...

Page 26: ...nal Copy tab 1 2 1 Sided Original to 2 Sided Copy Book 2 Book Original to 2 Sided Copy N in 1 N in 1 Copy 2 2 2 Sided Original to 2 Sided Copy 2 Page 2 Page Copy Booklet Booklet Copy Multi Size Feed 2...

Page 27: ...Effects tab Zoom Auto Zoom Edge Book Margin Centering Image Repeat Cover Page Insertion Transparency Interleaving Overlay Form Overlay File Edit Insertion Overlay tab When optional Finisher is not ins...

Page 28: ...t Paper Output Tray and select a Paper Tray Do not try to change paper size with the Copy Size buttons because selected copy size will be changed Ex Reduction 8 5 x 11 Letter R 11 x 17 Ledger Select a...

Page 29: ...active mode NOTE 11 x 17 Legal 8 5 x 11 5 5 x 8 5 11 x 17 100 77 65 50 Legal 121 100 79 61 8 5 x 11 129 100 100 65 5 5 x 8 5 200 155 129 100 The exact ratio is automatically selected Copy Size Landsca...

Page 30: ...nal s on the ADF or Platen Glass See pages 20 to 21 1 Select More Menus 3 Select 2 Sided Original Copy and then select 1 2 or 2 2 4 1 2 Two 1 sided originals are copied to one 2 sided copy 2 2 Platen...

Page 31: ...t OK Ex 1 2 screen 6 Select Long Edge or Short Edge Select OK Enter the desired number of copies Up to 999 7 Press the Start key 8 or Long Edge Style Long Edge Style Short Edge Style Short Edge Style...

Page 32: ...s 3 Select 2 Sided Original Copy and then select Book 2 4 You cannot select Book 2 when the Multi Size Feed is selected Blank page is copied onto the front side and the 1st page is copied onto the bac...

Page 33: ...en of the currently active mode NOTE Select OK 7 1 2 1 Select a Book Format or 1st Page with Image 1st Page Blank Select the Orientation or When copying from the Platen Glass place the next original a...

Page 34: ...opy 4 in 1 Copy 6 in 1 Copy For Portrait orientation 2 in 1 Copy 4 in 1 Copy 6 in 1 Copy For Landscape orientation Select the N in 1 mode Ex 2 in 1 screen 5 Copies 2 originals onto 1 sheet Copies 4 or...

Page 35: ...n Original Orientation Ex 2 in 1 screen 6 Select the Copy Layout Format and then select OK 7 Enter the desired number of copies Up to 999 8 Press the Start key 9 For 2 in 1 or Portrait Landscape When...

Page 36: ...de 5 When optional Finisher is not installed Sort Rotate Sort Non Sort or Rotate Group 1 1 1 2 4 1 Rotate Sort Letter size only 1 1 1 1 When loading both Letter and Letter R sized paper multiple copy...

Page 37: ...Select the Punch Position When copying from the Platen Glass place the next original and follow the instructions described on the Touch Panel Display When the optional Punch Unit is installed When opt...

Page 38: ...riginal may not be detected correctly If there are less than 5 mm of white margin on originals the edge of the copied paper may get blurred in white Ex Name card printed on both side Original Size les...

Page 39: ...described on the Touch Panel Display For Sort mode only Place the back side of the original on the Platen Glass 8 Leave the ADF open while making copies Press the Start key 6 Select Yes or No to copy...

Page 40: ...The optional Printer Controller Module is required for printing text graphic files in the PDF format Some TIFF and PDF files cannot be printed directly from the SD Memory Card depending on the type o...

Page 41: ...nails Up to 80 images The images are printed in the selected order Select All selects all the thumbnails in the same folder Select All Select Start Select folder and image data Only 1 image can be sel...

Page 42: ...image 7 For Variable Size Set the Frame Size in which the image will be printed without changing the horizontal to vertical ratio The Frame Size is different from the printed image size Image Size Fr...

Page 43: ...CMCIA PC Card Adapter After printing is completed remove the SD Memory Card or PCMCIA PC Card Adapter from the Card Slot 10 Close the Slot Cover Slot Cover Do not remove the SD Memory Card or PCMCIA P...

Page 44: ...perating Instructions For Scanner and Email of provided CD ROM When transferring scanned data to your PC it is necessary first to install the Panasonic Document Management System software and set up t...

Page 45: ...Communications Utility of provided CD ROM Close the Slot Cover Slot Cover Slot Cover Do not remove the SD Memory Card while the Access Indicator flashes When re inserting the SD Memory Card into the s...

Page 46: ...sity Lighter or Darker 7 Levels Resolution 200 dpi 300 dpi 400 dpi or 600 dpi Select a File Name Date Time Custom Custom file name Select a File Type JPEG PDF Compressed PDF When choosing Black in the...

Page 47: ...Multi Size Feed is selected Refer to Scanner Settings in the Operating Instructions For Scanner and Email of provided CD ROM Select the Original Orientation When 2 Sided Original is selected Long Edg...

Page 48: ...rized Panasonic dealer Address Book Email Select 20 29 Enter the Email Address and then select OK 4 Enter the Email Address Up to 60 characters Select OK Keyboard Button Names To input upper case lett...

Page 49: ...ame for the Email address and then select OK 6 Enter the Key Name Up to 15 characters Select OK Select whether you wish to add this New Email Address to Favorites 7 To enter other PC destination addre...

Page 50: ...tion from the Address Book the address must be registered in advance See pages 48 to 49 For more details refer to Scan Email Operations in the Operating Instructions For Scanner and Email of provided...

Page 51: ...Returns to the Address Book screen Select To Cc Bcc or From Select an Email address Select Close Enter the Email address Select OK Select Basic Menu to select the required setting mode See pages 46 to...

Page 52: ...to edit a registered address refer to Address Book in the Operating Instructions For Facsimile and Internet Fax of provided CD ROM Up to 200 addresses can be registered By the service setting up to 10...

Page 53: ...eset key 9 If you need a special access number to get an outside line dial it first and then select Pause to enter a pause represented by a before dialing the full number Ex 9 Pause 5551234 9 5551234...

Page 54: ...how to edit a registered address refer to Address Book in the Operating Instructions For Facsimile and Internet Fax of provided CD ROM Up to 200 addresses can be registered By the service setting up...

Page 55: ...t side of the incorrect character Press Back Space to delete and enter the correct character See page 48 Enter the Key Name for the Address Book and then select OK 7 Enter the Key Name Up to 15 charac...

Page 56: ...e may perform Rotate transmission automatically and not transmit the portion of the original that exceeds the standard size P portion P A A Rotation XMT Scanning Direction The portion labeled P that e...

Page 57: ...acsimile mode select Continue on the Touch Panel Display or press the Stop key on the Control Panel For Auto Reset NOTE The initial setting for Auto Reset Time is 1 minute If you do not touch any key...

Page 58: ...ctions For Facsimile and Internet Fax of provided CD ROM Sending Originals Facsimile Place original s on the ADF or Platen Glass 1 2 When scanning from the ADF read the notice for ADF See pages 20 56...

Page 59: ...button to reduce the contrast level Each time the button is selected the original will be scanned lighter Darker If you wish to scan an original with darker contrast select the button to increase the...

Page 60: ...tails on how to print the transaction journal refer to Reading Reports Lists in the Operating Instructions For Facsimile and Internet Fax of provided CD ROM Sending Originals Internet Fax Place origin...

Page 61: ...the button is selected the original will be scanned lighter Darker If you wish to scan an original with darker contrast select the button to increase the contrast level Each time the button is select...

Page 62: ...ppear on the display J Turn OFF the Power Switch on the left side and the Main Power Switch on the rear of the machine and then turn them back ON If the error code has not been cleared call the author...

Page 63: ...uthorized Panasonic dealer Displaying Status Normally Status is displayed in gray on each function screen Status is displayed in yellow if the Paper Tray is empty or toner becomes low Select Status di...

Page 64: ...See page 78 U28 OPC Drum Unit is not installed See pages 80 to 81 U29 OPC Drum Unit requires replacement See pages 80 to 81 User Error Codes U Codes Machine Error Codes E Codes User U Jam J Machine E...

Page 65: ...5 Paper Tray 1 4 Sheet Bypass Verify that the media type selection in the Control Panel matches the media loaded on the Trays Ex Select Transparency when Transparencies are loaded in the Sheet Bypass...

Page 66: ...er Pull out the Paper Tray 1 3 Remove the misfed paper 4 Insert the Paper Tray 1 5 Close the Feed Cover 1 6 Close the Sheet Bypass 7 Feed Cover 1 Do not touch the belt and the STR for optimum copy qua...

Page 67: ...lem Solving 67 ADU Section Remove the misfed paper 3 Close the ADU Cover 4 Close the Sheet Bypass 5 Open the Sheet Bypass 1 Open the ADU Cover 2 Sheet Bypass ADU Cover Misfed Paper ADU Cover Sheet Byp...

Page 68: ...Sheet Bypass 6 Feed Cover 1 Misfed Paper Right Side Cover Misfed paper is transported downward by turning the knob Do not forcibly pull out the misfed paper upward as toner may adhere to the transfer...

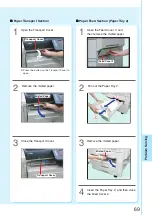
Page 69: ...on Close the Transport Cover 3 Transport Cover Open the Feed Cover 2 and then remove the misfed paper Pull out the Paper Tray 2 2 1 Paper Feed Section Paper Tray 2 Remove the misfed paper 3 Insert the...

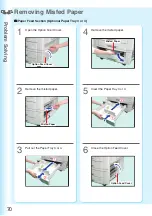
Page 70: ...fed paper 2 Pull out the Paper Tray 3 or 4 3 Remove the misfed paper 4 Insert the Paper Tray 3 or 4 5 Close the Option Feed Cover 6 Paper Feed Section Optional Paper Tray 3 or 4 Removing Misfed Paper...

Page 71: ...er back until it locks into place 3 Open the Finisher Top Cover and then remove the misfed paper 4 Release Button Push the Release Button to free the Finisher from the machine Misfed Paper Slowly rele...

Page 72: ...her Section Removing Misfed Paper Open the Finisher Top Cover 2 Close the Finisher Top Cover 4 Release Button Misfed Paper Finisher Top Cover Staple Cover Paper Transport Knob Push the Release Button...

Page 73: ...misfed paper 7 Open the Inner Cover 9 Remove the misfed paper 10 Slide the Finisher back until it locks into place 12 Close the Staple Cover 8 Misfed Paper Close the Inner Cover 11 Misfed Paper Inner...

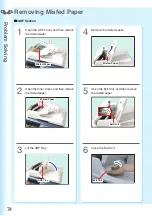
Page 74: ...t the ADF Tray 3 Open the Exit Unit and then remove the misfed paper 5 Close the Exit Unit 6 ADF Section Removing Misfed Paper Open the Inner Cover and then remove the misfed paper 2 Remove the misfed...

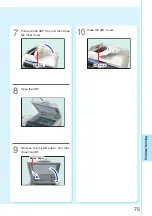
Page 75: ...Problem Solving 75 Open the ADF 8 Close the ADF Cover 10 ADF Cover Pull down the ADF Tray and then close the Inner Cover 7 ADF Tray Remove the misfed paper and then close the ADF 9 Misfed Paper...

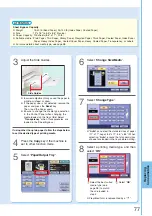
Page 76: ...paper type Plain Glossy or Recycled in the Paper Tray refer to General Settings Key Operator Mode in the Operating Instructions For Function Parameters of provided CD ROM Fan the paper and straighten...

Page 77: ...er Output Tray 5 Select Change Size Media 6 Select Change Type 7 Select a printing media type and then select OK 8 Adjust the Side Guides 3 Incorrect adjustment may cause the paper to wrinkle misfeed...

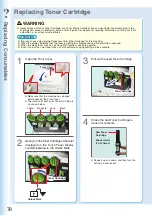
Page 78: ...e copying printing will be available Replacing Toner Cartridge Front Cover Toner Cartridge Toner Cartridge Shake the new Toner Cartridge to loosen its contents 4 New Toner Cartridge Shake it well 10 1...

Page 79: ...way in until it stops with the arrow label pointing to the Unlock Mark 6 New Toner Cartridge Front Cover Gently peel the tape off in the direction of the arrow 5 Tape Unlock Mark Lock Mark Do not ope...

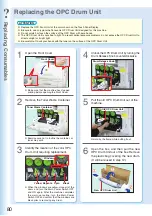
Page 80: ...careful not to soil your hands with the toner on the surface of the OPC Drum Unit Replacing the OPC Drum Unit Toner Waste Container Exercise care not to incline the container or toner may spill Drum...

Page 81: ...the Green Arrows of the new OPC Drum Unit with the ones on the machine and then insert the OPC Drum Unit into the machine up to the Black Arrow on the Drum Protective Cover 7 ATTENTION Insert the Ton...

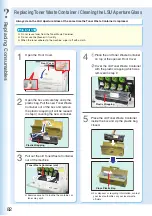
Page 82: ...replaced 2 Open the box and carefully unzip the plastic bag Pull the new Toner Waste Container out of the box and remove the plastic wrapping it will be reused in step 4 covering the new container 4 P...

Page 83: ...re Glass 4 Slots 7 Gently close the Front Cover 10 Insert the Cleaner back inside the Front Cover 8 Toner Waste Container new Front Cover Insert and pull out the Cleaner several times Clean the remain...

Page 84: ...ut the Staple Cartridge 2 When a staple jams an error message will be displayed Remove the jammed staple from the Staple Cartridge as illustrated Replacing Staples FQ SS32 Staple Cartridge FQ SS32 Sta...

Page 85: ...Sort Finish Staple Sort and the Staple Position See pages 36 to 37 8 Staple Cartridge To check the stapling operation place original s on the ADF 6 Press the Start key 9 Check the stapling operation...

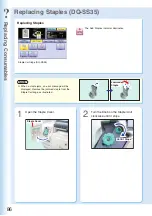
Page 86: ...be displayed Remove the jammed staple from the Staple Cartridge as illustrated Replacing Staples DQ SS35 Staple Cartridge DQ SS35 Open the Staple Cover Turn the Knob on the Stapler Unit clockwise unt...

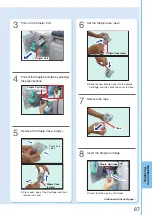
Page 87: ...een buttons 4 Remove the tape 7 Remove the Staple Case empty 5 Insert the Staple Cartridge 8 Press each side of the Cartridge and then remove the cover Insert it all the way in until it locks Staple C...

Page 88: ...e Menus 11 Close the Staple Cover 10 Select Sort Finish Staple Sort and the Staple Position See pages 36 to 37 12 Press the Start key 13 Face up Up to 100 sheets 20 lb Letter Select Sort Finish Select...

Page 89: ...89 Replacing Consumables memo...

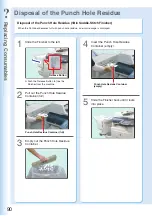
Page 90: ...ole Residue Container 3 Disposal of the Punch Hole Residue Insert the Punch Hole Residue Container empty 4 Slide the Finisher back until it locks into place 5 Punch Hole Residue Container full Punch H...

Page 91: ...Replacing Consumables 91 memo...

Page 92: ...polarity Notice California only This product contains a CR Coin Cell Lithium Battery which contains Perchlorate Material special handling may apply See www dtsc ca gov hazardouswaste perchlorate Repl...

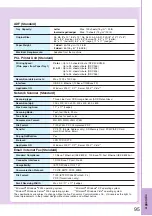
Page 93: ...5 Turn the Battery Holder upside down and then insert it into the machine 6 Fasten it with the screw 7 New Battery Battery Holder Screw The side of battery should be facing upwards Replace only with...

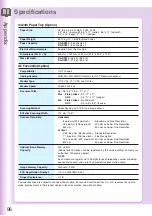
Page 94: ...seconds DP C405 Less than 6 7 seconds DP C305 Less than 7 3 seconds DP C265 Color Up to 30 ppm DP C405 C305 Up to 26 ppm DP C265 B W Up to 40 ppm DP C405 Up to 30 ppm DP C305 Up to 26 ppm DP C265 Pres...

Page 95: ...o 26 sheets minute DP C265 B W Up to 40 sheets minute DP C405 Up to 30 sheets minute DP C305 Up to 26 sheets minute DP C265 Resolution dots per inch Max 1200 x 1200 dpi Interface USB 2 0 Ethernet 10Ba...

Page 96: ...s Capacity Additional 800 stations can be registered by the service setting Contact your authorized Panasonic dealer NOTE Each station can register up to 36 digits for each telephone number including...

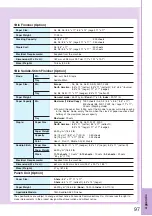
Page 97: ...le Saddle Stitch Paper Size A3 B4 A4 R 11 x 17 Ledger 8 5 x 14 Legal 8 5 x 11 Letter R Paper Weight 64 90 g m2 18 24 lb Stack 11 15 sheets 10 sets 6 10 sheets 10 sets 2 5 sheets 20 sets 64 g m2 17 lb...

Page 98: ...operation 2 Special Purpose Paper Labels FP 111L Envelopes Commercial 10 241 3 mm x 104 8 mm Monarch 7 3 4 190 5 mm x 98 4 mm DL 220 mm x 110 mm C5 229 mm x 162 mm Transparency CG3700 3M The following...

Page 99: ...Functions For Scanner and Email Please contact your local authorized Panasonic dealer for more details Toner Cartridge Black DQ TUW28K Approx 28 000 pages 8 5 x 11 size 5 coverage 1 DP C405 DQ TUV28K...

Page 100: ...see Note below Email consumerproducts us panasonic com Note For Technical Support please contact your Authorized Panasonic dealer This equipment complies with Part 68 of the FCC rules and the requirem...

Page 101: ...riffs Contact the state public utility commission public service commission or corporation commission for information If your home has specially wired alarm equipment connected to the telephone line e...

Page 102: ...rticularly important in rural areas Users should not attempt to make such connections themselves but should contact the appropriate electric inspection authority or electrician as appropriate CAUTION...

Page 103: ...ante dans les r gions rurales L utilisateur ne doit pas tenter de faire ces raccordements lui m me il doit avoir recours un service d inspection des installations lectriques ou un lectricien selon le...

Page 104: ...on Notice button 17 Compressed PDF 46 Confirm Settings 25 Confirm Settings button 17 Control Panel 15 Control Panel Angle Adjustment 3 Copy Count Indication 17 Copy Format 33 Copy Image Indication 17...

Page 105: ...Output Tray button 17 Paper Output Tray Indication 17 PCMCIA PC Card Slot 3 PDF 40 46 50 Photo 46 59 61 Placing Originals Copy 20 Placing Originals Facsimile Internet Fax 56 Pop up Screen Auto Reset...

Page 106: ...le 58 Sending Originals Internet Fax 60 S Fine 59 61 Sheet Bypass Labels Envelopes Transparency etc 76 98 Sheet Bypass Capacity 77 Shift Group 27 36 Shift Sort 27 36 Short Edge 31 Sort 27 36 Sort Fini...

Page 107: ...le for disk cartridges disk packs or floppy disks or it may contain non removable disk platters like most hard disks Abbreviation of dots per inch which indicates the resolution of images The more dot...

Page 108: ...ic keys located on your Control Panel A Local Area Network is a computer network system and printer limited to an immediate area such as an Office Factory and University used to integrate and exchange...

Page 109: ...ommunications for transmitting private documents via Internet The application protocols such as HTTP FTP and SMTP can be encrypted Both Netscape Navigator and Internet Explorer support SSL and many We...

Page 110: ...110 memo...

Page 111: ...maging Inc registered in the U S Patent and Trademark Office and may be registered in other jurisdictions ColorSetTM Profile Tool Kit Profile Studio and Profile Optimizer are trademarks of Monotype Im...

Page 112: ...ASONIC MACHINE SEEYOUR DEALER FOR DETAILS OF DEALER S WARRANTY Tr0907 1117 01 PJQMC1032ZB November 2007 Published in Japan Panasonic Communications Company of North America Unit of Panasonic Corporati...

Reviews: