background image

10 

5. Water Cycle Diagram 

  Connection for WH-SDH series or equivalent. 


  Connection for WH-SDF / SDC series or equivalent. 


Summary of Contents for WH-TD20E3E5

Page 1: ...eating Element 22 9 2 Replacing the Thermostat 22 9 3 Replacing the Sacrificial Anode 22 PRECAUTION OF LOW TEMPERATURE In order to avoid frostbite be assured of no refrigerant leakage during the installation or repairing of refrigerant circuit WARNING This service information is designed for experienced repair technicians only and is not designed for use by the general public It does not contain w...

Page 2: ...2 10 Technical Data 23 10 1 Tank Thermistor 23 11 Replacement Parts List 24 11 1 WH TD20E3E5 WH TD30E3E5 1 24 12 Replacement Parts List 25 12 1 WH TD20E3E5 UK WH TD30E3E5 UK 25 ...

Page 3: ...at horizontal strong and firm location which is able to withstand the Tank Unit s weight If the location is slanting or strength is not enough the set will fall and cause injury 7 For electrical work follow the local national wiring standard regulation and the installation instruction An independent circuit and single outlet must be used If electrical circuit capacity is not enough or defect found...

Page 4: ...t an installation location where it is accessible for maintenance 5 Do not install this appliance in a laundry room or other high humidity location This condition will cause rust and damage to the Tank unit 6 Make sure the power supply cord does not contact with hot part i e water piping High temperature may cause insulator of power supply cord damage hence electrical shock or fire 7 After install...

Page 5: ...al Stainless Steel LDX 2101 DIN 1 4162 Lean Duplex Diameter Thickness mm Ø 22 0 8 Heating coil Surface area m 2 1 4 1 8 Material ECO Foam PUR Thickness mm 40 Insulation Heat loss kW Approx 2 1 24hours Approx 2 7 24hours Insulation Jacket Material Epoxy coated steel 90 gloss white Diameter mm 580 580 Dimension Height mm 1150 1600 Weight Net kg 49 65 Cold water inlet inch 3 4 BSP with inside baffle ...

Page 6: ... LDX 2101 DIN 1 4162 Lean Duplex Diameter Thickness mm Ø 22 0 8 Heating coil Surface area m 2 1 4 1 8 Material ECO Foam PUR Thickness mm 40 Insulation Heat loss kW Approx 2 1 24hours Approx 2 7 24hours Insulation Jacket Material Epoxy coated steel 90 gloss white Diameter mm 580 580 Dimension Height mm 1150 1600 Weight Net kg 49 65 Cold water inlet inch 3 4 BSP with inside baffle plate Hot water ou...

Page 7: ...nce and safety o Hot water setting temperature of tank 40 C Max 75 C Set by remote control of indoor unit Safety by 2 thermostats o 1st stage Set 88 C Can be cancelled by remote control o 2nd stage Set 95 C Can be cancelled by thermostat reset button Maximum compatibility o Built in coil in stainless steel which is designed for circulation from solar panel etc Serviceability Feature o Easy drainin...

Page 8: ...3 Sensor socket 12 70 mm 1 2 BSP 4 Flow inlet 19 05 mm 3 4 BSP 5 Return outlet 19 05 mm 3 4 BSP 6 Cold water inlet 19 05 mm 3 4 BSP 7 Threaded Sensor hole for solar station connection 12 70 mm 1 2 BSP 8 Anode connector 19 05 mm 3 4 BSP Electrical Box Detail Diameter Height Resetbutton Safetycut out Thermostat Electric element 5 4 BSP Remove this jumper when connecting the Tank Unit to a PanasonicA...

Page 9: ...mm 1 2 BSP 4 Flow inlet 19 05 mm 3 4 BSP 5 Return outlet 19 05 mm 3 4 BSP 6 Cold water inlet 19 05 mm 3 4 BSP 7 Threaded Sensor hole for solar station connection 12 70 mm 1 2 BSP 8 Anode connector 19 05 mm 3 4 BSP 9 T P valve 19 05 mm 3 4 BSP 10 Sensor Electrical Box Detail Resetbutton Safetycut out Thermostat Electric element 5 4 BSP 8 10 1 9 2 3 4 7 5 6 T P Valve Dimension 46 1 2 BSP 32 92 15 mm...

Page 10: ...10 5 Water Cycle Diagram Connection for WH SDH series or equivalent Connection for WH SDF SDC series or equivalent ...

Page 11: ...mm 3 4 BSP Accessory parts A 3 way valve B Sensor C Installation manual D Safety valve E Adjustable legs 3 F Anode bar Diameter Height Detail of Electric Box Resetbutton Safetycut out Thermostat Electric element 5 4 BSP Remove this jumper when connecting the Tank Unit to a PanasonicAir to Water Heatpump Indoor Unit except S H model 8 1 2 3 4 7 5 6 6 1 1 Piping and Wiring Installation Panasonic Hea...

Page 12: ...n is at Heating Side On condition is at Tank Unit 5 Insert sensor until it touches securely end of socket tighten the cap of socket so that it is not shifted Refer bottom diagram 6 Connect the cable between heater and OLP which located inside electrical box as shown at below section Wiring at Tank Unit Electrical Box and Wiring at Indoor Unit Use cap tire cable 2 5 mm2 for wiring For S H series 3 ...

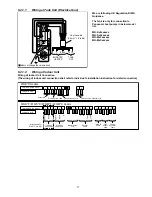
Page 13: ...unit connection shall refer to individual s installation instruction for detail connection Terminals on the indoor Lead wire cord 1 2 3 4 5 6 Booster Heater Cord Three way Valve Cable Sensor wire External Thermo Controller Cord Terminals on the indoor Lead wire cord Three way Valve Cable External Controller Cable Booster Heater Cord Receiver Cable Tank OLP Cable Tank Sensor Cable Two way Valve Cab...

Page 14: ...ding on the water quality corrode When diameter is approx 8 mm the anode must be replaced It is easy to check and replace the anode 1 Turn off power supply 2 Close water supply valve 3 Manually open the safety valve and drain approx 2ltrs 4 Unscrew the anode check and if necessary replace 6 1 4 Discharge of Water 1 Turn off power supply 2 Close water supply valve 3 Open safety valve by turning kno...

Page 15: ... manual C Safety valve D Adjustable legs 3 E Anode bar Detail of Electric Box Resetbutton Safetycut out Thermostat Electric element 5 4 BSP 8 10 1 9 2 3 4 7 5 6 6 2 1 Piping and Wiring Installation Panasonic Heating B side A B A side 3 way valve Inlet pipe Drain valve field supply Tee joint field supply Tee joint Safety valve field supply Hot water connection Anode bar insert 300 mm or more Obstac...

Page 16: ...ipework discharge through the tundish Tundish pipework must be 22 mm with a minimum vertical length of 300 mm below tundish Maximum permitted length of 22 mm pipework is 9 m Each bend or elbow is equivalent to 0 8 m of pipework Discharge pipe Connect the discharge from the tundish This must have a continuous fall and be fitted in accordance with The Building Regulations The tundish should be insta...

Page 17: ... wiring of indoor unit connection shall refer to individual s installation instruction for detail connection Terminals on the indoor Lead wire cord 1 2 3 4 5 6 Booster Heater Cord Three way Valve Cable Sensor wire External Thermo Controller Cord Terminals on the indoor Lead wire cord Three way Valve Cable External Controller Cable Booster Heater Cord Receiver Cable Tank OLP Cable Tank Sensor Cable...

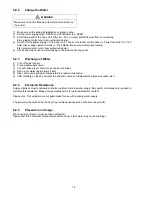
Page 18: ...ischarge of Water 1 Turn off power supply 2 Close water supply valve 3 Connect hose pipe to drain cock at base of cylinder 4 Open a hot water tap to allow air inlet 5 Open drain valve and open temperature pressure relief valve 6 After discharge close a hot water tap and drain valve and temperature pressure relief valve 6 2 4 Corrosion Resistance Duplex stainless steel is naturally corrosion resist...

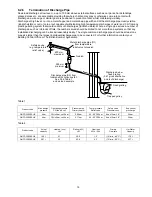
Page 19: ... should be at least one pipe size larger than the largest individual discharge pipe to be connected For further information contact your Building Control Office or The British Board of Agreement Metal discharge pipe D1 from temperature relief valve to tundish Discharge below fixed grating 3 61 gives alternative points of discharge Fixed grating Trapped gulley 600 mm maximum 300 mm minimum Discharg...

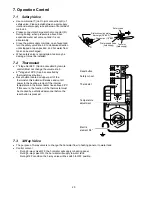
Page 20: ...d supply Safety valve R D K 7 2 Thermostat 1st stage Set 88 C Can be cancelled by remote control Must not change the volume knob 2nd stage Set 95 C Can be cancelled by thermostat reset button Reset button located on upper part of the thermostat this button will release and cut all power to the heating element if the internal temperature in the water heater rises above 98 C If this occurs the funct...

Page 21: ...at up using a std screwdriver Water not warm enough Heating element or the internal electrical wiring partially out of order Check the resistance of the heating element on the connector of the heater bundle and the condition of the internal wiring Safety valve SV is dripping Water expands when heated If there is no consumption of hot water over a period of time pressure builds up causing the safet...

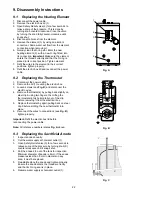
Page 22: ...vering the electric box 3 Loosen screws see Fig B and disconnect the electric wires 4 Remove thermostat 4 by pulling back slightly on steel clip S using two fingers then lifting the thermostat slightly horizontally out of the clip before removing it from the electrical box 5 Replace thermostat by again pulling back on steel clip S before slotting the new thermostat into place 6 Reconnect the wires...

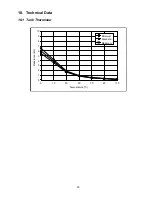
Page 23: ...23 10 Technical Data 10 1 Tank Thermistor 0 1 2 3 4 5 6 7 8 9 10 0 10 30 50 70 90 110 Temperature C Resistance kΩ Minimum Standard Maximum ...

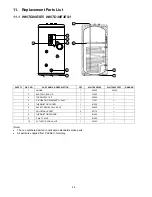
Page 24: ...6250 2 ELECTRIC BOX LID 1 74050 3 THERMOSTAT KIT 1 80060 4 5 4 HEATING ELEMENT 1 240V 1 71257 5 THERMISTOR POCKET 1 81020 6 SAFETY RELIEF VALVE SV 2 1 90406 7 ADJUSTABLE FEET 3 60710 8 THERMISTOR SENSOR 1 81809 9 3 WAY VALVE 1 91999 10 ACTUATOR FOR VALVE 1 90252 Note The non numbered parts are not kept as standard service parts All parts are supplied from PAPAEU Germany ...

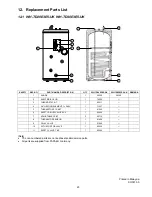
Page 25: ... 1 74050 3 THERMOSTAT KIT 1 80011 4 5 4 HEATING ELEMENT 1 240V 1 71257 5 THERMISTOR POCKET 1 81020 6 SAFETY RELIEF VALVE SV 2 1 90424 7 ADJUSTABLE FEET 3 60710 8 THERMISTOR SENSOR 1 81809 9 3 WAY VALVE 1 91999 10 ACTUATOR FOR VALVE 1 90252 11 SAFETY VALVE T P 1 92020 Note The non numbered parts are not kept as standard service parts All parts are supplied from PAPAEU Germany Printed in Malaysia SO...

Reviews: