


DIRECT TV REC
ASPECT
TEXT
PROGRAMME
STTL INDEX HOLD
MENU
N
AV
TV
EXIT
OPTION
RETURN
TV
INPUT
18
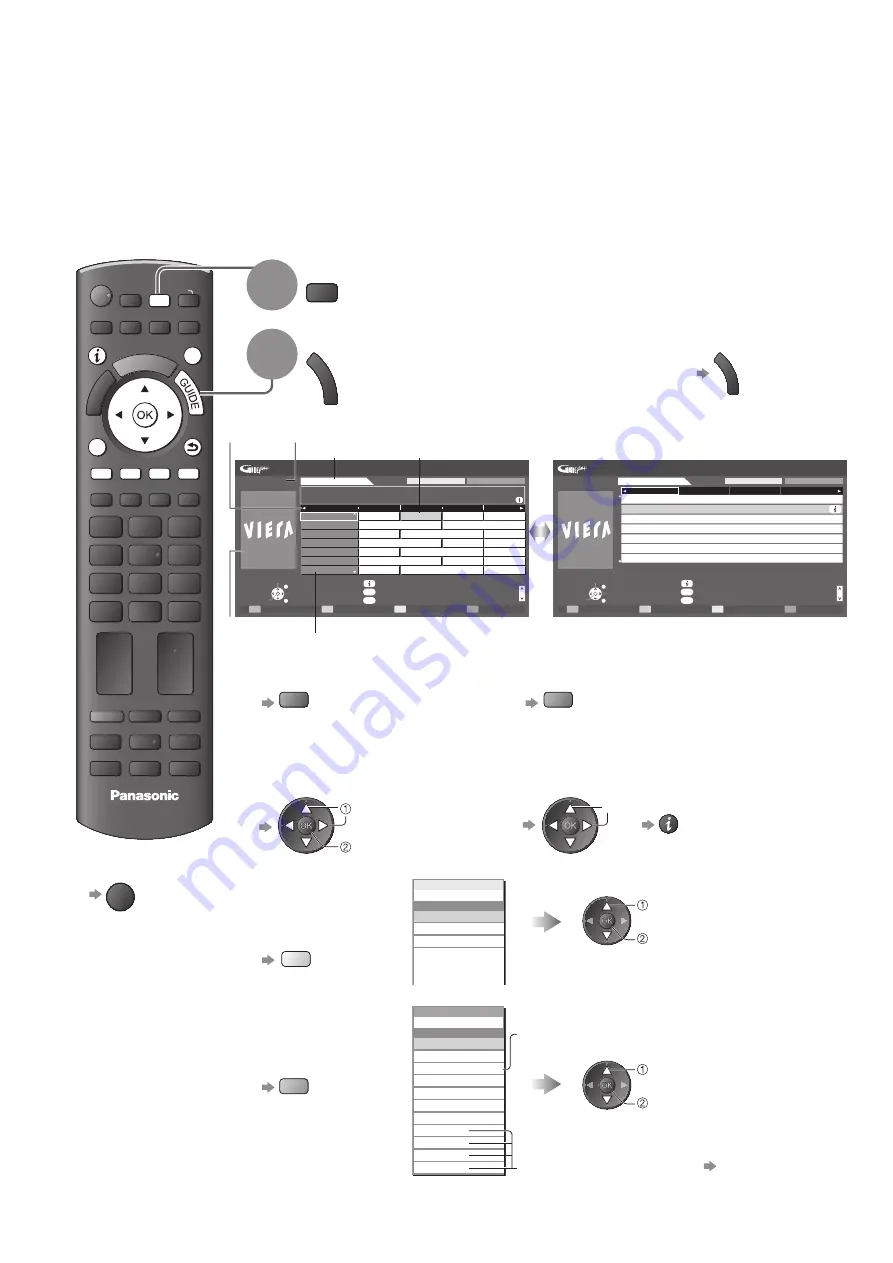
Using TV Guide
TV Guide
―
Electronic Programme Guide (EPG) provides an on-screen listing of the programmes
currently broadcast and the forthcoming broadcasts over the next seven days (depending on the
broadcasters).
This function varies depending on the country you select (p. 12).
●
DVB-T and Analogue channels are displayed on the same TV Guide screen.
●
Analogue channels will be listed after DVB-T channels but there will be no programme listings. “D” means DVB-T
channel and “A” means Analogue channel.
When this TV is turned on for the first time, or the TV is switched off for more than a week, it may take some time
●
before the TV Guide is completely shown.
1
Select the mode
TV
2
View TV Guide
G
U
ID
E
To change the layout (Landscape / Portrait)
●
G
U
ID
E
view “Landscape” to see many channels
view “Portrait” to see one channel at a time
Wed 24/10/2007
10:46
TV Guide: Landscape
All Types
All Channels
View
Select channel
Select programme
RETURN
Page up
Page down
Wed 24th
1 BBC ONE
20:00 - 20:30 DIY SOS : We open in the Battersbys
-24 hours
+24 hours
Prog.Type
Category
EXIT
BBC ONE
Eastender
DIY SOS
The Bill
Red Cap
19:30
Time:
20:00
20:30
21:00
BBC THREE
Hot Wars
Holiday Program
E4
Emmerdal.
Coronation Street
The Bill
BBC FOUR
10 O’ clock News BBC
Pepsi Char.
Good bye
BBC 2W
Panorama
Spring watch
Coast
BBCi
I’ m A Celebrity
Pop Idol
News
BBC Radi
1
7
14
70
72
105
719
D
D
D
D
D
D
D
Rugby
15 To 1
The Bill
Info
Change display mode
Select Advert
GUIDE
OPTION
Current date and time
Programme
Landscape (Displays by channel)
TV Guide
time
Channel position and name
Advertisement
TV Guide date
Example:
View
Select programme
Select channel
RETURN
Page up
Page down
+24 hours
Prog.Type
Category
EXIT
D 1 BBC ONE
D 7 BBC THREE D 14 E4
D 70 BBC FOUR
19:30~20:00
20:00~20:30
20:30~21:00
21:00~22:00
22:30~23:00
23:00~23:30
23:00~00:00
Eastender
DIY SOS
The Bill
Red Cap
Live junction
POP 100
Rugby
Wed 24th
Wed 24/10/2007
10:46
TV Guide: Portrait
All Types
All Channels
Info
Change display mode
Select Advert
GUIDE
OPTION
Portrait (Displays by time)
Example:
To the previous day
■
(DVB mode)
red
To the next day
■
(DVB mode)
green
To watch the programme
■
Select the programme or channel
To view details of the
■
programme
(DVB mode)
Select the programme
select
watch
select
Press again to
●
return to TV Guide.
To view a
■
channel list of
the selected type
(DVB mode)
yellow
All Types
Movie
News
.
.
.
.
.
.
Prog.Type
All Types
(Type list)
select type
view
To view a
■
channel list
of the selected
category
blue
To list favourite channels p. 33
Categor y
All Service s
All Channels
Free Channels
All DVB-T Channels
All Analogue Channels
TV
Radio
Favourites1
Favourites2
Favourites3
Favourites4
Categor y
All Channels
Pay Channels
Only Analogue channels are listed
(Category list)
select category
view
To return to TV
■
EXIT


