


14
6
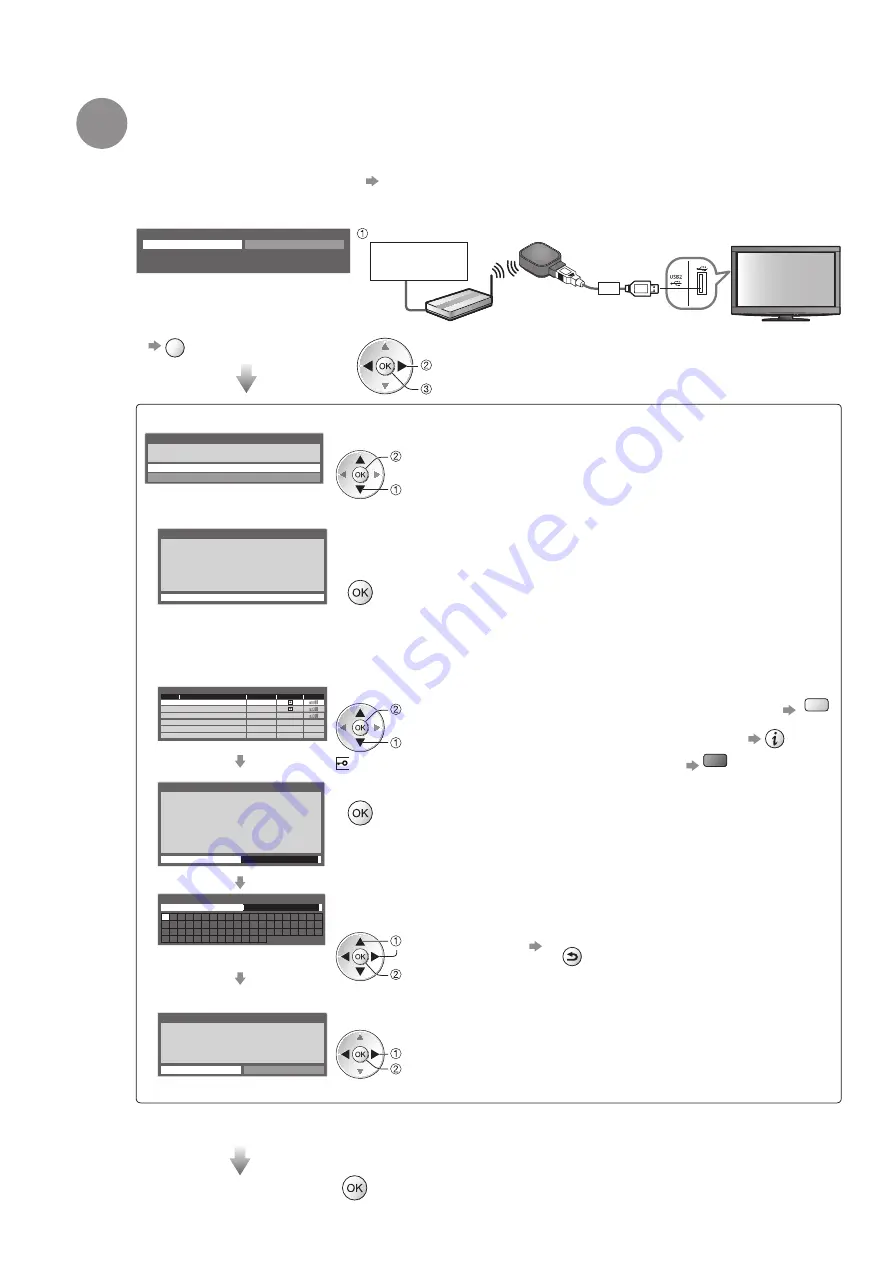
Setup the wireless LAN connection
Setup the wireless LAN connection to enable the network service functions.
(If you do not wish to use wireless LAN connection or the network service functions, skip this step.)
To setup the wireless LAN connection, use the Wireless LAN Adaptor (supplied). For the information
●
about the Wireless LAN Adaptor “Wireless LAN Adaptor” (p. 15)
Confirm the encryption key, settings and positions of your access point before starting setup. For details,
●
read the manual of the access point.
Start wireless LAN connection setup?
Please connect the wireless LAN adaptor (DY-WL10) to a
USB terminal.
Yes
No
You can setup the wireless LAN
connection later
To skip this step
●
EXIT
or select “No”
connect the Wireless LAN Adaptor to the USB 1 or 2 port
Wireless LAN Adaptor
and Extension cable
(supplied)
Access point
Internet
environment
access
select “Yes”
Wireless LAN connection setup starts
Connection Type
Please select netwok connection type.
WPS(Push button)
Search for access point
Select the connection type
select
access
WPS(Push button)
■
WPS(Push button)
1) Please press the ‘WPS’ buttton on the access
point until its light flashes.
2) When light is flashing select ‘Connect’ on TV.
If you are unsure, please check the instruction
manual of the access point.
Connect
Press the WPS button on the access point until the light flashes.
And then, press the OK button to connect the Wireless LAN Adaptor and
the access point.
Ensure that your access point supports WPS for this setup.
●
WPS: Wi-Fi Protected Setup
●
Search for access point
■
Access points found automatically are listed.
Available Access Points
Access Point A
11n(2.4GHz)
11n(5GHz)
SSID
No.
Wireless type
Encrypt
Reception
Access Point B
Access Point C
11n(5GHz)
1
2
3
Select your desired access point
select
access
: Encrypted access point
To search access points again
●
yellow
For the information of the
●
highlighted access point
To set manually
●
red
Encryption Key Setting
Connection will be made with the following settings:-
SSID : Access Point A
Authentication type : WPA-PSK
Encryption type : TKIP
Please input the encryption key.
Encryption key
Access the encryption key input mode
If the selected access point is not encrypted, the confirmation screen will
●
be displayed. It is recommended to select the encrypted access point.
Access Point Settings
Encryption key
A B C D E F G H I
J K L M N
U V W X Y Z
0 1 2 3 4 5 6
a b c d e
f
g h
i
j
k
l m n
u v w x y z
(
) + -
.
* _
O P Q R S T
7 8 9
!
:
#
o p q r
s
t
Enter the encryption key of the access point
Set characters one by one
Store
select
set
BACK/
RETURN
You can set characters by using numeric buttons.
●
Access Point Settings
Encryption key is set to:-
XXXXXXXX
Select ‘Yes’ to confirm.
Select ‘No’ to change.
Yes
No
Select “Yes”
select
set
To re-enter the encryption key, select “No”.
●
If the connection has failed, check the encryption key, settings and positions of your access point. And
●
then, follow the on screen instructions.
Exit to go to the next step
Auto Setup
(continued to the next page)