background image

~¨¢

2

Cuprins

>

¢ ¢©©©©©©©©©©©©©©©©©©©©©©©©©©©©©©©©©©©©©©©©©©©©©©©©©©© 3

!¢ £¢©©©©©©©©©©©©©©©©©©©©©©©©©©©©©©©©©©©©©©©©©©©©©© 4

"&

}©©©©©©©©©©©©©©©©©©©©©©©©©©©©©©©©©©©©©©©©©©©©©©©©©©©©©©©©©©©© 7

$*©©©©©©©©©©©©©©©©©©©©©©©©©©©©©©©©©©©©©©©©©©©©©©©©©©©©©©©©©©© 8

`#   ¢©©©©©©©©©©©©©©©©©©©©©12

   ¢£ ¢©©©©©©©©©©©©©©©©©©©©©©©©©©©©©©©©©©©©©©©©14

Utilizarea televizorului dvs. VIERA

?—   ?©©©©©©©©©©©©©©©©©©©©©©©©©©©©©©©©©©©©15

!— }¡'_~©©©©©©©©©©©©©©©©©©©©©©©©©©©©©©©©©©15

?—   ˆ©©©©©©©©©©©©©©©©©©©©©©©©©©©©©©©©©©©©©©©16

Altele

¦=¢#&©©©©©©©©©©©©©©©©©©©©©©©©©©©©©©©©©©©©©©©©©©©©©©©17

¦£©©©©©©©©©©©©©©©©©©©©©©©©©©©©©©©©©©©©©©©©©©©©©©©©©©©©©©©©©©18

 "©©©©©©©©©©©©©©©©©©©©©©©©©©©©©©©©©©©©©©©©©©©©©©©©©©©©©©©18

# £&¢  £
@}¡'_~XZ}£¢‚J£¢{

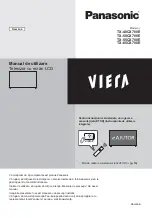
Summary of Contents for VIERA TX-65CX700E

Page 1: ...the Safety Precautions of this manual before use The images shown in this manual are for illustrative purposes only Please refer to Pan European Guarantee Card if you need to contact your local Panaso...

Page 2: ...k Start Guide Accessories 7 Connections 8 Identifying Controls 12 First time Auto Setup 14 Using your VIERA Watching TV 15 How to Use eHELP 15 Viewing 3D images 16 Others FAQs 17 Maintenance 18 Specif...

Page 3: ...vices made by other manufacturers and we disclaim any liability or damage arising from operation and or performance from usage of such other maker s peripheral devices The recording and playback of co...

Page 4: ...insert foreign objects into the TV through the air vents Do not use an unapproved pedestal mounting equipment Be sure to ask your local Panasonic dealer to perform the setup or installation of approve...

Page 5: ...s When problems occur due to static electricity etc the TV might stop operating to protect itself In this case turn the TV off at the Mains power On Off switch then turn it back on Additional informat...

Page 6: ...Do not view 3D images if you have a history of oversensitivity to light heart problems or any other medical conditions When viewing 3D images your sense of distance may be tricked or go wrong Be caref...

Page 7: ...t the optional accessories refer to eHELP Support Optional accessories Assembling Removing the pedestal Assembly screw 4 M4 12 Pedestal R Pedestal L Preparations Take out the pedestal and the TV from...

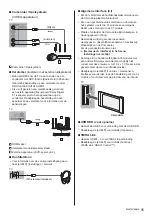
Page 8: ...ted from the mains socket before attaching or disconnecting any cables Check the terminal type and cable plugs are correct for connection Use a fully wired HDMI compliant cable Use a fully wired SCART...

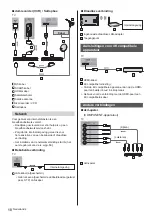
Page 9: ...connect to DVB via IP server to watch broadcast streaming It is recommended to connect to DVB via IP server with a LAN cable Wired connection TV Cable LAN cable Shielded Use Shielded Twist Pair STP L...

Page 10: ...connection will start when first using the TV p 14 Wired connection TV Internet environment LAN cable Shielded Use Shielded Twist Pair STP LAN cable Wireless connection Internet environment Built in...

Page 11: ...odule If a smart card and a CI module come as a set first insert the CI module then insert the smart card into the CI module Insert or remove the CI module completely in the correct direction as shown...

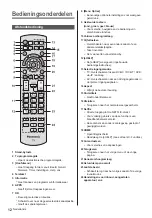
Page 12: ...PS 7 OK 8 Option Menu 9 Coloured buttons red green yellow blue 10 Volume Up Down 11 Numeric buttons 12 eHELP J X Z _ 13 Input mode selection 14 Aspect 15 Subtitles 16 Exit 17 Netflix J 18 HOME J X Z 1...

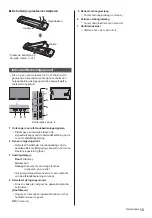
Page 13: ...s Z Indicator Control panel 4 5 6 7 1 2 3 1 Remote control signal receiver 2 Ambient sensor X _ X 3 Power LED Red Green _ Orange Z J 4 Input mode selection Main Menu OK Z 5 Channel Up Down Z 6 Volume...

Page 14: ...he remote control Z Select the language Select Home X X Set up the network connection Select your country J Z Tick the TV signal mode to tune and then select Start Auto Setup Z X X X X X X X Auto Setu...

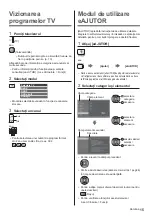
Page 15: ...g TV 1 Turn power on Z Z _ _ Z J X Z 2 Select the mode TV Selection DVB C DVB T DVB via IP Analogue 3 Select a channel 399 How to Use eHELP J X 1 Display eHELP Help eHELP J X X J X 2 Select the catego...

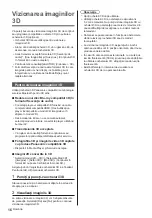
Page 16: ...Playing back 3D compatible Blu ray disc Frame Sequential format Z 3D supported broadcast 3D photos and 3D videos taken by 3D compatible Panasonic products 2D images converted to 3D X X Z X X X Z 1 Tu...

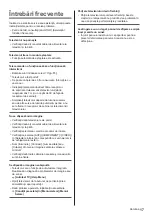
Page 17: ...e TV is turned on Check the mains lead is plugged into the TV and the mains socket Check the correct input mode is selected Check the setting of AV2 COMPONENT VIDEO in Input Selection to match the sig...

Page 18: ...to tap or scratch the surface with your fingernail or other hard objects Do not allow the cabinet and pedestal to make contact with a rubber or PVC substance for a long time This may degrade surface...

Page 19: ...ceiving systems Band name Check the latest information on the available services at the following website English only http panasonic net viera support DVB C Digital cable services MPEG2 and MPEG4 AVC...

Page 20: ...open source software refer to eHELP Support Licence This equipment complies with the EMC standards listed below EN55032 EN55020 EN55024 EN61000 3 2 EN61000 3 3 When using the wall hanging bracket Plea...

Page 21: ......

Page 22: ...on and recycling please contact your local municipality Penalties may be applicable for incorrect disposal of this waste in accordance with national legislation Note for the battery symbol bottom symb...

Page 23: ...aandachtig het gedeelte Veiligheidsmaatregelen in deze handleiding De afbeeldingen in deze handleiding dienen slechts als voorbeeld Zie uw Europese Garantie als u contact wilt opnemen met uw plaatseli...

Page 24: ...Accessoires 7 Verbindingen 8 Bedieningsonderdelen 12 Automatisch instellen bij het eerste gebruik 14 Uw VIERA tv gebruiken Tv kijken 15 Gebruik eHELP 15 3D beeld weergeven 16 Overige informatie Veelge...

Page 25: ...rakelijkheid of schade af die voortvloeit uit de werking en of prestaties bij gebruik van randapparatuur van dergelijke derde partijen Het opnemen en afspelen van inhoud op dit of elk ander apparaat k...

Page 26: ...Er zijn geen door de gebruiker repareerbare onderdelen aan de binnenkant Stel de tv niet bloot aan regen of hoge vochtigheid De tv mag niet blootgesteld worden aan druppelend of spattend water Plaats...

Page 27: ...e tv uit de buurt van andere apparaten die 2 4 GHz en 5 GHz signalen gebruiken zoals andere draadloze LAN apparaten magnetrons en mobiele telefoons om storing of vertraging door interferentie te vermi...

Page 28: ...rschillende mensen 3D beeld verschillend waarnemen Kijk niet naar 3D beeld als u overgevoelig bent voor licht hartproblemen hebt of als er een andere medische toestand bestaat Wanneer u naar 3D beeld...

Page 29: ...tie over de optionele accessoires Ondersteuning Optionele accessoires De standaard monteren verwijderen Montageschroef 4 M4 12 Standaard R Standaard L Voorbereidingen Haal de standaard en de tv uit de...

Page 30: ...nsluit of loskoppelt Controleer of u de juiste aansluitingen en connectoren gebruikt voor de verbinding Gebruik een HDMI kabel met volledige bedrading Gebruik een SCART kabel met volledige bedrading H...

Page 31: ...ver om gestreamde inhoud weer te geven Het wordt aanbevolen om een LAN kabel te gebruiken voor verbinding met een DVB via IP server Bekabelde verbinding TV Kabel LAN kabel afgeschermd Gebruik een afge...

Page 32: ...van de netwerkverbinding start bij het eerste gebruik van de tv p 14 Bekabelde verbinding TV Internetomgeving LAN kabel afgeschermd Gebruik een afgeschermde dubbeldraadse getwist paar STP LAN kabel D...

Page 33: ...neer u de CI module plaatst of verwijdert Als u een gecombineerde smartcard en CI module hebt plaatst u eerst de CI module en vervolgens steekt u de smartcard in de CI module Plaats of verwijder de CI...

Page 34: ...es 9 Gekleurde toetsen rood groen geel blauw 10 Volume omhoog omlaag 11 Cijfertoetsen _ 12 eHELP J X Z 13 Selectie ingangsmodus _ _ 14 Aspect 15 Ondertitels 16 Afsluiten 17 Netflix J 18 HOME _ J X ZJ...

Page 35: ...tor Bedieningspaneel 4 5 6 7 1 2 3 1 Ontvanger voor afstandsbedieningssignalen 2 Sensor omgevingslicht _ X X 3 Voedingslampje Rood Groen Oranje Z 4 Selecteert de ingangsmodus Hoofdmenu _ OK Z 5 Kanaal...

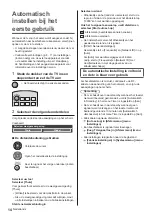
Page 36: ...uiken _ Z Selecteer uw taal Selecteer Thuis X X Stel de netwerkverbinding in Selecteer uw land Z Vink het tv signaal aan waarop u wilt afstellen en selecteer Start auto set up Z X X X X X X X De autom...

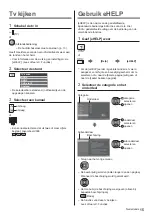
Page 37: ...1 Schakel de tv in Z Z Z J X ZJ 2 Selecteer de stand TV keuze DVB C DVB T DVB via IP Analoog 3 Selecteer een kanaal Gebruik eHELP J X 1 Geef eHELP weer Help eHELP J X X J X 2 Selecteer de categorie en...

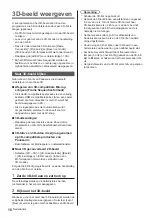
Page 38: ...n Afspelen van 3D compatibele Blu ray schijven Frame Sequential formaat Z 3D uitzendingen 3D foto s en 3D video die zijn opgenomen op 3D compatibele producten van Panasonic Naar 3D geconverteerd 2D be...

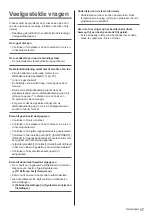
Page 39: ...ld weergegeven Controleer of de tv aan staat Controleer of de stekker van het netsnoer in de tv en in het stopcontact zit Controleer of de juiste ingangsmodus is geselecteerd Controleer of de instelli...

Page 40: ...op het oppervlak met uw vingernagel of een hard voorwerp Zorg dat de behuizing en de standaard niet gedurende langere tijd in contact zijn met rubber of pvc Hierdoor kan de kwaliteit van het oppervlak...

Page 41: ...zel Ontvangstsystemen Bandnaam U kunt de meest recente informatie over de beschikbare diensten op de volgende website bekijken alleen Engels http panasonic net viera support DVB C Digitale kabelservic...

Page 42: ...ormatie over de openbronsoftware Ondersteuning Licentie Dit apparaat voldoet aan de volgende EMC normen EN55032 EN55020 EN55024 EN61000 3 2 EN61000 3 3 Bij gebruik van de muurbevestigingssteun Neemt c...

Page 43: ......

Page 44: ...ecycling kunt u contact opnemen met uw plaatselijke gemeente Afhankelijk van uw nationale wetgeving kunnen er boetes worden opgelegd bij het onjuist weggooien van dit soort afval Let op het batterij s...

Page 45: ...Manual de utilizare Televizor cu ecran LCD _ X J...

Page 46: ...2 Cuprins 3 4 7 8 12 14 Utilizarea televizorului dvs VIERA 15 _ 15 16 Altele 17 18 18 _ X Z J...

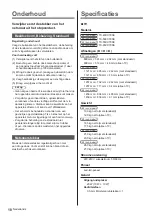
Page 47: ...3 _ Z Z Z Z Z Z Z Z Z J JJ...

Page 48: ...4 deschise...

Page 49: ...5 Unde radio J Z J J J J J Z Z J J Z Mutarea televizorului...

Page 50: ...6 Z Z _ J X _ _ _ J J J J _ J...

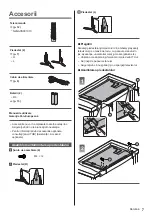
Page 51: ...7 Accesorii J Manual de utilizare _ X Z Z 1 C B 2 A A...

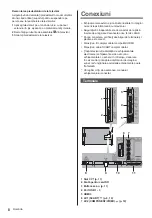
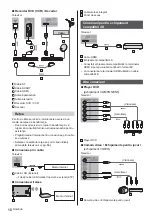
Page 52: ...8 _ 2 3 Z 4 5 1 2 3 8 9 10 6 11 7 _ _ J _...

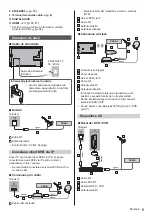
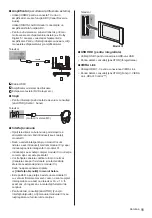
Page 53: ..._ _ _ Z _ J J Z J Z J _ X Z _ _ _...

Page 54: ..._ _ _ J Z J Z J J _ _ Z _ _ Z Z Z _ Z Z...

Page 55: ...Z Z J _ Z Z _ X Z Z _ Z _ X Z Modul CI __ _ X Z VIERA Link J _ X Z J...

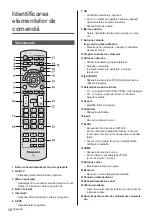
Page 56: ...entificarea elementelor de 2 Ghid TV 4 Buton Teletext 6 APPS 7 OK 9 Butoane colorate 10 11 Butoane numerice 12 _ X Z 13 14 15 16 17 Netflix J 18 HOME _ X Z 19 20 Revenire 21 22 23 Ultima vizualizare 2...

Page 57: ...13 Z 4 5 6 7 1 2 3 X X 3 LED de alimentare Z J OK Z 5 Z 6 Z...

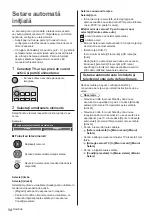
Page 58: ...14 J Z Z 1 2 Z X X Z Z X X X X X X X X X _ X X...

Page 59: ...15 Vizionarea 1 Z Z Z _ X Z 2 Selectare TV _ _ _ 3 Modul de utilizare eAJUTOR _ X 1 _ X X X 2 Z Z Z...

Page 60: ...16 3D Z _ X X X Z _ X Z _ _ Z _ _ _ _ _ _ X X Z X X X Z 1 _ 2 _ J X X _ J Z...

Page 61: ...17 _ X Z Bateriile sunt introduse corect Z X Z _ _ X _X X X X J X X _...

Page 62: ...inci Model de 50 inci Model de 55 inci Model de 65 inci _ Model de 40 inci Z Z Model de 50 inci Z Z Model de 55 inci Z Z Model de 65 inci Z Z Model de 40 inci Z Z Model de 50 inci Z Z Model de 55 inc...

Page 63: ...19 SCART Z _ _ X Z _ X Y X Z PB B R R X _ Z Z Z Z X Z X _ _ _ Z _ Z Z _ Z Z Z J Z Z Z J Z Z _ _ J J Z Z Z Z Z Z Z...

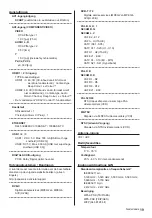
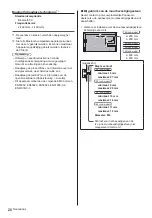
Page 64: ..._ Z _ X Z J a Model de 40 inci Model de 50 inci Model de 55 inci Model de 65 inci Z Model de 40 inci Model de 50 inci J Model de 55 inci J Model de 65 inci _ J Z...

Page 65: ......

Page 66: ......

Page 67: ......

Page 68: ..._ _ Web Site http www panasonic com Panasonic Corporation 2015 TQB0E2509N 1...

Reviews: