Panasonic Viera TX-65CR730B Operating Instructions Manual Download Page 8

English

8

2

A

A

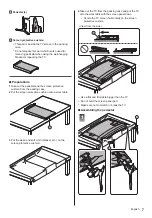
Removing the pedestal from the TV

Be sure to remove the pedestal in the following way 

when using the wall-hanging bracket or repacking the 

TV.

1

  Put the screen protective cushion onto a work table.

2

  Put the clean and soft cloth on the screen protective 

cushion.

3

  Put the TV onto the work table with the screen panel 

down.

4

  Remove the assembly screws   from the TV.

5

  Pull out the pedestal from the TV.

Connections

● 

External equipment and cables shown are not 

supplied with this TV.

● 

Please ensure that the unit is disconnected from the 

mains socket before attaching or disconnecting any 

cables.

● 

Check the terminal type and cable plugs are correct 

for connection.

● 

Use a fully wired HDMI compliant cable.

● 

Use a fully wired SCART cable.

● 

Keep the TV away from electronic equipment (video 

equipment, etc.) or equipment with an infrared sensor, 

otherwise distortion of image / sound may occur or 

operation of other equipment may be affected.

● 

Please also read the manual of the equipment being 

connected.

Terminals

4

5

1

2

3

8

9

10

6

11

7

1   CI  slot   (p. 11)
2   SD Card slot
3   Headphone  jack   (p. 11)
4   USB 1 - 3 port
5   HDMI3
6   AV1  (SCART)   (p. 9)
7   AV2 (COMPONENT / VIDEO)   (p.  10)
8   ETHERNET   (p. 10)

Summary of Contents for Viera TX-65CR730B

Page 1: ...g this product and retain them for future reference Please carefully read the Safety Precautions of this manual before use The images shown in this manual are for illustrative purposes only English Mo...

Page 2: ...ons 3 Quick Start Guide Accessories 6 Connections 8 Identifying Controls 12 First time Auto Setup 14 Using your VIERA Watching TV 15 How to Use eHELP 15 Others FAQs 16 Maintenance 17 Specifications 17...

Page 3: ...No license is granted or shall be implied for any other use Additional information may be obtained from MPEG LA LLC See http www mpegla com Transport only in upright position Safety Precautions To he...

Page 4: ...r installation of approved wall hanging brackets Do not apply any strong force or impact to the display panel Ensure that children do not climb on the TV Do not place the TV on sloping or unstable sur...

Page 5: ...information for the wireless LAN and access point may be on the following website http panasonic net viera support Ventilation Caution Allow sufficient space at least 10 cm around the TV in order to h...

Page 6: ...GmbH Winsbergring 15 D 22525 Hamburg Germany This TV is intended to be used in the following countries Ireland United Kingdom The wireless LAN feature of this TV shall exclusively be used inside build...

Page 7: ...from the packing case 2 Put the screen protective cushion onto a work table D 3 Put the clean and soft cloth blanket etc on the screen protective cushion 4 Take out the TV from the packing case and p...

Page 8: ...th this TV Please ensure that the unit is disconnected from the mains socket before attaching or disconnecting any cables Check the terminal type and cable plugs are correct for connection Use a fully...

Page 9: ...side tabs click Make sure that the mains lead is securely fixed To remove from the TV tabs Press both tabs and pull on mains connector to release Aerial TV RF cable Terrestrial aerial For DVB Analogue...

Page 10: ...n TV Internet environment LAN cable Shielded Use Shielded Twist Pair STP LAN cable Wireless connection Internet environment Built in wireless LAN Access point Connections for 4K compatible equipment T...

Page 11: ...odule If a smart card and a CI module come as a set first insert the CI module then insert the smart card into the CI module Insert or remove the CI module completely in the correct direction as shown...

Page 12: ...ext pages Sets characters When in Standby mode switches TV on 12 eHELP Displays eHELP Built in Operating Instructions 13 Input mode selection TV switches to DVB Analogue mode AV switches to AV input m...

Page 13: ...rol 2 Ambient sensor Senses brightness to adjust picture quality when Ambient Sensor in the Picture Menu is set to On 3 Power LED Red Standby Green On Orange Standby with some functions recording etc...

Page 14: ...urn to the previous item if available Select Home Select Home for use in a home viewing environment Shop is for shop display To change the viewing environment later on the set will need to have all se...

Page 15: ...g instructions built into the TV and gives a more detailed explanation for a better understanding of the operation of each feature 1 Display eHELP or Help eHELP If the eHELP has been accessed previous...

Page 16: ...played This TV has a built in Self Test Makes a diagnosis of picture or sound problems TV Self Test Help Menu Turn the TV off with Mains power On Off switch then turn it on again If the problem persis...

Page 17: ...eated and may be easily damaged Take care not to tap or scratch the surface with your fingernail or other hard objects Do not allow the cabinet and pedestal to make contact with a rubber or PVC substa...

Page 18: ...band PAL 525 60 Playback of NTSC tape from some PAL Video recorders VCR or NTSC disc playback from DVD player and recorder M NTSC Playback from M NTSC Video recorders VCR NTSC AV input only Playback f...

Page 19: ...dealer to purchase the recommended wall hanging bracket Holes for wall hanging bracket installation Rear of the TV 400 mm 200 mm View from the side Depth of screw minimum 8 mm maximum 16 mm Diameter...

Page 20: ...44 844 3899 For customers within Ireland 01289 8333 Monday Friday 9 00am 5 00pm Excluding public holidays For further support on your product please visit our website www panasonic co uk Direct Sales...

Reviews: