Advanced
Menu
Item
Adjustments / Con
fi
gurations (options)
Picture
Advanced
PC
Settings
R-Gain
Adjusts the white balance for red areas
G-Gain
Adjusts the white balance for green areas
B-Gain
Adjusts the white balance for blue areas
Gamma
(2.0 / 2.2 / 2.5)
Setup
PC
Setup
Input
Resolution
Switches to a wide view
•
VGA (640 × 480 pixels), WVGA (852 × 480 pixels),
XGA (1,024 × 768 pixels), WXGA (1,366 × 768 pixels)
•
Options change depending on signals
Clock
Set to the minimum level if noise occurs
H-pos
Adjusts horizontal position
V-pos
Adjusts vertical position
Clock Phase
Eliminates
fl
icker and distortion
•
Adjust after Clock adjustment
•
Set to the minimum level if noise occurs
Sync
Chooses another synchronous signal if the image is distorted
(H & V / On G)
•
H & V : by the horizontal and vertical signals from your PC
On G : by the green signal from your PC (if available)
OPTION SD CARD
EXIT
RETURN
INPUT
Input Selection
AV1
AV2/AV2S
AV3/AV3S
COMPONENT
PC
HDMI1
HDMI2
HDMI3
TV
Main Menu
VIERA Link
Picture
Sound
Setup
2/2
System Information
Time Zone
Auto
VIERA Link
On
Software License
Common Interface
System Update
Input Labels
Banner Display Timeout 3 seconds
Access
Setup Menu
OPTION SD CARD
INPUT
EXIT
TV
RETURN
1 of 2
Input Labels
AV1
DVD
AV2/AV2S
AV2/AV2S
AV3/AV3S
AV3/AV3S
COMPONENT
COMPONENT
PC
PC
HDMI1
HDMI1
HDMI2
HDMI2
HDMI3
HDMI3
30
31
•
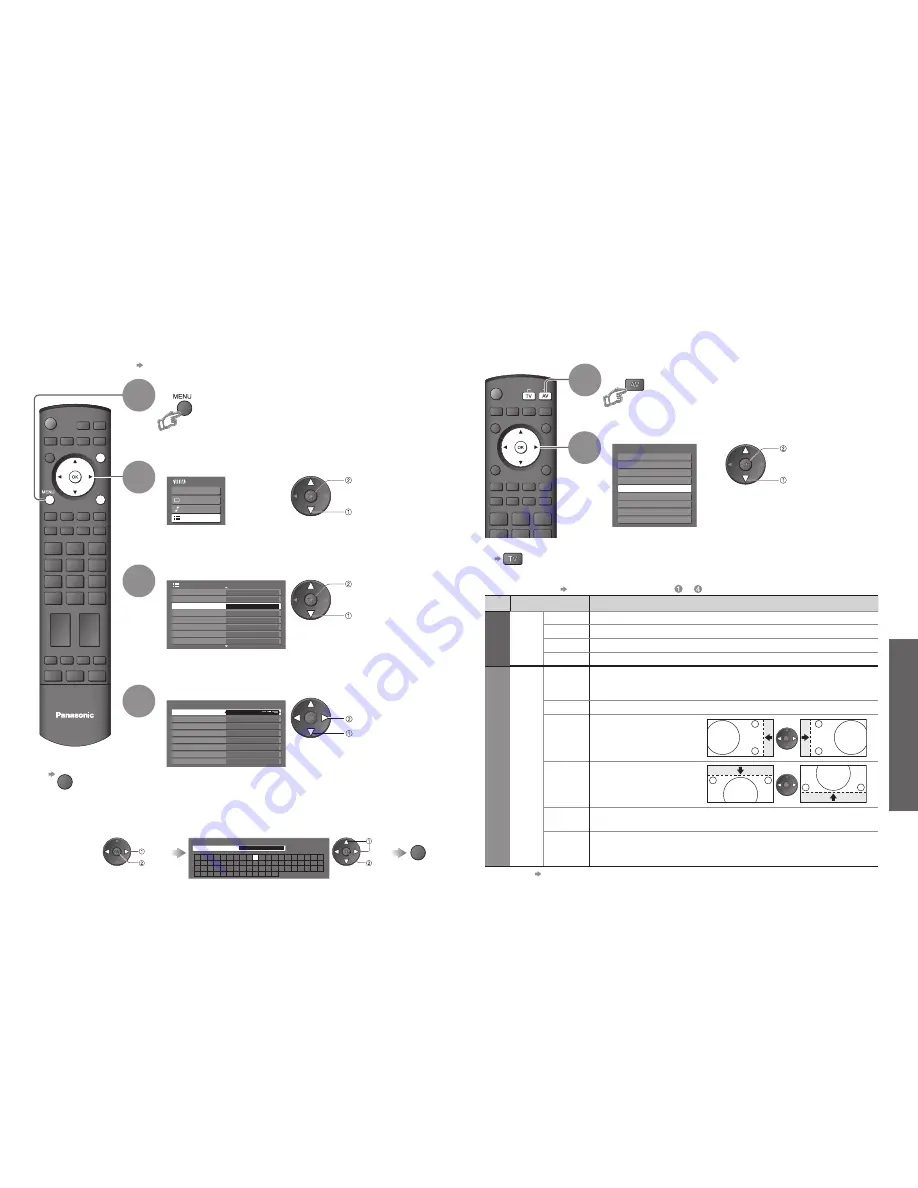
Displaying PC Screen on
TV
•
Input Labels
■
To return to TV
Displaying PC Screen on TV
Select the external input
Select “PC”
2
The screen of the PC connected to the TV can be displayed on the TV.
You can also listen to PC sound with the audio cable connected. To connect PC
(p. 38)
•
Corresponding signals (p. 43)
•
If “H-freq.” or “V-freq.” is shown in red,
the signals may not be supported.
■
PC menu setting
(changed as desired)
•
To make settings “How to Use Menu Functions”
to
(p. 18)
•
Other items p. 20 and p. 21
1
Input Labels
2
3
4
Select “Setup”
Select “Input Labels”
Display the menu
Select a input terminal and set
■
To return to TV
EXIT
For easier identi
fi
cation and selection of the input mode, you can label each input terminals or skip
terminal that is not connected to any equipment.
(To select the input mode p. 14)
set
select
1
The labels you set will be displayed in “Input Selection” menu (p. 14) or banner.
•
If “Skip” is selected, you cannot select the mode.
access
select
access
select
access
select
■
User input
You can name each input terminals freely.
Select “User input”
access
select
Set characters
User input
Name
A
B
C D
E
F
G H
I
J
K
L
M N
U
V W X
Y
Z
0
1
2
3
4
5
6
a
b
c
d
e
f
g
h
i
j
k
l
m
n
u
v
w
x
y
z
(
)
+
-
.
*
_
O P Q R
S
T
7
8
9
!
:
#
o
p
q
r
s
t
set
select
(maximum: ten characters)
Store
RETURN


