


48
FAQs, etc.
49
Signal name
Horizontal frequency (kHz)
Vertical frequency (Hz)
Component
HDMI
PC
525 (480) / 60i
15.73
59.94
∗
∗
525 (480) / 60p
31.47
59.94
∗
∗
625 (576) / 50i
15.63
50.00
∗
∗
625 (576) / 50p
31.25
50.00
∗
∗
750 (720) / 60p
45.00
60.00
∗
∗
750 (720) / 50p
37.50
50.00
∗
∗
1,125 (1,080) / 60i
33.75
60.00
∗
∗
1,125 (1,080) / 50i
28.13
50.00
∗
∗
640 × 400 @70 Hz
31.46
70.07
∗
640 × 480 @60 Hz
31.47
59.94
∗
640 × 480 @75 Hz
37.50
75.00
∗
852 × 480 @60 Hz
31.47
59.94
∗
800 × 600 @60 Hz
37.88
60.32
∗
800 × 600 @75 Hz
46.88
75.00
∗
800 × 600 @85 Hz
53.67
85.06
∗
1,024 × 768 @60 Hz
48.36
60.00
∗
1,024 × 768 @70 Hz
56.48
70.07
∗
1,024 × 768 @75 Hz
60.02
75.03
∗
1,024 × 768 @85 Hz
68.68
85.00
∗
1,280 × 1,024 @60 Hz
63.98
60.02
∗
1,366 × 768 @60 Hz
48.36
60.00
∗
Macintosh13” (640 × 480)
35.00
66.67
∗
Macintosh16” (832 × 624)
49.72
74.54
∗
Macintosh21” (1,152 × 870)
68.68
75.06
∗
Signal name
Aspect modes
Aspect Control Signal
Widescreen signal (WSS)
Control signal through SCART
(pin 8) or HDMI terminal
Auto
aspect 16:9 14:9 4:3 Zoom1 Zoom2 Zoom3 TV AV1 AV2 AV3 AV4 Component AV1 AV2 AV3
HDMI
1
HDMI
2
TV/A
V1/A
V2/
A
V3/A
V4
PAL
O
O
O
O
O
O
O
O O O O O
-
O
O
O
-
-
PAL 525/60
O
O
O
O
O
O
O
-
-
-
-
-
-
O
O
O
-
-
DVB
O
O
O
O
O
O
O
O
-
-
-
-
-
-
-
-
-
-
M.NTSC
O
O
O
O
O
O
O
-
-
-
-
-
-
O
O
O
-
-
NTSC(AV input only)
O
O
O
O
O
O
O
-
-
-
-
-
-
O
O
O
-
-
Component/HDMI
SD
525(480)/60i
O
O
O
O
O
O
O
-
-
-
-
-
-
-
-
-
O
O
525(480)/60p
O
O
O
O
O
O
O
-
-
-
-
-
-
-
-
-
O
O
625(576)/50i
O
O
O
O
O
O
O
-
-
-
-
-
O
-
-
-
O
O
625(576)/50p
O
O
O
O
O
O
O
-
-
-
-
-
O
-
-
-
O
O
HD
750(720)/50p
O
O
O
O
O
O
O
-
-
-
-
-
-
-
-
-
O
O
750(720)/60p
O
O
O
O
O
O
O
-
-
-
-
-
-
-
-
-
O
O
1125(1080)/50i
O
O
O
O
O
O
O
-
-
-
-
-
-
-
-
-
O
O
1125(1080)/60i
O
O
O
O
O
O
O
-
-
-
-
-
-
-
-
-
O
O
PC input
-
O
-
O
-
-
-
-
-
-
-
-
-
-
-
-
-
-
4 : 3
14 : 9
16 : 9
Zoom3
Zoom2
Zoom1
Auto aspect
New version 1.00 found.
Do you really want to update the software and reboot the system?
Press OK to download the new version
Press EXIT to lgnore
Technical Information
Aspect Ratio
Note
•
The ratio varies depending on the programme, etc. If the ratio is greater than the standard "16:9",
black bands may appear at the top and bottom of the screen.
•
If the screen size looks unusual when a widescreen-recorded programme is played back on a VCR,
adjust the tracking of the VCR. (See the VCR manual.)
•
Aspect mode can be memorized for SD (Standard definition) and HD (High definition) signals separately.
•
To select the ratio manually: (Only "16:9" or "4:3" in PC mode)
The optimum size and aspect can be chosen, and you can enjoy finer images. (p. 13)
■
Auto aspect: Auto aspect determines the best aspect ratio to use to fill your screen. It does this using a four step
process to determine if the picture being viewed is a widescreen picture.
4:3
14:9
16:9
Zoom3
Zoom2
Zoom1
Directly displays
the image at
"16:9" without
distortion
(anamorphic).
Displays a
"16:9" letterbox
or "4:3" image
without
distortion.
Displays the
image at the
standard
"14:9" without
enlargement.
Displays a
"16:9" letterbox
(anamorphic)
image full-
screen without
distortion.
Displays the
image at the
standard "4:3"
without
distortion.
Displays a "2.35:1" letterbox (anamorphic)
image full-screen without distortion. At
"16:9", displays the image at its maximum
(with slight enlargement).
Auto aspect
The best ratio
is chosen and
the picture
expanded to
fill the screen.
If Auto aspect detects a widescreen signal it switches into the appropriate 16:9 or 14:9 widescreen mode. If Auto aspect
does not detect a widescreen signal then this advanced TV enhances the picture for optimum viewing pleasure.
The text shown on the screen indicates how Auto aspect determined which ratio to use:
"WIDE" appears in the top left of the screen if a widescreen identification signal (WSS) is found or a signal found
through a SCART terminal. Auto aspect switches to the appropriate 16:9 or 14:9 widescreen ratio. This function
will also work in any aspect mode. "Auto aspect" appears in the top left of the screen if black stripes above and
below the picture are detected. Auto aspect chooses the best ratio and expands the picture to fill the screen. This
process can take several minutes, depending on the darkness of the picture.
Updating the DVB software
Note
•
During software download and update, DO NOT switch off the TV.
From time to time, a new version of software for DVB mode may become available for download to enhance
performance or operations of the TV.
A notification banner will appear when you tune to one of the BBC channels, or you can search for a new version
software by using the "System Update Search Now" function (p. 27).
To start downloading press "OK", this may take up to 20 minutes to
complete.
To ignore the new software press "EXIT", but this banner will keep
appearing during the period of new software availability, usually 2 to 3 days.
To download any new software automatically, ensure that the "Auto Update Search in Standby" function in the
System Update menu is set to "On" (p. 27).
The TV will then download new software automatically at night if it is left in standby without any timer programme
in progress.
•
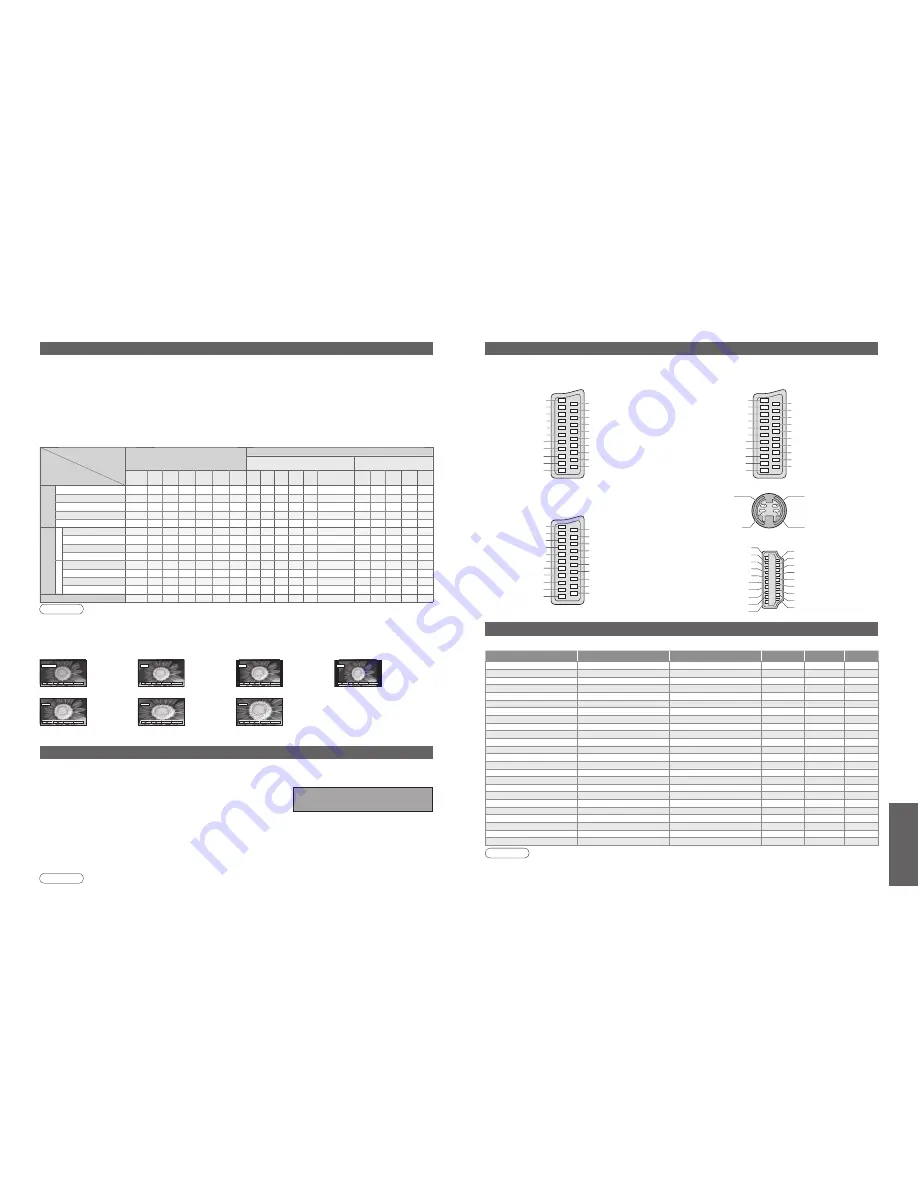
Technical Information
SCART, S-VIDEO and HDMI terminal information
Input signal that can be displayed
Socket Earth
CVBS out (video)
CVBS earth
Red in
Red earth
Green in
Green earth
Blue in
Blue earth
Audio out (L)
Audio out (R)
CVBS in (video)
RGB status earth
Status RGB
Earth
--
--
Status CVBS
Audio in (L)
Audio earth
Audio in (R)
21
19
17
15
13
11
9
7
5
3
1
20
18
16
14
12
10
8
6
4
2
■
AV1
SCART terminal
(RGB, VIDEO)
Suitable inputs for AV1 include RGB (Red / Green / Blue).
Socket Earth
CVBS out (video)
CVBS earth
S.C. - in
Earth
--
Earth
--
Earth
Audio out (L)
Audio out (R)
CVBS in (video)
Earth
--
Earth
--
Q-Link data
Status CVBS
Audio in (L)
Audio earth
Audio in (R)
21
19
17
15
13
11
9
7
5
3
1
20
18
16
14
12
10
8
6
4
2
■
AV2
SCART terminal
(VIDEO, S-VIDEO, Q-Link)
AV2 - Pins 15 and 20 are dependent on AV2 S-VHS /
VIDEO switching.
Chrominance in
Socket Earth
CVBS out (video)
CVBS earth
Red in, S.C. - in
Red earth
Green in
Green earth
Blue in
Blue earth
Audio out (L)
Audio out (R)
CVBS in (video)
RGB status earth
Status RGB
Earth
--
Q-Link data
Status CVBS
Audio in (L)
Audio earth
Audio in (R)
21
19
17
15
13
11
9
7
5
3
1
20
18
16
14
12
10
8
6
4
2
Luminance in
Chrominance earth
Luminance earth
■
AV4
S-VIDEO 4 pin terminal
■
AV3
SCART terminal
(RGB, VIDEO, S-VIDEO, Q-Link)
AV3 - Pins 15 and 20 are dependent on AV3 S-VHS /
VIDEO switching.
∗
Mark: Applicable input signal for Component (Y, P
B
, P
R
), HDMI and PC (D-sub 15P)
Note
•
Signals other than above may not be displayed properly.
•
The above signals are reformatted for optimal viewing on your display.
•
Applicable input signal for PC is basically compatible to VESA standard timing.
•
PC signal is magnified or compressed for display, so that it may not be possible to show fine detail
with sufficient clarity.
Hot Plug Detect
DDC/CEC Ground
SCL
CEC
TMDS Clock Shield
TMDS Data0
−
TMDS Data0+
TMDS Data1 Shield
TMDS Data2
−
TMDS Data2+
+5V Power
SDA
Reserved (in cable but N.C. on device)
TMDS Clock
−
TMDS Clock+
TMDS Data0 Shield
TMDS Data1
−
TMDS Data1+
TMDS Data2 Shield
19
17
15
13
11
9
7
5
3
1
18
16
14
12
10
8
6
4
2
■
HDMI
terminal


