background image

24

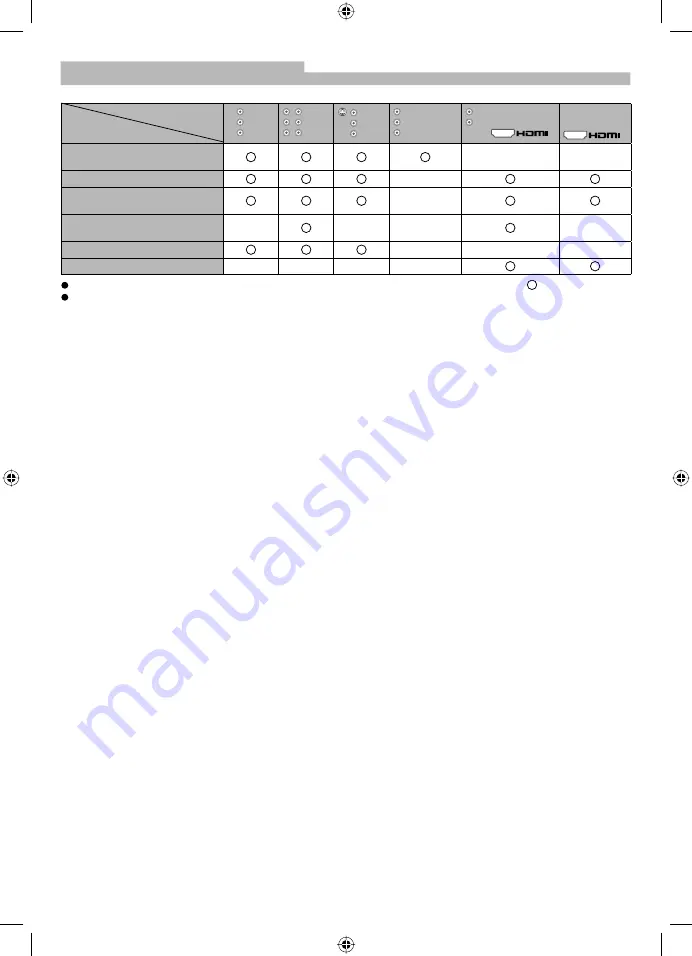
Types of connectable equipment to each connector

Connector

Recording/
Playback (equipment)

 AV1

 IN


   AV2

   IN


   AV3


 IN


 MONITOR

 OUT

 HDMI1

 AUDIO

 IN 

1

2

To record / playback (VCR / 

DVD recorder)
To watch DVDs
To watch camcorder images 

(Video camera)
To watch satellite broadcasts 

(Set top box)
To play games
VIERA Link

 Connect the S-VIDEO or VIDEO terminal when using AV3 IN terminals.

 Connect the COMPONENT or VIDEO terminal when using AV2 IN terminals.


Recommended 

Connection

External Equipment (continued)

TX-26LE8A_0091_EN1.indd   24

TX-26LE8A_0091_EN1.indd   24

7/16/08   2:21:46 PM

7/16/08   2:21:46 PM

Summary of Contents for Viera TX-26LE8A

Page 1: ...read these instructions before operating your set and retain them for future reference The images shown in this manual are for illustrative purposes only LG TQB4GC0091 TX 26LE8A_0091_EN1 indd 1 TX 26LE8A_0091_EN1 indd 1 7 16 08 2 21 30 PM 7 16 08 2 21 30 PM ...

Page 2: ...o prevent fire never place any type of candle or naked flame on top or near the TV set Maintenance First remove the mains plug from the socket outlet Wipe the surface clean using a soft cloth dampened with clean water Then using a soft dry cloth evenly wipe the surface clean until it is dry Caution Do not tap or scratch the surface with your fingernail or other hard object Use care not to subject ...

Page 3: ...cal shock When the TV is not going to be used for a long period of time remove the mains plug This TV will still consume some power even in the Off mode as long as the mains plug is still connected to a live socket outlet Transport only in upright position Transporting the TV with its display panel facing upright or downward may cause damage to the internal circuitry Do not expose your ears to exc...

Page 4: ...ls please refer to the wall hanging bracket installation manual TY WK32LR2W Wall hanging bracket Vertical WARNING Failure to use a Panasonic bracket or choosing to mount the unit yourself will be done at the risk of the consumer Any damage resulting from not having a professional installer mount your unit will void your warranty Always be sure to ask a qualified technician to carry out setup Incor...

Page 5: ...Bilingual sound Access Option menu Turn on off surround sound Access Viera Link menu Power indicator Standby RED Power ON GREEN Remote control signal receiver Range 7 metres C A T S Contrast Automatic Tracking System sensor senses brightness to adjust picture quality when Picture mode is set to Eco Function select Volume Contrast Brightness Colour Sharpness NTSC Tint Tint Balance Tuning mode Selec...

Page 6: ...ty picture and sound an Aerial the correct cable 75 Ω coaxial and the correct terminating plug are required If a communal Aerial system is used you may require the correct connection cable and plug between the wall Aerial socket and the TV Your local Television Service Centre or dealer may be able to assist you in obtaining the correct Aerial system for your particular area and the accessories req...

Page 7: ...turn the TV On with mains power On Off switch Need help with operations On screen operation guide will help you example Sound menu Select the picture setting Home is the recommended mode for viewing at home Select Home for optimal picture power consumption Shop is for in store display If Shop is selected the word Shop appears every time the TV is switched on page 9 Home Viewing Mode is set as Stan...

Page 8: ...ll search for locate store and then sort into order your local stations Once Auto tuning is completed the TV will display the programme now stored on programme position1 Auto Tuning If it is not the first time to perform Auto tuning all previous tuning data will be erased To edit channels Editing and Setting Channels on page 17 Press the EXIT button at any time to go back to watching TV For Auto t...

Page 9: ...o change the settings in Menu list page 15 and 16 or Watching TV To select a 2 or 3 digit programme number eg 39 in a short time Display status information Recall status information Displayed information For example Programme number Channel number Stereo mode Aspect mode Sound menu Picture menu Sound system Change aspect ratio Change the aspect ratio Each press changes the mode 16 9 Just 4 3 Zoom1...

Page 10: ...ode DVD 70 default Home Player theatre 71 VCR position DVD position Note Confirm correct operation after the code changed The codes will be reset to default values if batteries are replaced DVD means DVD player DVD recorders and home theatre recorders Some operations may not be possible on some equipment models Watching Videos and DVDs Select VCR to operate Panasonic VCR or DVD Select DVD to opera...

Page 11: ...tch to Teletext Display Index content varies depending on the broadcasters TELETEXT INFORMATION 17 51 28 Feb Time date Current page number Colour bar Select the page 2 up or or corresponds to the colour bar down Using teletext conveniently Reveal hidden data FULL TOP BOTTOM HOLD Reveal hidden words e g quiz page answers TOP BOTTOM Normal FULL Expand the BOTTOM half If you wish to hold the current ...

Page 12: ... pages View sub page View sub page Only when teletext is more than one page To view specific sub page Enter the 4 digit number example P6 Sub pages The number of sub pages varies depending on the broadcasters up to 79 pages It may take some time for searching during which time you can watch TV Watch TV while waiting for updates Watch TV programme while searching for a teletext page Teletext automa...

Page 13: ...ording to the input signal Auto On select select change Required by some functions access To return to TV To return to the previous screen or Choose from among alternatives Sha r pness T un i ng menu Access Changed Number and positions of alternatives Moved Displays the next screen Adjust using the slide bar Go to the next screen store How to use Menu Functions Auto On TX 26LE8A_0091_EN1 indd 13 T...

Page 14: ...ct Required by some functions access 3 4 To return to TV Only available items can be selected store To return to the previous screen or access Refer to page 19 23 Refer to page 8 17 Auto On TX 26LE8A_0091_EN1 indd 14 TX 26LE8A_0091_EN1 indd 14 7 16 08 2 21 40 PM 7 16 08 2 21 40 PM ...

Page 15: ...I 60Hz signal Colour temperature Chooses the colour balance of the entire image Cool Standard Warm Ch colour set Colour density varying between broadcast channels can be adjusted to three levels for each reception channel Select the channel you want to adjust and set this function D PNR Automatically reduces image noise Off Strong Weak Auto Set to Off when receiving a strong signal 3D COMB If colo...

Page 16: ... off VCR GAME Reproduction of irregular signals such as certain TV games and rental video tapes may be improved Off On Tuning menu Edits or sets channels page 17 Colour system Displayed during AV mode If a clear picture with current colours cannot be obtained when a Broadcast or AV signal is received this function is used Auto PAL SECAM NTSC 4 43 NTSC 3 58 PAL SECAM and NTSC 3 58 are different col...

Page 17: ...und system Allows you to change the sound system used for a programme channel 4 5MHz 5 5MHz 6 0MHz 6 5MHz Select the channel you want to adjust Set this function Edit Colour system Lets you select the correct transmission standard for the transmission signal being received Auto PAL SECAM NTSC 4 43 NTSC 3 58 Select the channel you want to adjust Set this function Normally select Auto Small adjustme...

Page 18: ...etup Input Resolution Switches to a wide view VGA 640 480 pixels WVGA 852 480 pixels SVGA 800 600 pixels XGA 1 024 768 pixels WXGA 1 366 768 pixels Options change depending on signals If H freq or V freq is shown in red the signals may not be supported Clock Set to the minimum level if noise occurs H pos Adjusts horizontal position V pos Adjusts vertical position Clock Phase Eliminates flicker and...

Page 19: ... 2 3 Display the menu Select and access Setup menu Select VIERA Link and set to On Default setting is On If no HDMI equipment are connected or standard HDMI non VIERA Link are used set to Off access select select set Easy playback Automatic Input switching When the connected HDAVI control compatible equipment is operated input mode is switched automatically Power on link When VIERA Link is set to ...

Page 20: ... mode or programme number or If you cancel pause or resume playback the recorded programme will be deleted from HDD Direct TV recording Direct TV Rec This function is available with DIGA Recorder which has HDD and HDAVI Control function when watching TV programme If you cannot operate check the VIERA Link setting in Setup menu page 19 and the equipment The recording is performed using the tuner of...

Page 21: ...pment which you want to access The menu of the equipment is displayed 4 Operate the menu of the equipment Available VIERA remote control buttons depending on the connected equipment Move cursor select menu Move cursor access adjust Store set access Return to the previous menu Exit the menu Display the operation guide of the equipment The same functions with the OPTION button of the equipment Acces...

Page 22: ...or HDAVI Control compatible equipment This standard is compatible with conventional HDAVI equipment 22 Speaker control Speaker Selection You can control the theatre speaker with this TV remote control point the remote control at the TV s signal receiver This function is available with Amplifier or Player theatre which has HDAVI Control function If you cannot operate check the VIERA Link setting in...

Page 23: ...hones PC To watch DVDs S VIDEO 4 pin terminal Chrominance in Chrominance earth Luminance in Luminance earth DVD player RF cable To watch satellite broadcasts Conversion adapter if necessary VIERA Link DIGA Set top box Computer To listen with speakers Amplifier with speaker system To record playback DVD recorder VCR or TX 26LE8A_0091_EN1 indd 23 TX 26LE8A_0091_EN1 indd 23 7 16 08 2 21 44 PM 7 16 08...

Page 24: ... DVDs To watch camcorder images Video camera To watch satellite broadcasts Set top box To play games VIERA Link Connect the S VIDEO or VIDEO terminal when using AV3 IN terminals Connect the COMPONENT or VIDEO terminal when using AV2 IN terminals Recommended Connection External Equipment continued TX 26LE8A_0091_EN1 indd 24 TX 26LE8A_0091_EN1 indd 24 7 16 08 2 21 46 PM 7 16 08 2 21 46 PM ...

Page 25: ...a VCR adjust the tracking of the VCR To select the ratio manually Only 16 9 or 4 3 in PC mode 16 9 16 9 ZOOM3 ZOOM3 4 3 4 3 ZOOM1 ZOOM 1 ZOOM2 ZOOM2 JUST JUST Directly displays the image at 16 9 without distortion anamorphic Displays a 4 3 image full screen Stretching is only noticeable at the left and right edges Displays the image at the standard 4 3 without distortion Displays a 21 9 letterbox ...

Page 26: ...A An equipment having no digital output terminal may be connected to the input terminal of either Component S VIDEO or Video to receive analogue signals The HDMI input terminal can be used with only following image signals 480i 480p 576i 576p 720p and 1080i Match the output setting of the digital equipment For details of the applicable HDMI signals see page 27 1 The HDMI logo is displayed on an HD...

Page 27: ...equipment Mark Applicable input signal for Component Y PB CB PR CR and HDMI Signal name Horizontal frequency kHz Vertical frequency Hz Component HDMI 525 480 60i 15 73 59 94 525 480 60p 31 47 59 94 625 576 50i 15 63 50 00 625 576 50p 31 25 50 00 750 720 60p 45 00 60 00 750 720 50p 37 50 50 00 1 125 1 080 60i 33 75 60 00 1 125 1 080 50i 28 13 50 00 Note Signals other than the above may not be displ...

Page 28: ...e is kept intact When the receiving conditions deteriorate listening will be easier if the mode is set to the MONO position using the stereo bilingual sound selection button DUAL also known as DUAL MONO or as BILINGUAL is not currently transmitted in some countries Trademark Credits HDMI the HDMI logo High Definition Multimedia Interface are trademarks or registered trademarks of HDMI Licensing LL...

Page 29: ...al panels and is not a problem The liquid crystal panel is built with very high precision technology giving you fine picture details Occasionally a few non active pixels may appear on the screen as fixed points of red blue green or black Please note this does not affect the performance of your LCD Pictures from an equipment are unusual when the equipment is connected via HDMI Is the HDMI cable con...

Page 30: ...stal panel is built with very high precision technology giving you fine picture details Occasionally a few non active pixels may appear on the screen as fixed points of red blue green or black Please note this does not affect the performance of your LCD H D M I VIERA Link function does not work Switch the TV unit on again with the equipment on Set VIERA Link to Off then set to On again Poor Video ...

Page 31: ...H I SECAM G K K1 28 69 PAL B AUST 13 57 PAL D K 13 62 NTSC M JAPAN 14 69 NTSC M U S A S1 S20 OSCAR 1 125 U S A CATV C13 C49 JAPAN S21 S41 HYPER Z1 Z37 CHINA 5A 9A AUST Aerial Rear VHF UHF Operating Conditions Temperature 0ºC 40ºC Humidity 20 80 RH non condensing Connection Terminal AV1 Input AUDIO L R VIDEO RCA PIN Type x 2 0 5 V rms RCA PIN Type x 1 1 0 V p p 75 Ω AV2 Input AUDIO L R VIDEO RCA PI...

Page 32: ...r purchase to aid in identification in the event of theft or loss and for Warranty Service purposes Model Number Serial Number WARRANTY New Zealand only Distributed in New Zealand by Panasonic New Zealand Limited 350 Te Irirangi Drive East Tamaki Private Bag 14911 Panmure Auckland Tel 09 272 0100 Customer Care Center Email Customerservice nz panasonic com www panasonic co nz NEW ZEALAND TX 26LE8A_...

Reviews: