background image

Using VIERA

 T

OOLS 

Using Media Player

10

 Using VIERA TOOLS

You can access some special features easily by using 
the VIERA TOOLS function.

Display the icon of the features, then 
select the icon you want 

VIERA

TOOLS


VIERA Link

VIDEO

MUSIC

ECO NAVIGATION

HOTO

Using Media Player

Media Player allows you to enjoy photo, music or video 
recorded on a USB Flash Memory.


During the operation, audio signal is output from 
AUDIO OUT, DIGITAL AUDIO OUT and HDMI 2 (ARC 
function) terminals. To use HDMI 2 with ARC function, 
connect an amplifier that has ARC function and set to 
use theatre speakers (p. 18).


The picture may not appear correctly on this TV 
depending on the digital cameras used.


Display may take some time when there are many files 
and folders in the USB Flash Memory.


Partly degraded files might be displayed at a reduced 
resolution.


The folder and file names may be different depending 
on the digital camera used.

Insert the USB Flash Memory

USB

USB

TV


Insert or remove 
straightly and 
completely.

 Display [VIERA TOOLS]

VIERA

TOOLS


Photo

VIDEO

MUSIC

ECO NAVIGATION

VIERA LINK

Select the mode

OK

 Access

 Select

[Photo]:

Displays the thumbnail of all photos in the 
USB Flash Memory.

[Video]:

Displays the thumbnail of video titles in the 
USB Flash Memory.

[Music]:

Displays the thumbnail of music folders in 
the USB Flash Memory.

[Contents Select]

Switching between modes

When you are in the thumbnail view of any mode, 
you can change to the other mode by accessing the 
[Contents Select] screen.
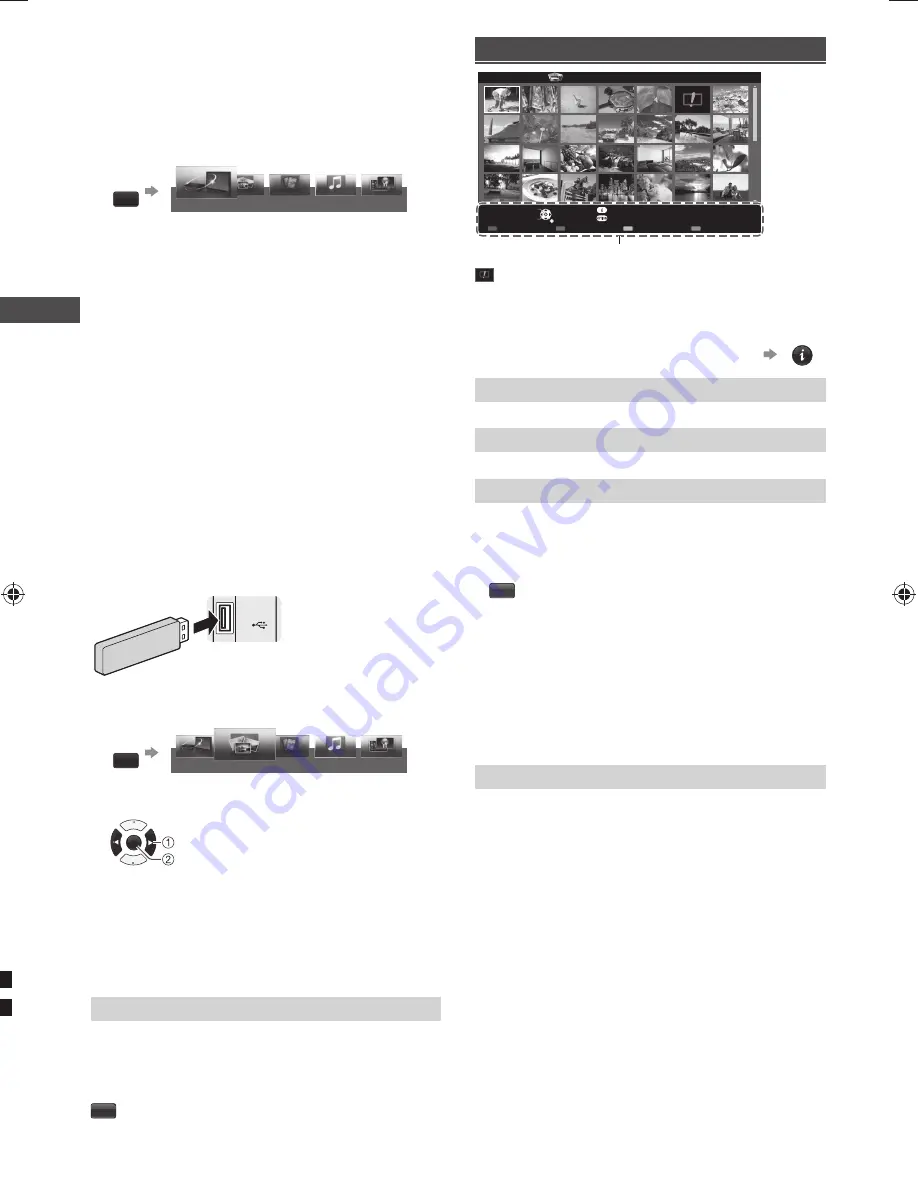
B

Photo mode

Select

RETURN

Slideshow

View Select

Drive Select

Contents Select

Info

View

Option Menu

USB

Media Player 

 Photo 

All photos

Operation guide

 : Error display

Follow the operation guide to perform 
available operations in Photo mode.

To display / hide the operation guide during 
[View] and [Slideshow]

INFO

[View]

Enters Single view mode to view photo one at a time

[Slideshow]

Lets you view all photos in the slideshow mode

[View Select]

Lets you toggle between thumbnail view and folder view


To sort by folder, recorded date or recorded month

Display the view selection in the thumbnail view

G

Select the sort type
[Folder view]:

 Displays the thumbnail grouped by 

folder.


• The files which are not in a folder will be collected to 

the folder named “/”.

[Sort by Date]

 / 

[Sort by Month]:

 Displays the 

thumbnail grouped by the same date or month.


• The group of the photos without a recorded date is 

shown as [Unknown].

[Option Menu]


[Change Size]

Changes the size of photos on a thumbnail screen


[Slideshow Settings]


[Frame]:

 Selects the frame type of the slideshow 

[Off] / [Multi] / [Collage] / [Drift (+ calendar)] / [Drift] / 
[Gallery (+ calendar)] / [Gallery] / [Cinema]


[Colour Effect]: 

Selects the colour effect of photos 

on Single view and Slideshow [Off] / [Sepia] / [Gray 
scale]


• This function is not available when [Frame] is set to 

[Drift], [Gallery] or [Cinema].


[Transition Effect]: 

Effect for photo switching during 

slideshow [Off] / [Fade] / [Dissolve] / [Motion] /
[Random]


[Auto Makeup]:

 Automatically detects the face in 

the photo and improves luminance and contrast
[On] / [Off]


[S

Sl


• T

t
[


• D

e


[B

ph


• T

t
E


[In

[S


• T

t
E


[R


[B

ph
[T


• [

y
T
s
[
[
t


• [

c

No


Pictu
setti


Pictu
slide

Vid

 Medi

 Trip1

 Nature2

 2010_9

 Pla

 : E

Follo
avail

To dis
inform

[Pla

Playb


To p
view

Sele

O

TH-L24XM6H_EN.indd   10

TH-L24XM6H_EN.indd   10

2/21/2013   8:39:08 AM

2/21/2013   8:39:08 AM

Summary of Contents for Viera TH-L24XM6H

Page 1: ...efore operating this product and retain them for future reference The images shown in this manual are for illustrative purposes only Some illustrations are presented as conceptual images and may be different from the actual products Illustrations shown may be different between models and countries Transport only in upright position CHW TQB4GC1089 1 ...

Page 2: ...ded by a consumer engaged in a personal and non commercial activity and or was obtained from a video provider licensed to provide AVC Video No license is granted or shall be implied for any other use Additional information may be obtained from MPEG LA LLC See http www mpegla com This product incorporates the following software 1 the software developed independently by or for Panasonic Corporation ...

Page 3: ... to perform the setup or installation of approved wall hanging brackets Do not apply strong force or impact to the display panel Do not place the TV on sloped or unstable surfaces and ensure that the TV does not hang over the edge of the base This TV is designed for table top use Do not expose the TV to direct sunlight and other sources of heat To prevent the spread of fire keep candles or other o...

Page 4: ... tropical climates Battery for the Remote Control Caution Incorrect installation may cause battery leakage corrosion and explosion Replace only with the same or equivalent type Do not mix old and new batteries Do not mix different battery types such as alkaline and manganese batteries Do not use rechargeable batteries Ni Cd etc Do not burn or break up batteries Do not expose batteries to excessive...

Page 5: ...ic dealer to purchase the recommended wall hanging bracket a b Rear of the TV Screw for fixing the TV onto the wall hanging bracket not supplied Depth of screw View from the side Holes for wall hanging bracket installation a 100 mm b 100 mm Screw specification Type M4 Depth of screw Minimum 6 mm Maximum 9 mm Warning When optional accessories such as wall brackets etc are used always read and follo...

Page 6: ... 4 AV1 IN 5 AV2 IN 6 USB port 7 HDMI 1 2 Connections Aerial and mains lead ANT RF cable Mains lead supplied Aerial Keep RF aerial cable away from the mains lead to avoid and minimise mains interference pickup Do not place the RF cable under the TV An aerial correct cable 75 Ω coaxial and correct terminating plug are required to obtain optimum quality picture and sound If a communal aerial system i...

Page 7: ...ug into the socket outlet AC 220 240 V 50 60 Hz 2 Turn on the TV with the remote control 3 Select your language OSD Language English OK Store Select 4 Select Home Please select your viewing environment Home Shop OK Confirm Select Shop is for shop display To change the viewing environment later on you need to initialise all settings by accessing Shipping Condition p 15 5 Tick the mode to tune then ...

Page 8: ...V input mode 14 TV Guide p 9 15 Displays subtitles 16 Exits to the TV viewing screen 17 Cursor buttons Makes selections or adjustments 18 Returns to the previous menu page 19 ASPECT Displays the Aspect Selection screen Follow the operation guide to select the mode 16 9 14 9 Just 4 3 Zoom 4 3 Full Sidecut Just Sidecut Zoom p 19 You can also press the button repeatedly to select the mode 20 Channel ...

Page 9: ...V button is pressed Using TV Guide The TV Guide Electronic Programme Guide EPG shows a list of the current broadcasts and forthcoming broadcasts over the next seven days depending on the broadcasters When this TV is turned on for the first time or switched off for more than a week it may take some time before the TV Guide is completely shown Digital TV mode only Display the TV Guide GUIDE Press ag...

Page 10: ...humbnail view of any mode you can change to the other mode by accessing the Contents Select screen B Photo mode Select RETURN Slideshow View Select Drive Select Contents Select Info View Option Menu USB Media Player Photo All photos Operation guide Error display Follow the operation guide to perform available operations in Photo mode To display hide the operation guide during View and Slideshow IN...

Page 11: ...Select Operation guide Error display Follow the operation guide to perform available operations in Video mode To display hide the operation guide and information banner during playback INFO Play Playbacks the selected title To playback from selected scene of the title Scene view Select the title Select the scene Play OK OK R To change aspect Display the Aspect Selection screen then select the desi...

Page 12: ... darkened room True Cinema Reproduces the original image quality precisely without any revision Custom Allows you to customize the picture settings In each Viewing Mode Backlight Contrast Brightness Colour Sharpness Tint Colour Temperature Vivid Colour Adaptive Backlight Control Ambient Sensor Noise Reduction and MPEG Noise Reduction can be adjusted and stored Backlight Contrast Brightness Colour ...

Page 13: ...ents Adjusts the vertical position and size when the aspect is set to Just or Zoom mode Just V Size max is 3 Zoom V Size max is 15 Screen Display Turns off on the TV screen without turning off the TV On Off The sound is active even if the screen turns off Press any buttons except Standby to turn the screen on Copy Adjustment Copies picture adjustments to other inputs Option Settings and Screen Set...

Page 14: ...l TV or video contents of Media Player HDMI1 2 Input Selects to fit the input signal Digital Analogue p 20 Digital When sound is carried via the HDMI cable connection Analogue When sound is not carried via the HDMI DVI adaptor cable connection For HDMI input Reset to Defaults Resets the current sound settings to defaults Timer Off Timer Sets the duration until the TV automatically goes to Standby ...

Page 15: ...70 79 NINE DIGITAL 7 HD Digital 7 Guide 1 TEN Digital Digital TV Favourites Editor All Digital Channels Favourites1 A channel is added 1 TEN Digital g g g g Favourit Select favourites To select other Favourites Add all To add all channels to the list Channel List You can hide skip unwanted channels The hidden channels cannot be displayed except in this function Select a channel and reveal hide 70 ...

Page 16: ...ce at first setting Make a note of the PIN number in case you forget it 2 Select Child Lock List Change PIN Child Lock List Child Lock 3 Select the channel input to be locked 101 BBC 1 Wales 7 BBC THREE 14 E4C 1 BBC1 2 Child Lock List TV and AV Name Input Digital TV Digital TV Digital TV Analogue TV Analogue TV Analogue TV External Type Digital TV Digital TV Digital TV Analogue TV Analogue TV Anal...

Page 17: ... or HDMI 2 terminal Use fully wired HDMI compliant cable Non HDMI compliant cables cannot be utilised Use an optical digital audio cable or RCA cable for audio output from the TV Set up the connected equipment Read the manual of the equipment Set VIERA Link to On in the Setup Menu VIERA Link p 14 Set up the TV After connection turn the equipment on and then switch the TV on Select the input mode f...

Page 18: ...f multiple recorders or players are connected VIERA Link Menu VIERA Link Control Speaker Selection Home Cinema Recorder2 Recorder2 Recorder1 2 Player1 2 The number is given from the TV s lower number of HDMI terminal connected to the same type of equipment For example when two recorders are connected to HDMI 1 and HDMI 2 the recorder connected to HDMI 1 is displayed as Recorder1 and the recorder c...

Page 19: ... OK Extra information Digital TV INFO Press again to hide the banner To select a favourite list Digital TV B if the favourite list is created in Favourites Edit Aspect 16 9 Directly displays the image at 16 9 without distortion anamorphic 14 9 Displays the image at the standard 14 9 without distortion Just Displays a 4 3 image full screen Stretching is only noticeable at the left and right edges 4...

Page 20: ...t video signal Input signal that can be displayed p 19 Match the output setting of the digital equipment Audio Return Channel HDMI 2 terminal only Content Type VIERA Link HDAVI Control 5 DVI connection If the external equipment has only a DVI output connect to the HDMI terminal via a DVI to HDMI adaptor cable When the DVI to HDMI adaptor cable is used connect the audio cable to the audio input ter...

Page 21: ...TV is equipped with auto power standby function p 19 The remote control does not work or is intermittent Replace the batteries p 5 Point the remote control directly at the remote control signal receiver of the TV within about 7 m and 30 degree angle Situate the TV away from sunshine or block sources of bright light from shining on the remote control signal receiver of the TV Parts of the TV become...

Page 22: ... 5 5 MHz 5 SECAM D K 12 NTSC 3 58 6 0 MHz 6 SECAM K1 13 NTSC 3 58 6 5 MHz 7 NTSC M NTSC 3 58 4 5 MHz 14 SECAM I 15 PAL 60 Hz 5 5 MHz Playback from Special Disc Players and Special VCR s or DVD 16 PAL 60 Hz 6 0 MHz 17 PAL 60 Hz 6 5 MHz GB20600 2006 Mode C 3780 8 MHz UHF Hong Kong free to air TV Broadcast reception Receiving channels Analogue TV VHF BAND 2 12 PAL SECAM B K1 0 12 PAL B AUST 1 9 PAL B...

Page 23: ...V rms VIDEO RCA PIN Type 1 1 0 V p p 75 Ω AUDIO OUT AUDIO L R RCA PIN Type 2 0 5 V rms DIGITAL AUDIO OUT PCM Dolby Digital DTS Fibre optic HDMI AV IN TYPE A Connectors 2 USB USB 2 0 TYPE A Connectors 1 DC 5 V Max 500 mA Note Design and Specifications are subject to change without notice Mass and Dimensions shown are approximate TH L24XM6H complies with China Terrestrial Television National Standar...

Page 24: ...contact your local authorities or dealer and ask for the correct method of disposal Customer s Record The model number and serial number of this product may be found on its rear panel You should note this serial number in the space provided below and retain this book plus your purchase receipt as a permanent record of your purchase to aid in identification in the event of theft or loss and for War...

Reviews: