background image

- 53 -

TV Guide

Using TV Guide

TV Guide

 - Electronic Programme Guide (EPG) provides an on-screen listing 

of the programmes currently broadcast and the forthcoming broadcasts over 

the next seven days (depending on the broadcasters).


For Digital TV

1.  Select Digital TV with 

TV

.

2. Display 

TV Guide

 with 

GUIDE

.


Press again to change the layout. (

Landscape

 / 

Portrait

)

– View 

Landscape

 to see several channels.

– View 

Portrait

 to see one channel by time.
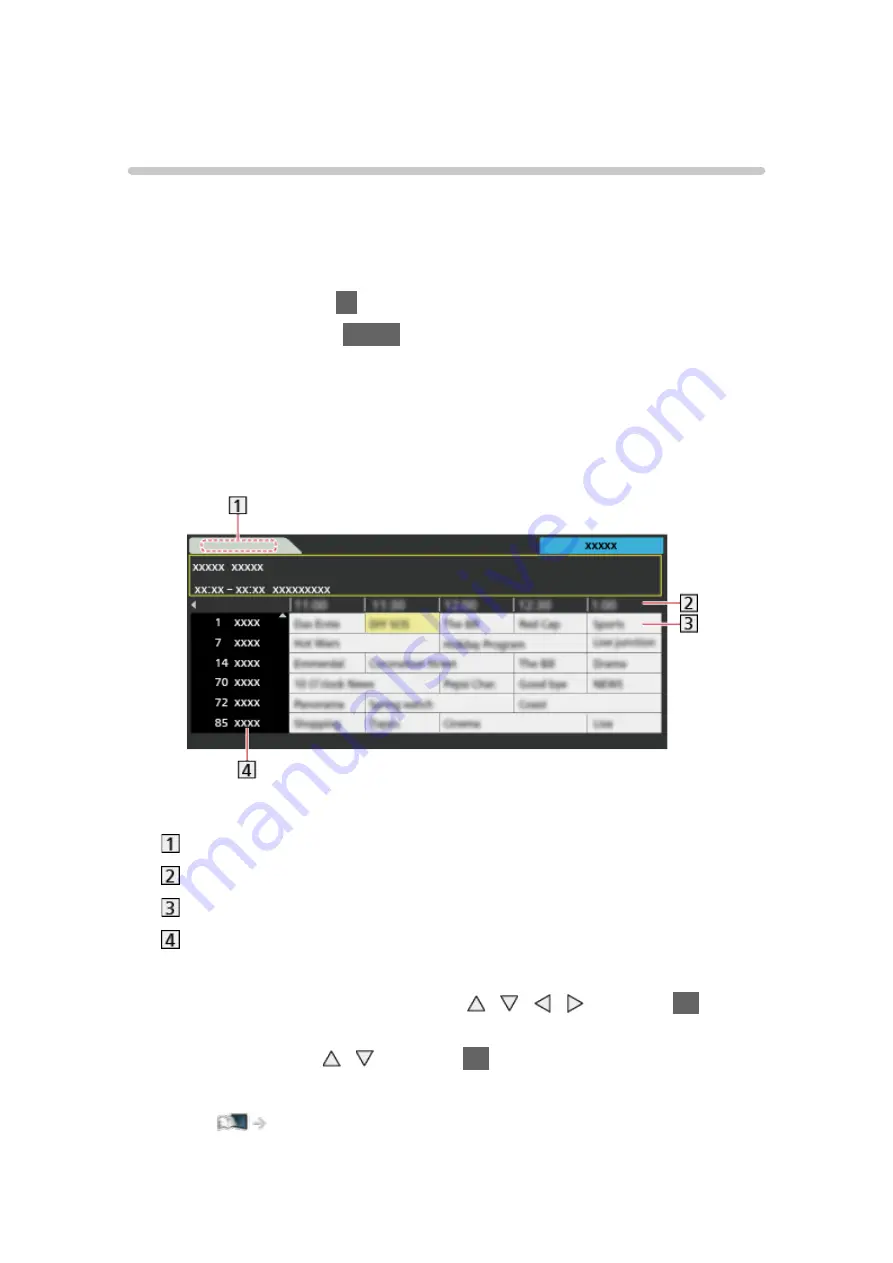
(Example)

 Date
 Time
 Programme
  Channel position and name


To watch the programme
1)  Select the current programme with   /   /   /   and press 

OK

 to 

access.

2) Select 

View

 with   /   and press 

OK

 to watch.

–  To use 

Timer Programming

 Watching > TV Guide > Timer Programming

Summary of Contents for Viera TH-60AS700H

Page 1: ...eHELP English TH 60AS700H ...

Page 2: ...tion 18 Selecting channel 20 Information banner 21 Option Menu 23 Subtitle 24 Last view 24 Off Timer 24 Energy saving functions 25 Adjusting time 26 Language 27 External equipment External connection 28 Watching external input 31 Operating with TV s remote control 32 HDMI features 33 Valid input signals 35 For best picture Viewing Mode 36 Ambient Sensor 37 Aspect 37 ...

Page 3: ...ice Guidance Settings 50 Advanced settings 51 TV Guide Using TV Guide 53 Timer Programming 55 3D Note 56 3D Eyewear Maintenance 56 Viewing 3D 57 3D Mode Selection 58 3D Settings 59 Source image format 61 Tuning and editing channels Setting menu 62 Favourites Edit 62 Channel List 64 Auto Tuning 65 Manual Tuning 66 Update Channel List 67 New Channel Message 67 Signal Condition 67 Add TV Signal 67 ...

Page 4: ...iting Timer Programming 76 Note 77 Technical information USB HDD 78 Media Player Using Media Player Information 79 Selecting device mode 81 Network device 83 Photo mode Selecting file 84 Viewing photo 85 Sorting photos 85 Multi Shot 3D 86 Using Slideshow 87 Video mode Selecting file 91 Watching video 92 Video Setup 93 Audio output settings 94 Recorded TV mode Selecting content 96 ...

Page 5: ...sic 101 Music Setup 102 USB Sharing USB Sharing 103 Technical information Device handling caution 105 SD Card 105 USB devices 106 Photo format 107 Video format 107 Music format 111 Network Internet content Information 112 Selecting internet content 113 Note 114 DLNA Information 115 Using DLNA 118 Network connections Internet connection 119 DLNA connection 120 Note 122 ...

Page 6: ...ettings 130 Network Link Settings 132 File Sharing Settings 133 Software Update 133 New Software Message 133 Photos Selecting file 134 Viewing photo 135 Using Slideshow 135 Videos Selecting file 137 Watching video 137 Video Setup 139 Audio output settings 140 Music Selecting file 141 Playing music 142 Music Setup 143 Technical information Photo format 144 Video format 144 Music format 148 ...

Page 7: ...Link HDAVI Control Summary of VIERA Link 156 Preparations 160 Easy playback 161 Power on Link 161 Power off Link 161 Standby Power Save 161 Intelligent Auto Standby 161 VIERA Link Control 162 Speaker Selection 163 Note 164 Child Lock Using Child Lock 165 PIN number 165 Shipping Condition Shipping Condition 166 Updating the TV Software Information 167 Auto update 167 Manual update 168 ...

Page 8: ...75 Ambient Sensor 176 Noise reduction settings 176 Advanced Settings 176 Option Settings 177 Screen Settings 178 3D Settings 179 Copy Adjustment 180 Reset to Defaults 180 Sound Mode 181 Basic settings 181 Volume settings 182 Voice Guidance Settings 183 Advanced settings 184 Reset to Defaults 184 Network Network Connection 185 Network Status 185 my Home Cloud Settings 185 VIERA Name 185 ...

Page 9: ...signal Power off 187 Setup Eco Navigation 188 Voice Control Settings 188 User Settings 188 USB Device Setup 188 Recording Setup 188 VIERA Touch Pad Controller 188 Bluetooth Setup 188 Child Lock 189 Tuning Menu 189 Language 190 Display Settings 191 VIERA Link Settings 192 System Menu 193 Other Settings 193 Support FAQs Picture 194 Digital TV 195 Sound 196 3D 197 HDMI 198 Network 199 ...

Page 10: ...ories 3D Eyewear 204 Communication Camera 204 Wall hanging bracket 205 Licence Licence 206 OK Letters enclosed in a box indicate remote control buttons Menu Letters in cyan indicate on screen display items References in this eHELP The images shown in this eHELP are for illustrative purposes only ...

Page 11: ...V applications and more It provides easy access to special features such as Media Player videos games communication tools etc as shown below example HOME OK OK HOME Home Screen Selected content screen TV application etc Home Screen Selection Your preferred Home Screen can be selected ...

Page 12: ... with HOME Example The last viewed Home Screen is displayed when the TV is turned on Press again to select or add your preferred Home Screen layout my Home Screen my Home Screen Settings 2 Select a feature with and press OK to access To watch full screen TV 1 Select the TV viewer with Example 2 Press OK to watch Example Also refer to Tutorial from the tool guide ...

Page 13: ...een Selection with HOME Example 2 Select the screen with and press OK to set Full Screen TV Displays full screen TV TV Home Screen To make your TV experience more convenient and comfortable Lifestyle Screen Displays the TV with useful information and services for everyday life Info Screen Enjoy internet content while watching TV ...

Page 14: ...per renaming freely editing applications setting the screen launched when the TV is turned on etc 1 Select Settings from the tool guide 2 Follow the on screen instructions Search You can search the content from various features 1 Select Search from the tool guide 2 Follow the on screen instructions Note To change the colour type of on screen displays set OSD Colour my Home Screen my Home Screen OS...

Page 15: ...tings OSD Colour with and press OK to access 3 Set with and press OK to store OSD Colour Jet black Pale grey Organic brown Sand beige Selects the preferred colour type of on screen displays This function is available for the information banner menu screen Home Screen etc ...

Page 16: ...rnet contents network contents Media Player etc from APPS List 1 Display APPS List with APPS Example To exit APPS List EXIT 2 Select an icon of the features with and press OK to access Internet contents Network Internet content my Stream Provides recommended contents TV programme internet content etc You need a broadband network environment to use this function fully Follow the on screen instructi...

Page 17: ...erver Network DLNA Using DLNA VIERA Link Functions VIERA Link HDAVI Control Settings You can customise APPS List screen settings etc 1 Display APPS List with APPS 2 Select the icon for settings on APPS List with and press OK to access 3 Follow the on screen instructions Note Setup menu items may be changed without notice ...

Page 18: ...oaxial and correct terminating plug are required to obtain optimum quality picture and sound If a communal aerial system is used you may require the correct connection cable and plug between the wall aerial socket and the TV Your local Television Service Centre or dealer may be able to assist you in obtaining the correct aerial system for your particular area and the accessories required Any matte...

Page 19: ...VIERA Link External equipment and cables shown are not supplied with this TV Please also read the manual of the equipment being connected Keep the TV away from electronic equipment video equipment etc or equipment with an infrared sensor otherwise distortion of image sound may occur or operation of other equipment may be affected Use a fully wired HDMI compliant cable Check the terminal type and c...

Page 20: ...play the channel list with OK 2 Select a channel from the list with and press OK to watch To select a channel using information banner 1 Display information banner with INFO if it is not displayed 2 Select a channel with and press OK to watch while the banner is displayed Watching Basic Information banner To select a channel using TV Guide For Digital TV 1 Display TV Guide with GUIDE 2 Select the ...

Page 21: ... time End time Digital TV Channel position etc Analogue TV Category Current time Features available message meanings Bad signal Poor quality TV signal Dolby D Dolby D HE AAC Dolby Digital Plus Dolby Digital or HE AAC audio track Subtitle service available Multiple image or audio available Audio mode Watching For best audio Advanced settings 1 90 Off Timer remaining time Watching Basic Off Timer ...

Page 22: ...iting channels Favourites Edit To adjust banner timeout set Banner Display Timeout 1 Display the menu with MENU 2 Select Setup Display Settings Banner Display Timeout with and press OK to access 3 Set with and press OK to store To change the colour type of on screen displays set OSD Colour my Home Screen my Home Screen OSD Colour To display the introduction banner for the internet service 1 Displa...

Page 23: ...paired users Watching For best audio Voice Guidance Settings Multi Video Selects from a group of multiple videos if available This setting is not memorised and it will return to the default setting once you exit the current programme For Digital TV Multi Audio Selects between alternative languages for sound tracks if available This setting is not memorised and it will return to the default setting...

Page 24: ...hannel or input mode easily with LAST VIEW Press again to return to the current view Note Switching channel may not be available depending on the condition Watching less than 10 seconds is not reflected in the previously viewed channel or input mode Off Timer Turn the TV Standby mode automatically after a fixed period 1 Display the menu with MENU 2 Select Timer Off Timer with and press OK to acces...

Page 25: ...ion does not affect the recording Auto Standby 1 Display the menu with MENU 2 Select Timer Auto Standby with and press OK to access 3 Select On Off with and press OK to set Auto Standby On Off Automatically turns the TV to Standby mode for energy saving when no operation is performed for 4 hours Automatic input switching with the connected equipment affects this function and time count will be res...

Page 26: ...h MENU 2 Select Setup Eco Navigation with and press OK to access 3 Select Set to Eco with and press OK to set Auto Standby and No signal Power off are active when Eco Navigation is set to Set to Eco Adjusting time Settings for the system time of this TV 1 Display the menu with MENU 2 Select Timer Clock Settings with and press OK to access 3 Select one of the following items with and press OK to se...

Page 27: ... Preferred Audio Preferred Subtitles 4 Set with and press OK to store OSD Language Changes language for on screen displays Preferred Audio Selects the default language for Digital TV multi audio depending on the broadcaster Preferred Subtitles Selects the default language for Digital TV subtitles depending on the broadcaster To display subtitles Watching Basic Subtitle ...

Page 28: ...tooth wireless technology Functions Bluetooth devices Check the terminal type and cable plugs are correct when connecting HDMI equipment HDMI terminal HDMI cable Recorder Player 3D compatible player Set top box Camcorder Amplifier with speaker system Note Use a fully wired HDMI compliant cable For VIERA Link connections Functions VIERA Link HDAVI Control Summary of VIERA Link Use HDMI2 for connect...

Page 29: ...als Composite cables Camcorder Game equipment USB devices USB port USB cable USB HDD Communication Camera Note It is recommended to connect the device to the TV s USB port directly You cannot use two or more of the same kind of USB devices simultaneously except USB Flash Memory or USB HDD ...

Page 30: ...USB card reader Additional information for the devices may be on the following website http panasonic net viera support English only To listen with speakers DIGITAL AUDIO OUT Optical digital audio cable Amplifier with speaker system To enjoy multi channel sound from external equipment e g Dolby Digital 5 1ch connect the equipment to the amplifier For the connections read the manuals of the equipme...

Page 31: ...s capable of operating the contents or external equipment Watching External equipment Operating with TV s remote control To return to TV mode TV Note If the external equipment has an aspect adjustment function set it to 16 9 For details read the manual of the equipment or ask your local dealer Input Labels Accesses the input labels list to select the label of each input mode or set to skip unconne...

Page 32: ...unctions or the connected equipment with the below buttons of this TV s remote control Playback VCR DVD video content Stop the operations Rewind view the picture rapidly in reverse VCR Skip to the previous track title or chapter DVD video content Rewind view the picture rapidly in reverse VCR Search backward DVD video content Fast forward view the picture rapidly forward VCR Skip to the next track...

Page 33: ...ks correctly after changing the code The codes may be reset to defaults if batteries are replaced Some operations may not be available depending on the equipment HDMI features HDMI high definition multimedia interface is the world s first complete digital consumer AV interface complying with a non compression standard HDMI allows you to enjoy high definition digital images and high quality sound b...

Page 34: ...rminal via a DVI to HDMI adaptor cable When using the DVI to HDMI adaptor cable connect the audio cable to the audio input terminal use AV IN audio terminals Enquire HDMI adaptor cable at your local digital equipment retailer shop Note Audio settings can be made on HDMI Input in the Sound Menu Watching For best audio Advanced settings If the connected equipment has an aspect adjustment function se...

Page 35: ...ONENT HDMI 525 480 60i 60p 625 576 50i 50p 750 720 60p 50p 1 125 1 080 60i 50i 1 125 1 080 60p 50p 24p Applicable input signal Note Signals other than above may not be displayed properly The above signals are reformatted for optimal viewing on your display ...

Page 36: ...eproduction for watching movies in a darkened room True Cinema Reproduces the original image quality precisely without any revision Custom Adjusts each menu item manually to suit your favourite picture quality In each Viewing Mode Backlight Contrast Brightness Colour Tint Sharpness Colour Temperature Vivid Colour Adaptive Backlight Control Ambient Sensor Noise Reduction MPEG Remaster Intelligent F...

Page 37: ... with ASPECT 2 Select the mode with and press OK to set You can also change the mode pressing ASPECT Press repeatedly until you reach the desired mode 16 9 Directly displays the image at 16 9 without distortion anamorphic 14 9 Displays the image at the standard 14 9 without distortion Just Displays a 4 3 image full screen Stretching is only noticeable at the left and right edges 4 3 Displays the i...

Page 38: ...gnals Basic settings 1 Display the menu with MENU 2 Select Picture with and press OK to access 3 Select one of the following items with and press OK to access Backlight Contrast Brightness Colour Tint Sharpness Colour Temperature Vivid Colour Adaptive Backlight Control Intelligent Frame Creation 24p Smooth Film 4 Set with and press OK to store Backlight Contrast Brightness Colour Tint Sharpness Ad...

Page 39: ... picture frame rate to make the 24p source movie images smooth This function is available only for 24p signal input and displayed instead of Intelligent Frame Creation Not valid for photo contents of Media Player Network services or when Game Mode is set to On Noise reduction settings 1 Display the menu with MENU 2 Select Picture Noise Reduction MPEG Remaster with and press OK to access 3 Set with...

Page 40: ...Display the menu with MENU 2 Select Picture Advanced Settings with and press OK to access 3 Select one of the following items with and press OK to access Contrast Control White Balance Colour Management Gamma Reset to Defaults 4 Set with and press OK to store Contrast Control Contrast Control Auto Custom Off Automatically adjusts the detailed contrast settings Select Custom to set Contrast Control...

Page 41: ...l R Gain G Gain B Gain Adjusts the detailed white balance of bright red green blue areas Reset to Defaults Resets items of More Detailed Adjustment Reset to Defaults Resets White Balance to the default settings Colour Management R Hue R Saturation R Luminance Adjusts the picture hue saturation luminance of red areas G Hue G Saturation G Luminance Adjusts the picture hue saturation luminance of gre...

Page 42: ...nta areas Reset to Defaults Resets items of More Detailed Adjustment Reset to Defaults Resets Colour Management to the default settings Gamma Gamma Switches the gamma curve Please note the numerical values are reference for the adjustment More Detailed Adjustment Adjusts more detailed items of Gamma Input Signal Level Adjusts the input signal level Gain Adjusts the gain of gamma for selected signa...

Page 43: ...ode 1080p Pure Direct HDMI Content Type HDMI RGB Range AV Colour System 3D COMB 4 Set with and press OK to store Game Mode On Off Provides suitable images for fast response signals when playing games Not valid in TV mode To display a continuous record of time spent using Game mode set Playing Time Display Film Cadence Mode On Off Improves vertical resolution for movie images This function is avail...

Page 44: ...ity of each content type for Auto mode select Auto Detail Setting For HDMI input HDMI RGB Range Auto Full Normal Adjusts the black level of the image for each HDMI input When the black level is not suitable select Full For HDMI input AV Colour System Auto PAL SECAM M NTSC NTSC Selects optional colour system based on video signals For AV input 3D COMB On Off Makes still or slow moving pictures more...

Page 45: ...edge of the screen This function can be memorised for SD Standard definition and HD High definition signals respectively Not valid in Network services H Size H Size1 H Size2 Switches the horizontal display range to reduce noise on the side edge of the image For TV mode AV and HDMI input Not valid in 3D mode Zoom Adjustments Adjusts the vertical position and size when aspect is set to Just Sidecut ...

Page 46: ...lect Picture Copy Adjustment Destination Viewing Mode Destination Input with and press OK to access 3 Select the destination to copy to with and press OK to set 4 Select Copy Start with and press OK to copy 5 When the confirmation screen is displayed select Yes with and press OK to set Note Option Settings Screen Settings and 3D Settings will not be copied ...

Page 47: ...he equaliser to suit your favourite sound quality In each mode Bass Treble Surround and Bass Boost can be adjusted and stored For the User mode Equaliser will be available in the Sound Menu instead of Bass and Treble Select Equaliser and adjust the frequency Watching For best audio Basic settings This function is effective only for the sound from TV speakers Basic settings 1 Display the menu with ...

Page 48: ...gher frequency To reset the levels of each frequency to the default settings select Reset to Defaults with and press OK This function is effective only for the sound from TV speakers Balance Adjusts volume level of right and left speakers Surround Virtual Surround Off Selects surround sound settings Virtual Surround Provides a dynamic enhancer of width and depth to simulate improved spatial effect...

Page 49: ...rol On Off Automatically regulates large sound level differences between channels and inputs Volume Correction Adjusts the volume of each individual channel or input mode Speaker Distance to Wall Up to 30cm Over 30cm Compensates for the low frequency sound due to the distance between the speakers and the wall If the back space between the TV and wall is within 30 cm Up to 30cm is recommended If th...

Page 50: ...sic features on screen messages etc for visually impaired users Speed Fast Normal Slow Selects the readout speed for the voice guidance Volume Max Mid Min Selects the volume for the voice guidance Language Changes language for the voice guidance All languages may not be available When the selected language is not supported Language is set to English automatically User Level Beginner Expert Selects...

Page 51: ...hile mono signal is transmitted For Analogue TV When you receive the stereo bilingual sound system sound output modes can be selected by using the MPX in the Sound Menu Meanings of mode indicators STEREO MAIN I SUB II MONO Available mode indicator for each type of broadcast NICAM Used in New Zealand Singapore Hong Kong etc Regular broadcast Standard Audio No indicator Regular NICAM MONO I MAIN I N...

Page 52: ...O OUT and HDMI2 ARC function terminals SPDIF is a standard audio transfer file format Auto Dolby Digital Plus Dolby Digital and HE AAC multi channel are output as Dolby Digital Bitstream MPEG is output as PCM DTS is output as DTS for video contents of Media Player Network services PCM Digital output signal is fixed to PCM ARC Audio Return Channel is a function of digital audio output using HDMI ca...

Page 53: ...al TV 1 Select Digital TV with TV 2 Display TV Guide with GUIDE Press again to change the layout Landscape Portrait View Landscape to see several channels View Portrait to see one channel by time Example Date Time Programme Channel position and name To watch the programme 1 Select the current programme with and press OK to access 2 Select View with and press OK to watch To use Timer Programming Wa...

Page 54: ... list favourite channels set Favourites Edit Watching Tuning and editing channels Favourites Edit To view more details of the programme 1 Select the programme with 2 Press INFO to view Press again to return to TV Guide To exit TV Guide EXIT Note When this TV is turned on for the first time or the TV is switched off for more than a week it may take some time before TV Guide is completely shown ...

Page 55: ... If you select the current programme a confirmation screen asking whether you want to watch or record the programme appears Select Timer Programming with and press OK to set USB HDD Rec to record from the time you finish the timer event setting Note Not valid in Analogue TV Timer Programming only works reliably if correct time information is received via the signal from the broadcaster or service ...

Page 56: ... screens digital clocks or calculators etc may be difficult to see while wearing the 3D Eyewear Do not use the 3D Eyewear as sunglasses 3D effects may be perceived differently depending on the person 3D Eyewear Maintenance Storing and cleaning the 3D Eyewear Store the 3D Eyewear in a cool dry place Clean using a soft dry cloth Wiping the 3D Eyewear with a cloth that is covered in dust or dirt may ...

Page 57: ...after Mains Power On Off switch is next turned on Select No if you do not want to display this message again Playing back 3D compatible Blu ray disc Frame Sequential Connect the 3D compatible player via a fully wired HDMI compliant cable If you use the non 3D compatible player the images will be displayed in 2D mode If the input mode is not switched automatically select the input mode connected to...

Page 58: ...e this manual setting 1 Display 3D Mode Selection Manual with red during above operation 2 Select the mode with and press OK to set Original Displays the source image as it is Use to identify the format type of the source image Watching 3D Source image format Side by Side 3D Side by Side 2D Top and Bottom 3D Top and Bottom 2D Displays the mode you select Not valid in Analogue TV and AV mode 2D 3D ...

Page 59: ...o the 3D mode automatically or not On Advance Detects all the 3D format signals and displays the 3D image automatically On Detects the particular 3D format signals Frame Sequential etc and displays the 3D image automatically To view 3D images without any notifications and operations set to On Advance 3D Signal Message On Off Selects whether to give a notification message when a signal of 3D format...

Page 60: ...nce This setting will not be memorised when changing the input mode or channel L R Picture Swap L R Normal R L Reversed Swaps pictures for left eye and right eye except in 2D 3D mode Select R L Reversed if you feel that the sense of depth is unusual This setting will not be memorised when changing the input mode or channel Edge Smoother On Off Set to On if you feel the contoured parts of an image ...

Page 61: ...mages are displayed correctly with appropriate 3D format as following yellow boxes Source image format Side by Side Top and Bottom Normal format 2D 3D Mode Selection Original Side by Side 3D Top and Bottom 3D 2D 3D When selecting Side by Side 2D or Top and Bottom 2D the images will be displayed without 3D effect Depending on the player or broadcasts the image may be different from the above illust...

Page 62: ...ate Channel List New Channel Message Signal Condition Add TV Signal Favourites Edit List favourite Digital TV channels Create your favourite channel lists from various broadcasters up to 4 Favourites 1 to 4 The favourites lists are available from Favourites in the information banner and the TV Guide screen Watching Basic Information banner Watching TV Guide Using TV Guide 1 Select Favourites Edit ...

Page 63: ...r Numeric buttons 4 Press green to store To delete the channel 1 Select the channel with 2 Press OK to delete Press yellow to delete all channels To name the favourites 1 Press red 2 Enter characters maximum 10 characters with or Numeric buttons and press OK to set 3 Press RETURN to store Note Channel numbers are defined by the broadcaster and cannot be changed Hidden channels can be selected but ...

Page 64: ...llow Edit Digital TV Analogue TV Channels To swap move the channel position if available 1 Press green to edit 2 Set the new position with Numeric buttons or and press green to store To retune each channel Manual Tuning red Watching Tuning and editing channels Manual Tuning To rename the channel name Analogue TV 1 Press blue to edit 2 Enter characters maximum 5 characters with or Numeric buttons a...

Page 65: ...d press OK to start Auto Tuning Settings are made automatically When the operation is completed the channel at the lowest position will be displayed This setting is applicable only for the selected TV mode Auto Tuning using the buttons on the TV 1 Press and hold INPUT OK HOLD for MENU button for 3 seconds to display the menu 2 Set Auto Tuning with following control panel buttons Move the cursor se...

Page 66: ... Press OK to search Analogue TV Set Analogue TV channel manually after Auto Tuning Set Sound System and Colour System and then perform this function Normally set Colour System to Auto 1 Select the channel position with Numeric buttons 2 Select the channel with Channel Up Down 3 Search with 4 Select Store with and press OK to set Use Fine Tuning to make small adjustments to the tuning of an individ...

Page 67: ...ly New Channel Message Selects whether to give a notification message when a new Digital TV channel is found or not When a notification message appears you can perform Update Channel List pressing OK Signal Condition Selects a channel and checks the signal condition with indicators A good Signal Strength is not an indication of suitable signal for Digital TV reception To change the channel For Dig...

Page 68: ...Check the terminal type and cable plugs are correct when connecting USB port USB cable USB HDD Socket outlet Caution All data in the USB HDD will be erased in the following cases When formatting the USB HDD with this TV Recording USB HDD setup Setting for USB HDD When formatting the USB HDD to use on PC etc When the TV is repaired due to a malfunction you may have to format the USB HDD again with ...

Page 69: ...n the broadcaster and service provider You cannot copy the recorded TV programmes of the USB HDD For more information of the USB HDD Recording Technical information USB HDD Setting for USB HDD Format and set up the USB HDD with this TV in order to use it for recording All the USB devices recognised as a mass storage device will be listed Please note that USB HDD will be formatted and all data in i...

Page 70: ...s OK to set If another formatted USB HDD for recording already exists this confirmation screen will be displayed to switch to enable this USB HDD for recording Mode of the USB HDD The USB HDD is available for recording playing back Only one USB HDD on the list is available for recording The USB HDD is available for playing back To change the mode OK To edit USB HDD name green To format red To remo...

Page 71: ...h and press OK to set To start One Touch Recording Press to start Other channels cannot be selected while recording is in progress To stop recording in progress Press to stop To play back or delete the recorded contents Recorded TV programmes can be played back in Media Player 1 Display icons of the feature with APPS 2 Select Recorded TV with and press OK to access Media Player Recorded TV mode Ev...

Page 72: ...ith to start REW LIVE TV When you select Auto recording will start automatically This recording may not start if another recording is in progress TV signal condition is bad or there are no images displayed To operate REW LIVE TV To pause To search backward up to 90 minutes After pausing or searching backward the following buttons are available for operation Search backward Search forward Return to...

Page 73: ...ill be deleted automatically in the following conditions Even if REW LIVE TV stops for the following conditions as long as the setting is Auto a new recording will start automatically in a condition that makes the recording available Other channels selected Locked channel selected Invalid channel selected No TV signal External input selected When the full screen application TV Guide Media Player e...

Page 74: ...r event details 1 Press OK to start making the settings 2 Select USB HDD Rec Reminder with USB HDD Rec Records the programme to the USB HDD When the start time comes the channel will be switched automatically and the video and audio signals will be output 2 minutes before the start time a reminder message appears if you are watching TV Reminder Reminds you to watch the programme When you are watch...

Page 75: ...ame etc STTL Displays subtitles if available Press yellow to indicate subtitles and press again to remove them For Reminder Date You can set one day ahead with select daily or weekly with Daily Sun Sat Sunday to Saturday Daily Mon Sat Monday to Saturday Daily Mon Fri Monday to Friday Weekly Sat Fri Thu Wed Tue Mon Sun Same time on the same day every week Start time End time Duration automatic disp...

Page 76: ...ubtitles if available yellow Press again to remove subtitles For Reminder To cancel a timer event temporarily blue Press again to stop cancelling To adjust the clock If you cannot get the time information set Clock Settings manually 1 Display the menu with MENU 2 Select Timer Clock Settings Mode with and press OK to access 3 Select Manual with and press OK to set 4 Set Date Time with or Numeric bu...

Page 77: ...der message appears if you are watching TV To remove the message and start the programming press OK To cancel the programming press EXIT LED will turn to orange in Standby mode if Timer Programming is set Reminder messages will remain displayed until one of the following occurs You press OK to view the programme or EXIT to cancel the reminder The timer event that the reminder is set for ends ident...

Page 78: ...re guaranteed Check the USB HDDs that have been tested for compatibility with this TV at the following website http panasonic net viera support English only Note Data modified with a PC may not be displayed Do not remove the device while the TV is accessing data Otherwise this can damage the device or TV Do not touch the pins on the device Do not subject the device to a high pressure or impact Ins...

Page 79: ... TV will be played back Music mode Digital music data will be played back During the operation audio signal is output from DIGITAL AUDIO OUT and HDMI2 ARC function terminals But no video signals are output To use HDMI2 with ARC function connect an amplifier that has ARC function and set to use theatre speakers Functions VIERA Link HDAVI Control Date shows the date on which the recording was made b...

Page 80: ...f the card until a click is heard To remove push it again Label surface Cutout To insert or remove the USB Flash Memory Ensure alignment is straight and complete when inserting or removing To remove the USB Flash Memory safely from the TV perform Safely remove USB in USB Device Setup 1 Display the menu with MENU 2 Select Setup USB Device Setup with and press OK to access 3 Select the device with a...

Page 81: ...settings are completed Recording USB HDD setup To play back contents in the network device ensure the connection and settings are completed Media Player Using Media Player Network device 2 Display APPS List with APPS 3 Select Media Player with and press OK to access 4 Select the device with and press OK to access If only one device is connected this step will be skipped The network device already ...

Page 82: ...V s remote control To change the device You can change the current device to another device directly in the same mode when two or more available devices are connected 1 Display the device selection screen with yellow while the thumbnail is displayed 2 Select the device with and press OK to access Not valid in Recorded TV mode To change the device in Recorded TV mode Media Player Recorded TV mode C...

Page 83: ...Enter User Password with or Numeric buttons and press OK to set Press RETURN to store To register the new network device set Server Name Shared Folder For details read the manual of the equipment 5 Select Register with and press OK to set To delete the registered device select Delete with and press OK to set Note Regarding performance not all servers are guaranteed PCs with Windows 7 Windows 8 Win...

Page 84: ...play the option menu with OPTION 2 Select Change Size with and press OK to change For supported file formats Media Player Technical information Photo format Thumbnail view To display hide information of the highlighted content INFO To display Slideshow Settings red Media Player Photo mode Using Slideshow To sort green To change the device yellow To change the contents blue ...

Page 85: ...umbnail view with green 2 Select Folder view Sort by Date Sort by Month with and press OK to set Folder view Displays the thumbnail grouped by folder Files which are in the root folder will be collected to the folder named Sort by Date Sort by Month Displays the thumbnail grouped by the same date or month The group of the photos without recorded dates is shown as Unknown To return to the thumbnail...

Page 86: ... 3D with and press OK to access 3 Select two photos for L left and R right with and red You can only select photos of the same recorded date and the same pixels You may not be able to view the created 3D photo properly if you transpose the left and right photos 4 Create the 3D photo with OK If your selected photos are not suitable for the 3D photo the error message will be displayed and you will r...

Page 87: ...play the option menu with OPTION 2 Select Slideshow Settings with OK 3 Select one of the following items with and press OK to access Frame Colour Effect Transition Effect Auto Makeup Screen Mode Burst Playback Interval Repeat Back Ground Music 4 Set with and press OK to store Frame Off Multi Collage Drift calendar Drift Gallery calendar Gallery Cinema Selects the frame type of the slideshow Multi ...

Page 88: ...llery or Cinema Transition Effect Off Fade Dissolve Motion Random Selects the transition effect for switching photos during the slideshow Fade The next photo fades in gradually Dissolve Each photo is dissolved when switching to the next photo Motion Each photo is displayed with an effect of enlarging reducing moving up or moving down Random The transition effect is selected at random This function...

Page 89: ...hen Frame is set to Drift Gallery Cinema or when Transition Effect is set to Motion Interval Long Normal Short Selects slideshow interval Not valid when Frame is set to Drift Gallery Cinema or when Transition Effect is set to Motion Repeat On Off Slideshow repeat Back Ground Music Off Type1 Type2 Type3 Type4 Type5 User Auto Selects the background music during Photo mode Type1 5 Music files install...

Page 90: ...h and press OK to access Depending on the condition of the device select folders until you reach the desired music file 2 Select File Folder with and press OK to set File The selected music file will be registered Folder All the music files in the folder which contains the selected music file will be registered Note Picture quality may be degraded depending on the slideshow settings Picture settin...

Page 91: ...o Preview to Off Media Player Video mode Video Setup 2 Start playback with red If you have stopped the last playback halfway the confirmation screen is displayed to select whether to start from where you stopped last time or from the beginning For supported file formats Media Player Technical information Video format Thumbnail view To display hide information of the highlighted content INFO To sta...

Page 92: ...k may not continue depending on the condition To repeat playback Media Player Video mode Video Setup Playback To operate playback Rewind Fast forward Stop OK Pause displays the time seek bar Playback To jump to the specified time point 1 Display the time seek bar with OK 2 While the time seek bar is displayed Press Search approx 10 seconds Press and hold Search rapidly 3 Jump to the specified time...

Page 93: ... thumbnail RETURN Video Setup Set up the settings for Video mode 1 Display the option menu with OPTION 2 Select Video Setup with OK 3 Select one of the following items with and press OK to access Video Preview Multi Audio Dual Mono Audio Subtitle Subtitle Text Repeat Menu items and selectable options vary depending on the content 4 Set with and press OK to store Video Preview On Off Sets to start ...

Page 94: ...itles correctly if available This function is available during playback Repeat On Off Playback repeat within the title or selected file depending on the content Audio output settings You can enjoy the multi channel sound via an amplifier connected to DIGITAL AUDIO OUT or HDMI2 ARC function terminal To confirm or change the current sound status Media Player Video mode Video Setup 1 Display the menu...

Page 95: ...nction terminals SPDIF is a standard audio transfer file format Auto Dolby Digital Plus Dolby Digital and HE AAC multi channel are output as Dolby Digital Bitstream MPEG is output as PCM DTS is output as DTS PCM Digital output signal is fixed to PCM ARC Audio Return Channel is a function of digital audio output using HDMI cable ...

Page 96: ... recorded TV programmes are listed Not Viewed Contents not played back yet are listed Icons are displayed Content not played back yet Once you play back the content this icon will disappear Protected content cannot be deleted Content under recording You can play back this content even if under recording Two or more contents are grouped 2 Select the content with and press OK to start playback If yo...

Page 97: ...ss Search approx 10 seconds Press and hold Search rapidly 3 Jump to the specified time point with OK To display hide the operation guide and information banner INFO To repeat between the starting point A and finishing point B blue Set A and B in order The points will be reset by pressing again or by other operations To the previous next chapter red green A recorded content is automatically divided...

Page 98: ... Group To release several groups at once tick all the desired groups Exclude from Group Select the group and press OK to display the grouped contents To exclude one specific content from the group tick it and then select Exclude from Group To exclude several contents at once tick all the desired contents Change Protect Status Select the content to protect from deletion and then select Change Prote...

Page 99: ... device to play back photos videos or music change to the appropriate content 1 Display the option menu with OPTION 2 Select Contents Select with and press OK to access Chapter List You can start playback from the chapter list you select 1 Display the chapter list with yellow 2 Select the chapter with and press OK to start playback Note The chapter list is not displayed while the selected content ...

Page 100: ...to access 3 Select Auto PCM with and press OK to set SPDIF Selection Auto PCM Selects the initial setting for digital audio output signal from DIGITAL AUDIO OUT and HDMI2 ARC function terminals SPDIF is a standard audio transfer file format Auto Dolby Digital Plus Dolby Digital and HE AAC multi channel are output as Dolby Digital Bitstream MPEG is output as PCM DTS is output as DTS PCM Digital out...

Page 101: ...w To display hide information of the highlighted content INFO To start playback red To change the device yellow To change the contents blue Playing music Playback of the selected file in the folder 1 Select the folder with and press OK to access 2 Select the file with 3 Start playback with red Playback To operate playback Rewind Fast forward Stop OK Pause displays the time seek bar Playback ...

Page 102: ...play hide the operation guide INFO To the previous track red To the next track green To return to thumbnail RETURN Music Setup Set up the setting for Music mode This function is available in the thumbnail view 1 Display the option menu with OPTION 2 Select Music Setup Repeat with OK 3 Select Off Folder One with and press OK to set Folder Playback repeat within the selected folder One Playback repe...

Page 103: ...e drive from Source drive with and press OK to access 4 Select the folder or file to copy with and press red to set To select all folders or files at once green 5 Press to go to Destination drive 6 Select the drive with and press OK to access You cannot select the source drive as the destination drive 7 Select Copy Here with and press OK to access 8 When the confirmation screen is displayed select...

Page 104: ... press OK to access 4 When the confirmation screen is displayed select Yes with and press OK to delete Note Not valid for the contents in the network device Some files may not be copied properly Please note there may be a risk of file corruption due to power failure or sudden shut down during USB Sharing process In consideration of possible loss of the data included in your USB devices or SD card ...

Page 105: ... erroneous operation may damage the data or device Back up the recorded data at regular intervals to prevent data deterioration data damage or erratic operation of the TV Panasonic is not liable for any deterioration or damage of recorded data SD Card SD Card Use an SD Card which meets SD standards Failure to do so may cause the TV to malfunction 2 1 mm 32 mm 24 mm Card format SDXC Card exFAT SDHC...

Page 106: ...Memory format FAT16 FAT32 or exFAT USB HDDs formatted on a PC are not guaranteed to work in Media Player USB HDD The capacity of USB HDD that works with this TV is from 160 GB to 3 TB Connect the USB HDD to the socket outlet to record and play back properly with this TV Use the USB HDD formatted with this TV Recording USB HDD setup Setting for USB HDD Regarding performance not all USB HDDs are gua...

Page 107: ...if they fulfil these conditions Do not use multi byte characters or other special codes for file names Connected devices may become unusable with this TV if the file or folder names are changed Video format Supported Video formats SD Video mod Video codec MPEG1 MPEG2 Audio codec Dolby Digital MPEG Audio SD Video Standard Ver 1 31 Entertainment Video Profile The data may not be available if a folde...

Page 108: ...re HE AAC LPCM MPEG Audio MP3 WMA WMA Pro Some subtitles or chapter functions may not be available MP4 f4v m4v mp4 Video codec H 264 BP MP HP MPEG1 MPEG2 MPEG4 SP ASP Audio codec AAC Dolby Digital Dolby Digital Plus HE AAC MPEG Audio MP3 This TV supports this container recorded with Panasonic products For details read the manual of the products MKV mkv Video codec H 264 BP MP HP MPEG1 MPEG2 MPEG4 ...

Page 109: ...odec H 264 BP MP HP Audio codec AAC MP3 3GPP 3gp 3g2 Video codec H 264 BP MP HP MPEG4 SP ASP Audio codec AAC HE AAC PS mod mpg mpeg vob vro Video codec H 264 BP MP HP MPEG1 MPEG2 VC 1 Audio codec AAC Dolby Digital Dolby Digital Plus HE AAC LPCM MPEG Audio MP3 TS mts m2ts tp trp ts tts Video codec H 264 BP MP HP MPEG1 MPEG2 VC 1 Audio codec AAC Dolby Digital Dolby Digital Plus DTS core HE AAC MPEG ...

Page 110: ...s are the same except for the file extensions If there are more than one subtitles text files inside the same folder they are displayed in the following order of priority srt sub txt Note Some files may not be played back even if they fulfil these conditions Do not use multi byte characters or other special codes for file names Connected devices may become unusable with this TV if the file or fold...

Page 111: ...WMA Pro wma Copy protected files cannot be played back WMA Lossless is not supported LPCM wav Note Some files may not be played back even if they fulfil these conditions Do not use multi byte characters or other special codes for file names Connected devices may become unusable with this TV if the file or folder names are changed ...

Page 112: ...by Panasonic and enjoy internet contents such as videos games communication tools etc from APPS List Example To enable this function you need a broadband network environment Ensure the network connections and network settings are completed Network Network connections Network Network settings ...

Page 113: ...u may operate the internet contents with the free cursor and Voice Control function of Touch Pad Controller supplied Functions Voice Control You can connect a keyboard for character input in the applications You can also use the keyboard for TV operation as well as for APPS List Functions Bluetooth devices Functions Keyboard Video communication requires an exclusive Communication Camera TY CC20W F...

Page 114: ...ist You can update the software later manually Network Network settings Software Update The services through APPS List are operated by their respective service providers and such service may be discontinued either temporarily or permanently without notice Therefore Panasonic will make no warranty for the contents or the continuity of the services Some contents may be inappropriate for some viewers...

Page 115: ...ome network And then you can enjoy these contents on this TV Example For watching and operating contents on this TV Network DLNA Using DLNA For supported file formats Network Technical information To use a PC as a media server Prepare the PC with Windows 7 Windows 8 or ensure the server software is installed on the PC Windows 7 Windows 8 and Twonky 7 installed on the PC with Windows XP or Mac are ...

Page 116: ...ts on this TV with the DMC Digital Media Controller network equipment You can enjoy contents stored in the media server by controlling with the DMC network equipment smartphone PC with Windows 7 Windows 8 installed etc connected to your home network To use this function with your smartphone or Windows 7 Windows 8 set TV Remote App Settings of this TV Network Network settings TV Remote App Settings...

Page 117: ...mation of the application http panasonic net viera support English only For the operations refer to the support information of the application To use this function with another DLNA Certified VIERA set Network Link Settings of this TV Network Network settings Network Link Settings Sharing the current programme may not be available when selecting radio channels encrypted copy protected programmes o...

Page 118: ... access another TV select the name of another TV from the displayed media server list To display hide information of the highlighted media server INFO 4 Select the file with and press OK to access Example Depending on the condition of media server you may need to select the folder before selecting the file To display hide information of the highlighted file INFO Note Non playable files are also li...

Page 119: ... cannot be used Required speed effective at least 1 5 Mbps for SD Standard Definition and 6 Mbps for HD High Definition picture quality respectively If the transfer speed is not enough contents may not be played back properly Wireless connection Built in wireless LAN Rear of the TV Access point Internet environment Wired connection ETHERNET terminal LAN cable Shielded Use the Shielded Twist Pair S...

Page 120: ...broadband network environment To use internet service you need a broadband network environment Network Network connections Internet connection Wireless connection For DLNA and internet service Built in wireless LAN Rear of the TV Access point Hub or Router Internet environment Smartphone DLNA Certified media server PC etc ...

Page 121: ...ed Use the Shielded Twist Pair STP LAN cable Hub or Router Internet environment DLNA Certified media server PC etc Wireless connection For DLNA TV To use the TV as a wireless access point Network Network settings Custom Wireless Access Point DLNA Certified media server PC etc Smartphone ...

Page 122: ...ipment compatible only with 100BASE TX category 5 or later LAN cables are required Contact your Internet Service Provider ISP or telecommunications company for further assistance regarding the network equipment Confirm the terms and conditions of the contracts with your Internet Service Provider ISP or telecommunications company Depending on the contracts additional fees may be charged or multiple...

Page 123: ...utomatically 4 Select your desired access point with and press OK to access Available Wireless Networks are displayed automatically Encrypted access point For WPS Push button 1 Select Easy setup with Push button with and press OK to access 2 Press the WPS button on the access point until the light flashes 3 Connect the TV with the access point with OK WPS Wi Fi Protected Setup If the connection ha...

Page 124: ...red 1 Display the menu with MENU 2 Select Network Network Connection with and press OK to access 3 Select Quick setup with and press OK to access 4 Automatically setup is done and Network Status is displayed Network Network settings Network Status 5 Select Exit with and press OK to set To set manually Network Network settings Custom Wired Note When the network connection type is set to Wired Wirel...

Page 125: ...until the light flashes 3 Connect the TV with the access point with OK WPS Wi Fi Protected Setup If the connection has failed check the settings and positions of your access point And then follow the on screen instructions For WPS PIN 1 Press green 2 Enter the PIN code to the access point 3 Connect the TV with the access point with OK For Manual 1 Press yellow 2 You can set up SSID security type e...

Page 126: ...oxy Settings It is not required for normal household use Some internet services may not be available depending on the proxy settings Proxy This is the address of the relay server which is connected between the browser and the target server to send data to the browser 1 Select Proxy with and press OK to access 2 Enter the address with or Numeric buttons and press OK to set 3 Press RETURN to store P...

Page 127: ...uire IP Address Acquire DNS Address Auto is recommended Available settings are displayed automatically To set manually select and set IP Address Subnet Mask Default Gateway DNS Address Proxy Settings It is not required for normal household use Some internet services may not be available depending on the proxy settings Proxy This is the address of the relay server which is connected between the bro...

Page 128: ...access point Confirm the PIN code network settings of the equipment before starting setup For details read the manual of the equipment 1 Display the menu with MENU 2 Select Network Network Connection Custom Wireless Access Point with and press OK to access 3 Select Connect to device in WPS with and press OK to access To set manually select Change settings see below 4 Select and set WPS Push button...

Page 129: ...current network settings Network Network settings Network Status Ensure the equipment to connect supports WPS for this setup WPS Wi Fi Protected Setup Network Status Displays and checks the network status MAC Address current network settings etc 1 Display the menu with MENU 2 Select Network Network Status with and press OK to access 3 Automatically testing is done and Network Status is displayed T...

Page 130: ...nvironment set the names of the TVs for each TV Remote App Settings Sets to control the TV with the equipment smartphone etc connected to your network 1 Display the menu with MENU 2 Select Network TV Remote App Settings with and press OK to access 3 Select one of the following items with and press OK to access TV Remote On Off Enables to control the TV from the network equipment smartphone etc Pow...

Page 131: ...equipment smartphone etc Note This function is not available when the TV is turned off with Mains Power On Off switch You need to install the application for controlling VIERA on your smartphone For information of the application http panasonic net viera support English only For the operations refer to the support information of the application Depending on the network condition this function may ...

Page 132: ...er list of another VIERA and then select the content to share Also read the manual of another VIERA To use this function with your smartphone you need to install the application for controlling VIERA on your smartphone For information of the application http panasonic net viera support English only For the operations refer to the support information of the application Changing the default configur...

Page 133: ...ia Player Using Media Player Network device Software Update Accesses the specific website to update the TV s software if any updates are available 1 Display the menu with MENU 2 Select Network Software Update with and press OK to access 3 Follow the on screen instructions New Software Message Selects whether to give a notification message when new software is found via network or not 1 Display the...

Page 134: ... one of the media servers with and press OK to access For the operations to access another TV select the name of another TV from the displayed media server list To display hide information of the highlighted media server INFO 4 Select the file with and press OK to access Depending on the condition of media server you may need to select the folder before selecting the file To display hide informati...

Page 135: ... thumbnail of photos for the first view with 2 Start Slideshow with red and OK To display hide the operation guide INFO To pause return to Single view OK To return to list RETURN Slideshow Settings Set up the settings for photo file operations on this TV 1 Display the option menu with OPTION 2 Select Slideshow Settings with and press OK to access 3 Select one of the following items with and press ...

Page 136: ...displayed with an effect of enlarging reducing moving up or moving down Random The transition effect is selected at random Auto Makeup On Off Automatically detects the face in the photo and improves luminance and contrast Interval Long Normal Short Selects slideshow interval Not valid when Transition Effect is set to Motion Repeat On Off Slideshow repeat Back Ground Music Off Type1 Type2 Type3 Typ...

Page 137: ...formation of the highlighted media server INFO 4 Select the file with and press OK to access Depending on the condition of media server you may need to select the folder before selecting the file To display hide information of the highlighted file INFO Note Non playable files are also listed but cannot be selected Watching video Playback If you have stopped the last playback halfway the confirmati...

Page 138: ... OK To display hide the operation guide and information banner INFO To the previous content red To the next content green To change aspect 1 Display Aspect Selection with ASPECT 2 Select the mode with and press OK to set Aspect1 Displays the content enlarged without distortion Aspect2 Displays the content full screen Original Displays the content original size You can also change the mode pressing...

Page 139: ... or scene in the thumbnail view Images may not be displayed for an instant in the thumbnail view Set the preview Off to solve this Multi Audio Dual Audio Dual Mono Audio Selects for selectable sound tracks if available It may take several seconds to change the sound This function is available during playback Subtitle Display hide subtitles if available This function is available during playback Su...

Page 140: ...IGITAL AUDIO OUT and HDMI2 ARC function terminals SPDIF is a standard audio transfer file format Auto Dolby Digital Plus Dolby Digital and HE AAC multi channel are output as Dolby Digital Bitstream MPEG is output as PCM DTS is output as DTS PCM Digital output signal is fixed to PCM ARC Audio Return Channel is a function of digital audio output using HDMI cable Note During the operation audio signa...

Page 141: ...one of the media servers with and press OK to access For the operations to access another TV select the name of another TV from the displayed media server list To display hide information of the highlighted media server INFO 4 Select the file with and press OK to access Depending on the condition of media server you may need to select the folder before selecting the file To display hide informatio...

Page 142: ...mp to the specified time point 1 Display the time seek bar with OK 2 While the time seek bar is displayed Press Search approx 10 seconds Press and hold Search rapidly 3 Jump to the specified time point with OK To display hide the operation guide INFO To the previous track red To the next track green To return to list RETURN ...

Page 143: ...c file operations on this TV 1 Display the option menu with OPTION 2 Select Music Setup Repeat with OK 3 Select Off Folder One with and press OK to set Folder Playback repeat within the selected folder One Playback repeat of the selected one file ...

Page 144: ... back even if they fulfil these conditions Do not use multi byte characters or other special codes for file names Connected devices may become unusable with this TV if the file or folder names are changed Video format Supported Video formats SD Video mod Video codec MPEG1 MPEG2 Audio codec Dolby Digital MPEG Audio SD Video Standard Ver 1 31 Entertainment Video Profile The data may not be available...

Page 145: ...re HE AAC LPCM MPEG Audio MP3 WMA WMA Pro Some subtitles or chapter functions may not be available MP4 f4v m4v mp4 Video codec H 264 BP MP HP MPEG1 MPEG2 MPEG4 SP ASP Audio codec AAC Dolby Digital Dolby Digital Plus HE AAC MPEG Audio MP3 This TV supports this container recorded with Panasonic products For details read the manual of the products MKV mkv Video codec H 264 BP MP HP MPEG1 MPEG2 MPEG4 ...

Page 146: ...annot be played back FLV flv Video codec H 264 BP MP HP Audio codec AAC MP3 3GPP 3gp 3g2 Video codec H 264 BP MP HP MPEG4 SP ASP Audio codec AAC HE AAC PS mod mpg mpeg vob vro Video codec MPEG1 MPEG2 Audio codec Dolby Digital LPCM MPEG Audio TS mts m2ts tp trp ts tts Video codec H 264 BP MP HP MPEG1 MPEG2 Audio codec AAC Dolby Digital Dolby Digital Plus HE AAC MPEG Audio ...

Page 147: ...s are the same except for the file extensions If there are more than one subtitles text files inside the same folder they are displayed in the following order of priority srt sub txt Note Some files may not be played back even if they fulfil these conditions Do not use multi byte characters or other special codes for file names Connected devices may become unusable with this TV if the file or fold...

Page 148: ...WMA Pro wma Copy protected files cannot be played back WMA Lossless is not supported LPCM wav Note Some files may not be played back even if they fulfil these conditions Do not use multi byte characters or other special codes for file names Connected devices may become unusable with this TV if the file or folder names are changed ...

Page 149: ...dit a user profile 1 Display the main menu with MENU 2 Select Setup User Settings with and press OK to access 3 Select a user with and press OK to access To create a new user select Create new user 4 Select one of the following items with and press OK to access Your icon Your name Your voice Your face Main Home Screen my Home Cloud account 5 Follow the on screen instructions Your icon Sets your fa...

Page 150: ... up an account for the cloud services To delete a user profile 1 Display the main menu with MENU 2 Select Setup User Settings with and press OK to access 3 Select a user with and press OK to access 4 Select Remove this user with and press OK to access 5 When the confirmation screen is displayed select Yes with and press OK to set Note You need a broadband network environment to use this function f...

Page 151: ...fully Face Recognition Voice Print Recognition By using the Communication Camera and Voice Control function this TV recognises your face voice and provides the recommended contents Say my Stream into the microphone of the Touch Pad Controller to use this function To use this function you need to set up a user profile and register face voice data etc Functions User profile Settings Communication Ca...

Page 152: ...ouch Pad Controller is completed Functions Touch Pad Controller Settings Voice Control Settings 1 Display the menu with MENU 2 Select Setup Voice Control Settings Language Speech Detection Level Terms of Service with and press OK to access 3 Set with and press OK to store Language Select the language for Voice Control function All languages may not be available When the selected language is not su...

Page 153: ... When the confirmation screen is displayed read carefully and start Voice Control function 2 The operation guide is displayed and follow the on screen instructions To display voice command list OPTION To exit Voice Control function RETURN Note When you start Voice Control function sound level of the TV becomes low Voice Control function may not work properly in the following conditions Not pronoun...

Page 154: ...troller directly at the TV s remote control signal receiver because it works with the infrared You can operate the switch without registration It is recommended to speak within about 15 cm from microphone of Touch Pad Controller when using Voice Control function My button Press my button of Touch Pad Controller while watching media content in my Stream and you can register the content as your favo...

Page 155: ... items with and press OK to access Pairing Cursor Settings Operation Guide 4 Follow the on screen instructions Pairing Registers Touch Pad Controller supplied to this TV Only 1 Touch Pad Controller can be registered Cursor Settings Sets for the cursor of Touch Pad Controller Operation Guide Displays the operation guide of Touch Pad Controller ...

Page 156: ...ink This TV supports HDAVI Control 5 function Some functions are not available depending on the equipment s version of HDAVI Control Confirm the connected equipment s version of HDAVI Control VIERA Link HDAVI Control is a unique function that we have developed and added based on the control functions provided by HDMI which is an industry standard known as HDMI CEC Consumer Electronics Control As s...

Page 157: ...pment with VIERA Link function DIGA Recorder DVD Player Blu ray Disc Player HD Video Camera LUMIX Camera Available features HDMI connection DIGA Recorder DVD Player Blu ray Disc Player Easy playback Power on Link Power off Link Standby Power Save Intelligent Auto Standby VIERA Link Control HD Video Camera LUMIX Camera Easy playback Power on Link Power off Link VIERA Link Control For equipment whic...

Page 158: ...eo Camera LUMIX Camera with VIERA Link function HDMI terminal DIGITAL AUDIO OUT HDMI cable Optical digital audio cable Player theatre Blu ray Disc theatre with VIERA Link function Speaker system Amplifier with VIERA Link function DIGA Recorder with VIERA Link function If the connected equipment has HDAVI Control 5 function you do not have to use this audio cable Optical digital audio cable In this...

Page 159: ...Blu ray Disc theatre Easy playback Power on Link Power off Link Standby Power Save Intelligent Auto Standby VIERA Link Control Speaker Selection Amplifier Power off Link Intelligent Auto Standby Speaker Selection For equipment which has HDAVI Control 2 or later function For equipment which has HDAVI Control 4 or later function While playing a disc Except for watching a disc ...

Page 160: ... Disc theatre etc Audio system Maximum 1 Player theatre Blu ray Disc theatre Amplifier etc Tuner Maximum 4 Set top box etc Preparations Connect the equipment supporting VIERA Link For VIERA Link connections Functions VIERA Link HDAVI Control Summary of VIERA Link Use a fully wired HDMI compliant cable Set up the connected equipment Read the manual of the equipment Set VIERA Link to On in the Setup...

Page 161: ...lled higher or lower in synchronisation with the TV on off state to reduce the consumption When the TV is set to Standby mode the connected equipment is automatically set to Standby and the power consumption of the connected equipment is automatically minimised When the TV is turned on the connected equipment is still in Standby mode but the power consumption is increased to start the connected eq...

Page 162: ...ions to operate the menu of the equipment Confirm the remote control code is 73 Watching External equipment Operating with TV s remote control To display the operation guide OPTION If other manufacturers product is accessed Setup Contents Selection menu may be displayed Available TV s remote control buttons depend on the connected equipment If multiple recorders or players are connected Each recor...

Page 163: ... access 4 Select Home Cinema TV with and press OK to set Home Cinema The sound is delivered from theatre speakers Player theatre Blu ray Disc theatre or Amplifier will be automatically turned on if it is in Standby mode The sound of TV speakers is mute When the equipment is turned off TV speakers will be activated You can use Volume Up Down and MUTE TV TV speakers are active Multi channel sound If...

Page 164: ... work properly depending on the connected equipment Image or sound may not be delivered for the first few seconds when the input mode is switched HDAVI Control 5 is the newest standard for HDAVI Control compatible equipment This standard is compatible with conventional HDAVI equipment To confirm the HDAVI Control version of this TV Support Information Using Help menu ...

Page 165: ...ting Make a note of the PIN number in case you forget it 4 Select Child Lock List with and press OK to access 5 Select the channel input with and press OK to lock appears when the channel input is locked To cancel 1 Select the locked channel input with 2 Press OK To lock all green To cancel all locks yellow To jump to the head of the next channel input group blue PIN number You can change the PIN ...

Page 166: ...ttings etc 1 Display the menu with MENU 2 Select Setup System Menu Shipping Condition with and press OK to access 3 When the confirmation screen is displayed select Yes with and press OK to set 4 Follow the on screen instructions Auto Tuning will automatically start Note To retune TV channels only e g after moving house set Auto Tuning Watching Tuning and editing channels Auto Tuning ...

Page 167: ... to set If System Update is performed the software will be updated TV functions may be changed If you do not want to do so set Auto Update Search in Standby to Off Every time you set the TV automatically performs search in Standby and downloads an update if any software updates are available The automatic updating cannot be performed under the following conditions TV turned off with Mains Power On...

Page 168: ...e System Update Search Now with and press OK to access 3 Searches for an update for several minutes and displays a corresponding message if any 4 Download with OK Note Download may take a few hours During software download and update DO NOT switch off the TV To update via the internet Network Network settings Software Update ...

Page 169: ...each the desired character 1 _ a b c 2 A B C d e f 3 D E F g h i 4 G H I j k l 5 J K L m n o 6 M N O p q r s 7 P Q R S t u v 8 T U V w x y z 9 W X Y Z Space 0 The character is set automatically if you leave for 1 second You can also set the character pressing OK or other Numeric buttons less than 1 second The characters may vary depending on the input items ...

Page 170: ...ort English only 1 Display the menu with MENU 2 Select Setup Bluetooth Setup with and press OK to access 3 Select Devices Bluetooth Audio Settings with and press OK to access Devices Searches the available device and displays the status You cannot use two or more A2DP compliant audio devices simultaneously Not paired The device is not registered Register the device by following the on screen instr...

Page 171: ...lable only for the Bluetooth audio devices Audio Output Set to Bluetooth only to mute the TV speakers automatically when using the Bluetooth audio device And you can adjust the volume of the device using Volume Up Down Volume Adjusts the volume of the Bluetooth audio device Settings in the Sound Menu may not be effective for the Bluetooth audio devices This setup has not been designed for Touch Pa...

Page 172: ...TV screen depending on the connected keyboard Some of the keys of keyboards may correspond to the operation of the remote control Keyboard Remote Control Enter OK Backspace RETURN Esc EXIT 0 9 Character Numeric buttons F1 HOME F2 APPS F3 MENU F4 AV F5 F6 Channel Down Up F7 F8 Volume Down Up F9 F10 F11 F12 Coloured buttons ...

Page 173: ...atives with and press OK to set You can adjust using the slide bar with and press OK to set You can go to the next screen with OK You can enter names or numbers freely for some items 1 Enter characters one by one with and press OK to set You can set characters using Numeric buttons Functions Setting characters Using Numeric buttons 2 Press RETURN to store To reset the settings To initialise pictur...

Page 174: ...ork services etc Using control panel buttons 1 Press and hold INPUT OK HOLD for MENU button for 3 seconds to display the menu 2 Select and set with following control panel buttons Move the cursor select from a range of options select the menu item up and down only adjust levels left and right only Access the menu store settings after adjustments have been made or options have been set with INPUT O...

Page 175: ...picture Basic settings Vivid Colour On Off Automatically adjusts colours to vivid ones Watching For best picture Basic settings Adaptive Backlight Control Automatically controls the level of backlight according to the images Watching For best picture Basic settings Intelligent Frame Creation Max Mid Min Off Automatically compensates the picture frame rate and removes juddering movements to make th...

Page 176: ...usts picture settings automatically depending on ambient lighting conditions On Off Watching For best picture Ambient Sensor Noise reduction settings Noise Reduction Auto Max Mid Min Off Reduces unwanted picture noise Watching For best picture Noise reduction settings MPEG Remaster Auto Max Mid Min Off Reduces flicker noise in contoured parts of a picture and block noise Watching For best picture ...

Page 177: ... Network services or when Game Mode is set to On 1080p Pure Direct On Off Reproduces the original image quality in detail for 1080p HDMI input signal Watching For best picture Option Settings Not valid in 3D mode HDMI Content Type Graphics Photos Auto Off Adjusts the picture settings of each HDMI input according to the selected content type Watching For best picture Option Settings For HDMI input ...

Page 178: ...on Screen Settings 16 9 Overscan On Off Selects the screen area displaying the image for 16 9 aspect Watching For best picture Screen Settings Not valid in Network services H Size H Size1 H Size2 Switches the horizontal display range to reduce noise on the side edge of the image Watching For best picture Screen Settings For TV mode AV and HDMI input Not valid in 3D mode Zoom Adjustments Adjusts th...

Page 179: ...on message when a signal of 3D format is found or not Watching 3D 3D Settings Not valid when 3D Detection is set to On Advance For Digital TV Component and HDMI input 2D 3D Depth Max Mid Min Selects a level of 3D image depth for viewing converted 2D images Watching 3D 3D Settings 3D Adjustment On Off Adjustment of the 3D effect except in 2D 3D mode Watching 3D 3D Settings L R Picture Swap L R Norm...

Page 180: ...hing 3D 3D Settings Safety Precautions Displays the precautions for viewing 3D images Watching 3D 3D Settings Copy Adjustment Copies the selected True Cinema or Custom settings to those of the other input Watching For best picture Copy Adjustment Reset to Defaults Resets the current Picture Viewing Mode to the default settings ...

Page 181: ...e or minimise sharper higher sound output Watching For best audio Basic settings Equaliser Adjusts the frequency level to suit your favourite sound quality Watching For best audio Basic settings Balance Adjusts volume level of right and left speakers Watching For best audio Basic settings Surround Virtual Surround Off Selects surround sound settings Watching For best audio Basic settings Bass Boos...

Page 182: ... level differences between channels and inputs Watching For best audio Volume settings Volume Correction Adjusts the volume of each individual channel or input mode Watching For best audio Volume settings Speaker Distance to Wall Up to 30cm Over 30cm Compensates for the low frequency sound due to the distance between the speakers and the wall Watching For best audio Volume settings ...

Page 183: ...ice Guidance Settings Volume Max Mid Min Selects the volume for the voice guidance Watching For best audio Voice Guidance Settings Language Changes language for the voice guidance Watching For best audio Voice Guidance Settings User Level Beginner Expert Selects the level of verbosity for the voice guidance Watching For best audio Voice Guidance Settings Web Browser On Off Set to On to enable voic...

Page 184: ...igital TV SPDIF Selection Auto PCM Selects the initial setting for digital audio output signal from DIGITAL AUDIO OUT and HDMI2 ARC function terminals Watching For best audio Advanced settings For Digital TV or video contents of Media Player Network services HDMI Input Digital Analogue Selects to fit the input signal Watching For best audio Advanced settings For HDMI input Reset to Defaults Resets...

Page 185: ...twork settings my Home Cloud Settings VIERA Name Sets your favourite name for this TV Network Network settings VIERA Name TV Remote App Settings Sets to control the TV from network equipment smartphone etc Network Network settings TV Remote App Settings Network Link Settings Sets to control the TV with devices connected to the network Network Network settings Network Link Settings File Sharing Set...

Page 186: ...ble software updates from the Panasonic website Network Network settings Software Update New Software Message On Off Selects whether to give a notification message when new software is found via network or not Network Network settings New Software Message ...

Page 187: ... for this TV Watching Basic Adjusting time Date Sets the current date manually Watching Basic Adjusting time Time Sets the current time manually Watching Basic Adjusting time Auto Standby Automatically turns the TV to Standby mode for energy saving when no operation is performed for 4 hours On Off Watching Basic Energy saving functions No signal Power off Automatically turns the TV to Standby mode...

Page 188: ...ing for USB HDD Recording Setup Settings for the recording feature of the USB HDD Recording USB HDD setup Setting for USB HDD VIERA Touch Pad Controller Pairing Registers Touch Pad Controller supplied to this TV Functions Touch Pad Controller Settings Cursor Settings Sets for the cursor of Touch Pad Controller Functions Touch Pad Controller Settings Operation Guide Displays the operation guide of ...

Page 189: ...nnels Channel List Auto Tuning Automatically searches for receivable channels Watching Tuning and editing channels Auto Tuning Manual Tuning Searches for channels manually Watching Tuning and editing channels Manual Tuning Update Channel List Updates the channel list while keeping your settings Watching Tuning and editing channels Update Channel List For Digital TV New Channel Message On Off Selec...

Page 190: ...for the selected TV mode The menu name varies depending on the TV mode Digital TV Tuning Menu Analogue TV Tuning Menu Language OSD Language Changes language for on screen displays Watching Basic Language Preferred Audio Selects the default language for Digital TV multi audio depending on the broadcaster Watching Basic Language Preferred Subtitles Selects the default language for Digital TV subtitl...

Page 191: ...ication and selection in Input Selection or banner Watching External equipment Watching external input Banner Display Timeout 10 9 8 7 6 5 4 3 2 1 0 No display seconds Sets how long the information banner stays on screen Watching Basic Information banner Smart Banner On Off Displays the introduction banner for the internet service Watching Basic Information banner Playing Time Display On Off Set t...

Page 192: ...I Control Power off Link Standby Power Save On Off Controls the connected equipment to reduce power consumption in Standby Functions VIERA Link HDAVI Control Standby Power Save This function is available when VIERA Link is set to On and Power off Link is set to On Intelligent Auto Standby On Off Makes non watched or non used connected equipment go into Standby mode to reduce the power consumption ...

Page 193: ...ns Shipping Condition Shipping Condition System Update Downloads new software to this TV Functions Updating the TV Software Auto update Licence Menu Displays the software licence information Other Settings Power Save On Off Reduces brightness of the picture to economise on power consumption ...

Page 194: ...Watching For best picture Noise reduction settings Check nearby electrical equipment car motorcycle fluorescent lamp No image can be displayed Check the correct input mode is selected Check the setting of AV COMPONENT VIDEO in Input Selection to match the output of the external equipment Watching External equipment Is Contrast Brightness or Colour in the Picture Menu set to the minimum Watching Fo...

Page 195: ...ping Condition then select Home in first time Auto Tuning Functions Shipping Condition Shipping Condition Digital TV Before requesting service or assistance please follow these simple guides to solve the problem If the problem still persists please contact your local Panasonic dealer for assistance Due to the digital reception technologies involved quality of the Digital TV signals may be relative...

Page 196: ... mute on or off Is the volume set to the minimum Check connections and setting of external equipment Watching External equipment Ensure that Speaker Selection is set to TV Functions VIERA Link HDAVI Control Speaker Selection Ensure that TV Speaker is set to On Watching For best audio Volume settings Sound level is low or sound is distorted Sound signal reception may be poor Set MPX in the Sound Me...

Page 197: ...gnals may not be automatically recognised as 3D images Set 3D Mode Selection Manual to match the picture format Watching 3D Viewing 3D For some people the 3D images may be difficult to see or cannot be seen especially among users who have a different level of eyesight between the left and right eyes Take necessary measures wearing glasses etc to correct your eyesight before use There is something ...

Page 198: ...tching For best audio Advanced settings If digital sound connection has a problem select analogue sound connection Watching External equipment HDMI features Pictures from external equipment are unusual when the equipment is connected via HDMI Check the HDMI cable is connected properly Watching External equipment External connection Turn the TV and equipment off then turn them on again Check an inp...

Page 199: ...o issue IP address automatically If the network administrator prefers to allocate an IP address set an IP address manually Network Network settings The router may be using MAC address filtering security setting Confirm the MAC Address of this TV and set the router to use it Network Network settings Network Status If the problem persists consult your Internet Service Provider or telecommunications ...

Page 200: ...rk and an error message appears Check the connections Functions VIERA Link HDAVI Control Summary of VIERA Link Turn the connected equipment on and then switch the TV on Functions VIERA Link HDAVI Control Parts of the TV become hot Even if the temperature of parts of the front top and rear panels has risen these temperature rises do not cause any problems in terms of performance or quality Overcurr...

Page 201: ...ler Settings Use Touch Pad Controller within approx 3 2 m from the TV The range may be shortened depending on the obstacles between the TV and the controller or the surrounding environment Voice Control function does not work Voice Control function may not work properly depending on the pronunciation noise and network environment For details Functions Voice Control The display panel moves slightly...

Page 202: ...e away all the moisture Caution Do not use a hard cloth or rub the surface too hard otherwise this may cause scratches on the surface Take care not to subject the surfaces to insect repellent solvent thinner or other volatile substances This may degrade surface quality or cause peeling of the paint The surface of the display panel is specially treated and may be easily damaged Take care not to tap...

Page 203: ... Select Help with and press OK to access 3 Select TV Self Test System Information with and press OK to access TV Self Test Makes a diagnosis of picture or sound problems Follow the on screen instructions System Information Displays the system information of this TV ...

Page 204: ...assive 3D For more information http panasonic net viera support English only Communication Camera Communication Camera TY CC20W This camera can be used for video communication and face recognition Network Internet content Selecting internet content my Home Screen my Home Screen Settings Depending on the area this optional accessory may not be available For details consult your local Panasonic deal...

Page 205: ...ure the wall hanging brackets Any damage caused by installing without a qualified installer will void your warranty Carefully read the instructions accompanying optional accessories and be absolutely sure to take steps to prevent the TV from falling off Handle the TV carefully during installation since subjecting it to impact or other forces may cause product damage Take care when fixing wall brac...

Page 206: ...gressive are trademarks of Panasonic Corporation and Sony Corporation DLNA the DLNA Logo and DLNA CERTIFIED are trademarks service marks or certification marks of the Digital Living Network Alliance Windows is a registered trademark of Microsoft Corporation in the United States and other countries Mac is a trademark of Apple Inc HDMI the HDMI Logo and High Definition Multimedia Interface are trade...

Page 207: ...liability for indirect special incidental and consequential damages including but not limited to lost profits or replacement systems Speech Powered by Dragon 2002 2014 Nuance Communications Inc All rights reserved PlayReady is a trademark registered by Microsoft Please be aware of the following a This product contains technology subject to certain intellectual property rights of Microsoft Use or d...

Page 208: ...will be useful but WITHOUT ANY WARRANTY without even the implied warranty of MERCHANTABILITY or FITNESS FOR A PARTICULAR PURPOSE Please refer to the detailed terms and conditions thereof shown in the Software License menu on this product At least three 3 years from delivery of this product Panasonic will give to any third party who contacts us at the contact information provided below for a charge...

Page 209: ...Ver 2 00 ...

Reviews: