background image

8

PULL

AV3

TV

Lift door to open

Increases or decreases the programme position by one. When a function is already displayed, 

press to increase or decrease the selected function. When in Standby mode, switches TV On.

Changes the 

input mode

Function select

 Volume / Contrast / Brightness / Colour / 

Sharpness / Tint (NTSC mode) / Bass / 

Treble / Balance / Auto Setup (p. 34)

Headphones jack 

(p. 48)

AV3 terminals 

(p. 48)

Accessories / Options

Identifying Controls
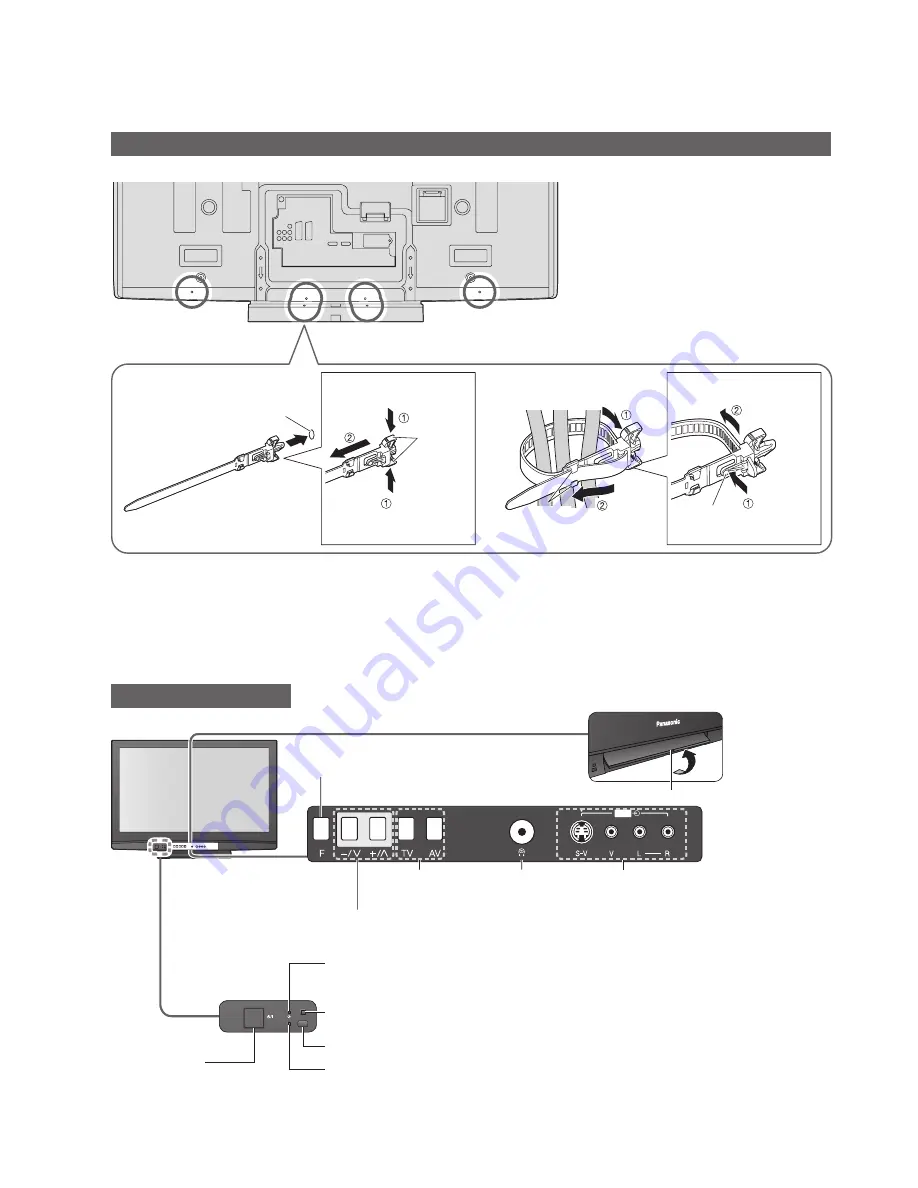
Using the clamper

• 

Do not bundle the RF cable and mains 

lead together (could cause distorted 

image).

• 

Fix cables with clampers as necessary.

• 

When using the optional accessory, 

follow the option’s assembly manual to 

fi

 x cables.

Rear of the TV

snaps

To loosen:

 Keep 

pushing both 

side snaps

 Set the 

tip in the 

hooks

Insert the clamper 

in a hole


Attach the clamper


Bundle the cables

 Keep 

pushing 

the knob

knob

hooks

To remove 

from the TV:

hole

Mains power 

On / Off switch

 Switch On to turn on the TV 

or turn the TV to standby 

mode by the remote control

Timer LED

 Active for Timer Programming or Standby for Direct TV Recording :orange (

fl

 ash)

Timer Programming On :orange

C.A.T.S. (Contrast Automatic Tracking System) sensor

 Senses brightness to adjust picture quality in “Eco” mode in Picture Menu (p. 26)

Remote control signal receiver
Power LED

 Standby: red

On: green

 When using the remote control, indicates the TV has received a command.

Summary of Contents for Viera TH-42PZ8B

Page 1: ...se read these instructions before operating your set and retain them for future reference The images shown in this manual are for illustrative purposes only Operating Instructions Plasma Television Model No TH 42PZ8B TH 46PZ8B ...

Page 2: ...nderstanding and enjoyment particularly for visually impaired viewers Digital Switchover Starting in late 2007 and ending in 2012 TV services in the UK will go completely digital TV region by TV region If you have any questions please call Digital UK on 08456 50 50 50 or visit www digitaluk co uk Digital Switchover will cover a period of several weeks When it starts you will lose all Analogue TV p...

Page 3: ...d in the 2008 VIERA TV range is rated for up to 100 000 hours This measurement is based on the time taken for the brightness of the panel to reduce to half of it s maximum level The time taken to reach this level may vary depending on the image content and the environment where the TV is used Image retention and malfunctions are not taken into account Contents Be Sure to Read Safety Precautions 4 ...

Page 4: ...right position Transporting the TV with its display panel facing upright or downward may cause damage to the internal circuitry AC 220 240 V 50 60 Hz IMPORTANT THE MOULDED MAINS PLUG FOR YOUR SAFETY PLEASE READ THE FOLLOWING TEXT CAREFULLY This TV is supplied with a moulded three pin mains plug for your safety and convenience A 5 amp TH 42PZ8B 10 amp TH 46PZ8B fuse is fitted in this mains plug Sha...

Page 5: ... TV away from these types of equipment Electronic equipment In particular do not place video equipment near the TV electromagnetic interference may distort images sound Equipment with an infrared sensor This TV also emits infrared rays this may affect operation of other equipment Maintenance First remove the mains plug from the socket outlet Display panel Regular care Gently wipe the surface clean...

Page 6: ...items shown Remote Control N2QAYB000222 TV OK 1 3 2 4 6 5 7 9 8 0 Batteries for the Remote Control 2 R6 UM3 Clamper 2 TMME289 p 8 Mains Lead K2CT3DH00018 TH 42PZ8B K2CT3DH00025 TH 46PZ8B p 11 Operating Instructions Pan European Guarantee Card CRM Customer Relationship Management Cleaning cloth TXFPE01RLTB Pedestal TBLX0053 1 TXFBL01RSTD TH 42PZ8B TBLX0051 1 TXFBL01RLTD TH 46PZ8B p 7 Optional acces...

Page 7: ...ot use the pedestal if it becomes warped or physically damaged If you use the pedestal while it is physically damaged personal injury may result Contact your nearest Panasonic dealer immediately During set up make sure that all screws are securely tightened If insufficient care is taken to ensure screws are properly tightened during assembly the pedestal will not be strong enough to support the TV...

Page 8: ...ing the optional accessory follow the option s assembly manual to fix cables Rear of the TV snaps To loosen Keep pushing both side snaps Set the tip in the hooks Insert the clamper in a hole Attach the clamper Bundle the cables Keep pushing the knob knob hooks To remove from the TV hole Mains power On Off switch Switch On to turn on the TV or turn the TV to standby mode by the remote control Timer...

Page 9: ...Up Down Programme Information p 15 Displays programme information Index p 19 Returns to the teletext index page teletext mode Exit Returns to the normal viewing screen VIERA Link Menu p 45 Press to access VIERA Link Menu directly Guide p 20 Displays TV Guide Option Menu p 15 Easy setting for viewing and sound options Main Menu p 24 Press to access VIERA Link Picture Sound and Setup Menus Subtitles...

Page 10: ...e to disconnect the mains plug at the socket outlet first Example 1 Connecting aerial Example 2 Connecting DVD Recorder VCR TV only TV DVD Recorder or VCR Note Connect to AV2 for a DVD Recorder VCR supporting Q Link p 43 Connect to AV1 for a Satellite receiver For HDMI compatible equipment possible to connect to HDMI terminals HDMI1 HDMI2 by using HDMI cable p 48 Q Link connection p 42 VIERA Link ...

Page 11: ...lite receiver TV DVD Recorder VCR and Satellite Aerial Rear of the TV AC 220 240 V 50 60 Hz To remove from the TV Push until both side tabs click Press both tabs and pull on mains connector to release tabs Make sure that the mains lead is securely fixed Mains lead supplied DVD Recorder or VCR Fully wired HDMI compliant cable Satellite receiver RF cable SCART cable fully wired SCART cable fully wir...

Page 12: ...etailed procedures Owner ID p 37 Make a note of the PIN number in case you forget it Search and store TV programmes automatically These steps are not necessary if the setup has been completed by your local dealer When inputting Owner ID Auto Setup is now complete and your TV is ready for viewing When inputting Owner ID later EXIT You can now use the remote control to turn On the TV or turn the TV ...

Page 13: ...ursor select the menu Move the cursor adjust levels select from a range of options Access the menu store settings after adjustments have been made or options have been set RETURN Return to the previous menu EXIT Exit the menu system and return to the normal viewing screen Note If tuning has failed Auto Setup p 35 If downloading has failed Q Link Download p 27 To initialize all settings Shipping Co...

Page 14: ...ff switch should be On p 8 down or 1 Also possible to select the mode using the TV button on the front panel of the TV p 8 To select the two or three digit programme number e g 39 3 9 in a short time Display Information banner if it is not displayed While the banner is displayed select the programme Possible to set display timeout in Banner Display Timeout p 27 Select a programme using TV Guide p ...

Page 15: ...able TXT Teletext service available Multi Audio Multiple audio available Stereo Mono Audio mode 1 90 Off Timer remaining time For settings p 16 To confirm another tuned programme name To watch the programme listed in the banner To change the category blue To hide EXIT Information on the next event DVB mode To set display timeout Banner Display Timeout p 27 Extra information press again to hide the...

Page 16: ...E Plus Settings Power on Preference TV Setup Menu Off MENU Display the menu Select Setup Select Off Timer and set the time set select To cancel Set to Off or turn the TV off To display the remaining time Information banner p 15 When the remaining time is within 3 minutes the remaining time will flash on screen Turn the TV off automatically after a fixed period Change aspect ratio Select Change EXI...

Page 17: ... DVB mode DVB teletext services DVB teletext services differ greatly from analogue teletext When you switch to a DVB teletext service the images you see can contain graphics and text laid out and controlled in a manner decided by the broadcaster Displayed if programme has teletext service 1 If in Analogue mode Select DVB Information banner p 15 2 Viewing Teletext Watching TV You can check if the p...

Page 18: ...STEXT mode default In FASTEXT mode four differently coloured subjects are situated at the bottom of the screen To access more information about one of these subjects press the appropriately coloured button This facility enables fast access to information on the subjects shown What is List mode In List mode four differently coloured page numbers are situated at the bottom of the screen Each of thes...

Page 19: ...pleted You cannot change the programme The news page provides a function that indicates arrival of latest news News Flash Changes to TV screen temporarily View the updated page View the TV picture while searching for a teletext page Teletext automatically updates itself when new information becomes available Store frequently viewed pages in the colour bar List mode only press and hold As page is d...

Page 20: ... The Bill CBBC Cha 10 O clock News BBC Pepsi Char Good bye Cartoon Panorama Sex And The City Terminator BBCi I m A Celebrity Pop Idol News BBC Radi 1 7 14 70 72 105 719 D D D D D D D Rugby 15 To 1 The Bill GUIDE Using TV Guide TV Guide Electronic Programme Guide EPG provides an on screen listing of the programmes currently broadcast and the forthcoming broadcasts over the next seven days depending...

Page 21: ...ete Timer off EXIT 0 9 Page up 1 1 Page down Info 1 D BBC1 TIMER Name 6 8 FR 18 00 20 00 120 Off Pos Date Start End min 1 D BBC1 Holiday News 7 8 SA 21 30 22 30 60 Off Guide 3 D ITV1 Freshly Squeezed Extra 7 8 SA 22 30 23 30 60 Off S P Event recording is a timer programme controlled by information from the TV Guide Programme start and end times may be changed by broadcasters and sent to the TV for...

Page 22: ... Input signals are automatically identified by the SCART pin 8 terminal This function is also available for HDMI connections p 48 If input mode is not switched automatically Perform and Dependant on the setup of the equipment 2 Display the Input select menu 3 Select the input mode connected to the equipment Input Selection AV1 AV2 S COMPONENT AV3 S HDMI1 HDMI2 TV select watch You can also select t...

Page 23: ...e control Setting your remote control to operate Panasonic VCR DVD etc Set the VCR DVD switch to the appropriate position VCR DVD Press and hold during the following operations Enter the appropriate code for the equipment to be controlled see table below Press VCR position Equipment Code VCR 10 default DVD 11 DVD position Equipment Code DVD 70 default Player home theatre 71 Note Confirm if the rem...

Page 24: ...unctions that can be set varies according to the input signal 2 Select the menu Main Menu VIERA Link Picture Sound Setup example Picture Menu access select 3 Select the item Picture Menu 1 2 Viewing Mode Dynamic Contrast Brightness Colour Sharpness Tint Colour Balance Warm Colour Management Off P NR Off select example Picture Menu 4 Adjust or select 1 2 Viewing Mode Dynamic Contrast Brightness Col...

Page 25: ... settings only Reset to Default in Picture Menu p 26 To reset the sound settings only Reset to Default in Sound Menu p 26 To initialize all settings Shipping Condition in Setup Menu p 36 Changed Number and positions of alternatives Moved Displays the next screen up down User input Name A B C D E F G H I J K L M N U V W X Y Z 0 1 2 3 4 5 6 a b c d e f g h i j k l m n u v w x y z _ O P Q R S T 7 8 9...

Page 26: ...sent Picture Mode to the default settings Sound Mode Select two different sound settings Music Speech In each Sound Mode setting Bass and Treble can be adjusted and stored to suit your particular sound requirement Changes to any settings in a mode will affect all signal sources Sound quality can be improved Bass Increases or decreases level to enhance or minimise lower deeper sound output Treble I...

Page 27: ...ays the system information of the GUIDE Plus system Off Timer Sets the time the TV automatically turns Off Off 15 30 45 60 75 90 minutes Power on Preference Set to TV to view picture from TV tuner Set to AV to view input from an external equipment connected to a SCART terminal e g satellite receiver TV AV The external equipment must be switched on and sending a control signal for automatic switchi...

Page 28: ... Volume Speakers Off Headphones Off p 26 p 26 2 2 HDMI1 Input Auto Audio Description Access Reset to Default Set Sound Menu NICAM Off 1 2 Mode Music Bass Treble Balance Headphone Volume Surround Off Volume Correction Speaker Distance to Wall Over 30cm Sound Menu Preferred Multi Audio English 1 3 Timer Programming Access DVB Profile Edit Access DVB Service List Link Settings Access Analogue Service...

Page 29: ... News 7 8 SA 21 30 22 30 60 Off Guide 3 D ITV1 Freshly Squeezed Extra 7 8 SA 22 30 23 30 60 Off S P p 40 System Update Auto Update Search in Standby System Update Search Now On p 31 Owner ID Please enter new PIN PIN p 37 Off 2 of 2 Common Interface Slot 1 Module inserted p 31 All tuning data will be erased Are you sure Are you sure Shipping Condition p 36 Wed 12 05 04 10 46 Profile Editor BBC One ...

Page 30: ...letext FASTEXT Setup Menu GUIDE RETURN ASPECT OPTION DIRECTTV REC VCR 1 3 2 4 6 5 7 9 8 0 TEXT STTL INDEX HOLD PROGRAMME REC VCR DVD TV INPUT EXIT MENU OK MENU DVB Settings DVB mode 4 3 5 Select Setup Select Common Interface or System Update Display the menu Set To return to TV EXIT 1 If in Analogue mode Select DVB DVB Settings provide access to various advanced features 2 access select access sel...

Page 31: ...terface CI Modules This TV receiver works only Pay TV modules complying with CI standard Off 2 of 2 Common Interface Slot 1 Module inserted Access Common Interface Follow the on screen instructions example select go Coloured characters red green yellow blue On screen operation guide may not correspond to the remote control buttons Insert the CI module optional The features that appear on screen ar...

Page 32: ...vourite programme lists skip unwanted programmes and control programme audience etc To return to TV EXIT 1 Select DVB or Analogue 2 DVB Profile Edit and DVB Service List are available in DVB mode only Analogue Service List is available in Analogue mode only green To add all programmes to the list yellow Create your favourite programme list Profile from various broadcasters up to 4 Profile 1 to 4 T...

Page 33: ...e programme name and programme position for Analogue programmes This function is available in Analogue mode If a VCR is connected only with the RF cable edit VCR Select the programme to edit BBC1 Analogue Service List 1 2 3 4 5 6 7 Programme position Name Edit To change the name displayed when selecting programmes Select Rename green Set characters Edit Service Name Name A B C D E F G H I J K L M ...

Page 34: ...DVB Signal Condition Access On MENU Tuning Programmes Select Setup 3 Select Tuning Menu 4 Display the menu Select a function 5 You can retune all the TV programmes when moving house or search for new services which may have recently started broadcasting To return to TV EXIT 2 1 Select DVB or Analogue DVB Manual Tuning Add New DVB Services New Service Message and DVB Signal Condition are available ...

Page 35: ...oon Nwk Free TV 10 Free TV 4 Pay TV 0 Radio 0 Data 0 Searching EXIT RETURN Start Auto Setup All digital tuning data will be erased Auto Setup Start Auto Setup Settings are made automatically All the previous tuning settings are erased The analogue settings are downloaded to a Q Link compatible equipment connected to the TV in Analogue mode When the operation is completed the programme at programme...

Page 36: ...e on screen instructions Auto Setup will automatically start when Mains power On Off switch is next turned On p 12 To retune TV programmes only e g after moving house Auto Setup p 35 3 2 4 Select Setup Select Shipping Condition Display the menu Set To return to TV EXIT Restore Settings Resets the TV to its original condition i e no programmes tuned in All settings other than Owner ID programmes pi...

Page 37: ... Auto Setup p 12 and input it later start from If you input the Owner ID in Auto Setup p 12 perform Select Setup Display the menu 2 1 Owner ID HOUSE NO NAME A POSTCODE EXIT VCR 1 3 2 4 6 5 7 9 8 0 Enter the PIN number twice at first setting Make a note of the PIN number in case you forget it Enter the PIN number 4 digits To change the PIN number To check the personal information stored Hold down f...

Page 38: ...e p 22 To return to TV EXIT 1 Display the menu MENU 2 Select Setup Main Menu VIERA Link Picture Sound Setup access select 3 Select Input Labels 3 3 System Information Software Licence Setup Menu Banner Display Timeout 3 seconds Input Labels Access access select 4 Select a input terminal and set Input Labels AV1 DVD AV2 S AV2 S COMPONENT COMPONENT AV3 S AV3 S HDMI1 HDMI1 HDMI2 HDMI2 set select The ...

Page 39: ...nput terminals freely Select User input access select Set characters User input Name A B C D E F G H I J K L M N U V W X Y Z 0 1 2 3 4 5 6 a b c d e f g h i j k l m n u v w x y z _ O P Q R S T 7 8 9 o p q r s t set select maximum ten characters Store RETURN ...

Page 40: ... If the recorder is compatible with Q Link or similar technologies p 43 and setup connection are done completely p 42 and p 43 you do not need to programme the recorder the TV will control the recording progress If the recorder is not compatible with Q Link or similar technologies set Q Link in Setup Menu p 27 to the connected terminal AV1 or AV2 and make timer programming of the recorder Read the...

Page 41: ...controlled by information from the TV Guide Programme start and end times may be changed by broadcasters and sent to the TV for timer programme to follow the change Split Programme is a programme which is interrupted by one or more events Both of the above are subject to signals being sent by broadcasters Direct TV Recording p 43 and p 45 You can record the current programme to DVD Recorder VCR im...

Page 42: ...the manual of the equipment too Q Link SCART cable DVD Recorder VCR with Q Link function Connect the DVD Recorder VCR supporting Q Link to the TV s AV1 or AV2 terminal via a fully wired SCART cable VIERA Link SCART cable HDMI cable DIGA Recorder HD Video Camera with VIERA Link function Connect the equipment supporting VIERA Link to the TV s AV1 AV2 HDMI1 or HDMI2 terminals via fully wired SCART an...

Page 43: ...ut p 27 Download Analogue programme setting Q Link Download p 27 or Auto Setup in Analogue mode p 35 or Auto Setup when first using the TV p 12 Features available Some recorders are not applicable Read the manual of the recorder Direct TV Recording What you see is What you record INPUT RETURN MENU OK ASPECT OPTION VCR 1 3 2 4 6 5 7 9 8 0 PROGRAMME REC VCR DVD TEXT STTL INDEX HOLD EXIT DIRECTTV REC...

Page 44: ...the connected equipment Read the manual of the equipment For optimal recording the settings of the recorder might be required For details read the manual of the recorder Download Analogue programme setting Q Link Download p 27 or Auto Setup in Analogue mode p 35 or Auto Setup when first using the TV p 12 Set VIERA Link On in Setup Menu VIERA Link p 27 Set up the TV After connection turn the equipm...

Page 45: ...Pause Live TV programme HDAVIControl3 and RecorderwithHDD Pause Live TV You can pause the live TV programme and resume later Live TV programme will be recorded on HDD of the connected DIGA Recorder This function is available with DIGA Recorder which has HDD and HDAVI Control 3 function Connect DIGA Recorder with both HDMI and SCART cables to use this function If you cannot operate check the settin...

Page 46: ...utomatically Control the menu of the connected equipment by VIERA remote control HDAVI Control 2 HDAVI Control 3 VIERA Link Control Link Functions Q Link VIERA Link access select select When the equipment with HDAVI Control function is connected Direct TV Rec Speaker Selection VIERA Link Menu Home Cinema Start VIERA Link Control Speaker Selection Home Cinema Recorder Pause Live TV Recorder Player ...

Page 47: ...t Volume up down Mute The sound of TV speakers is mute When the equipment is turned off TV speakers will be active TV TV speakers are active select set Note This function may not work properly depending on the connected equipment Image or sound may not be available for the first few seconds when the playback starts Image or sound may not be available for the first few seconds when Input mode is sw...

Page 48: ...ions p 59 External Equipment Types of connectable equipment to each terminal Terminal Recording Playback equipment AV1 AV2 AV3 Front of TV To record playback videocassettes DVDs VCR DVD recorder To watch DVDs DVD player To watch camcorder images Video camera To watch satellite broadcasts Set top box To play games Game equipment To use amplifier with speaker system Q Link VIERA Link with HDMI with ...

Page 49: ...e Sound Menu p 26 To listen with speakers HD Satellite receiver SCART cable RF cable SCART cable To watch satellite broadcasts To record playback DVD Recorder VCR Fully wired HDMI compliant cable or Camcorder Game equipment Fully wired HDMI compliant cable RCA cable Amplifier with speaker system DVD Recorder HDMI equipment HDMI connection p 50 ...

Page 50: ...uire at your local digital equipment retailer shop Auto Aspect The optimum size and aspect can be chosen and you can enjoy finer images p 16 Auto Auto aspect determines the best aspect ratio to use to fill your screen It does this using a four step process to determine if the picture being viewed is a widescreen picture If Auto aspect detects a widescreen signal it switches into the appropriate 16...

Page 51: ... new version Press EXIT to lgnore SCART S VIDEO and HDMI terminal information AV1 SCART terminal RGB VIDEO Q Link Suitable inputs for AV1 include RGB Red Green Blue AV2 SCART terminal RGB VIDEO S VIDEO Q Link AV2 Pins 15 and 20 are dependent on AV2 S VHS VIDEO switching 20 CVBS in video 18 RGB status earth 16 Status RGB 14 Earth 12 10 Q Link data 8 Status CVBS 6 Audio in L 4 Audio earth 2 Audio in...

Page 52: ...al Signal name COMPONENT HDMI 525 480 60i 525 480 60p 625 576 50i 625 576 50p 750 720 60p 750 720 50p 1 125 1 080 60i 1 125 1 080 50i 1 125 1 080 60p 1 125 1 080 50p 1 125 1 080 24p Note Signals other than above may not be displayed properly The above signals are reformatted for optimal viewing on your display ...

Page 53: ...e Portrait All Types All Services Wed 24th Check the DVB transmitter Adjust the direction of the aerial to another transmitter installed nearby Check the analogue broadcast If the image quality is poor check the aerial and consult your nearest dealer On Screen messages I e EC AV1 You can simply clear these Press again to redisplay Q Link function does not work Please confirm SCART cable and connec...

Page 54: ...image in DVB Check DVB Signal Condition p 35 If Signal Quality or Signal Strength are displayed in red check aerial If problem persists consult your local Panasonic dealer Turn the TV off with the Mains power On Off switch then turn it On again Sound is unusual Set the sound setting of the connected equipment to 2ch L PCM Check the HDMI1 Input setting in the Sound Menu p 26 If digital sound connec...

Page 55: ...inserted Check the CI module inserted completely p 31 No Recording Check media The tape or disc may be write protected missing or damaged Bad Signal The signal is weak Check the aerial Are you sure you want to delete this timer Press OK to delete timer Press RETURN to return Confirm correct operation Are you sure Confirm correct operation All tuning data will be erased Shipping Condition will eras...

Page 56: ... there may not be any new software available Shipping condition completed TV can now be switched off Auto Setup will automatically start when Mains power On Off switch is next turned On p 12 Please check settings and connections on HDMI devices Communication error in VIERA Link function p 44 Timer already expired Starting time in Timer Programming is already past Set correctly p 41 Recording this ...

Page 57: ... OF PROFITS LOSS OF BUSINESS OR INDIRECT SPECIAL OR CONSEQUENTIAL DAMAGES IN CONNECTION WITH THE PROVISION OR USE OF ANY INFORMATION EQUIPMENT OR SERVICES RELATING TO THE GUIDE PLUS SYSTEM Glossary DVB Digital Video Broadcasting DVD Digital Versatile Disc DVI Digital Visual Interface EPG Electronic Programme Guide HDMI High Definition Multimedia Interface NTSC National Television System Committee ...

Page 58: ... signal 52 L Licence 57 M Mains Lead 10 Mains power On Off switch 8 12 Maintenance 5 Menu Functions 24 29 Mode 26 Multi Audio 15 N New Service Message 35 NICAM 26 NTSC 28 59 O Off Timer 16 27 Optional accessories 6 Owner ID 12 37 P PAL 59 Pedestal 7 Picture Overscan 27 PIN number 12 33 37 P NR 26 Power LED 8 12 Q Q Link 27 42 43 Quick Start Guide 6 13 R Remote control 6 9 Reset to Default 26 RGB 5...

Page 59: ... 20 80 RH non condensing Connection Terminals AV1 Scart terminal 21 Pin terminal Audio Video in Audio Video out RGB in Q Link AV2 Scart terminal 21 Pin terminal Audio Video in Audio Video out RGB in S Video in Q Link AV3 VIDEO RCA PIN Type 1 1 0 V p p 75 Ω S VIDEO Mini DIN 4 pin Y 1 0 V p p 75 Ω C 0 286 V p p 75 Ω AUDIO L R RCA PIN Type 2 0 5 V rms COMPONENT VIDEO Y 1 0 V p p including synchroniza...

Page 60: ... visit www panasonic co uk guarantee Information for Users on Collection and Disposal of Old Equipment and used Batteries These symbols on the products packaging and or accompanying documents mean that used electrical and electronic products and batteries should not be mixed with general household waste For proper treatment recovery and recycling of old products and used batteries please take them...

Reviews: