8
9
Quick Start Guide
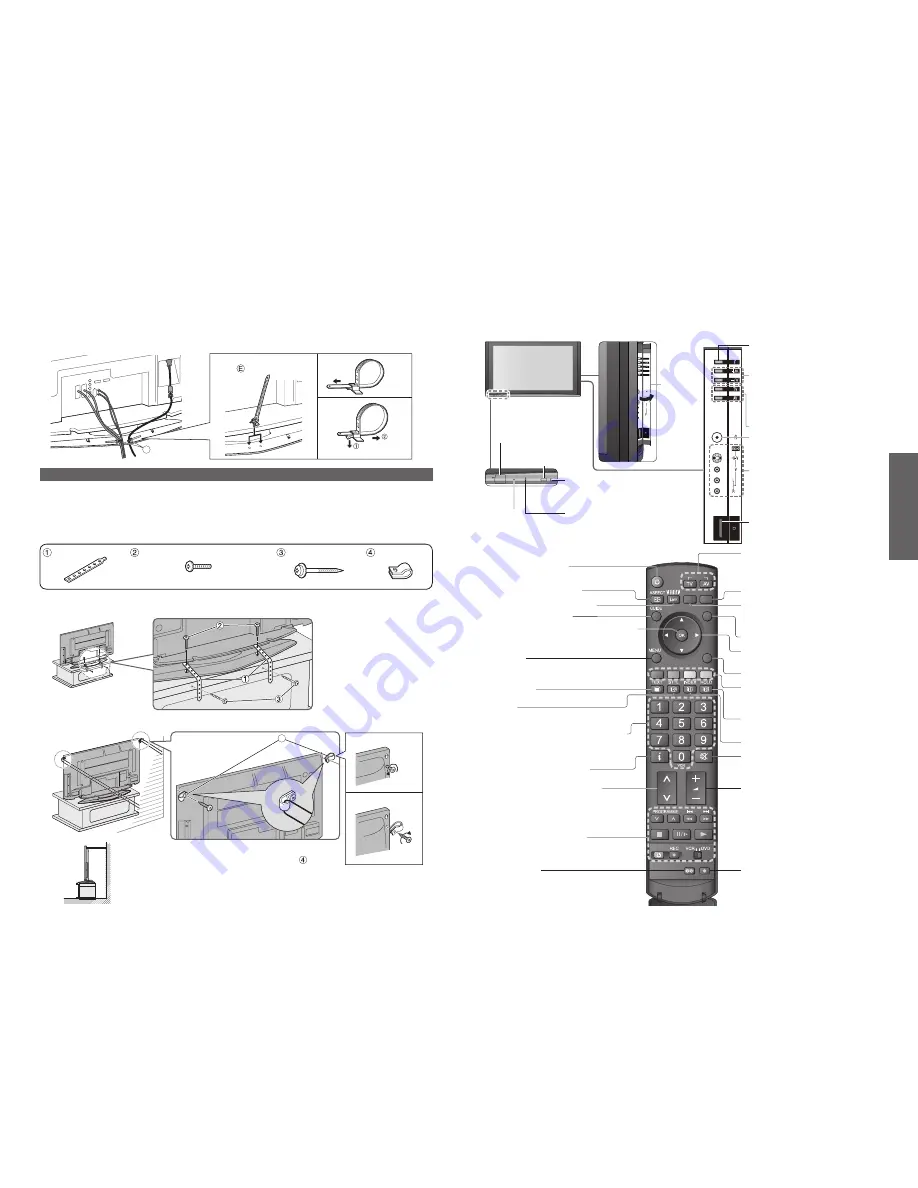
MULTI WINDOW
OPTION SD CARD
EXIT
RETURN
INPUT
DIRECT TV REC
4
S-V
V
L
R
AV3
F
TV
AV
E
Insert the spigot on the two
bands
into the pedestal.
Keep the knob
pressed
•
Identifying Controls
•
Installation of the pedestal
Cursor buttons to make selections and
adjustments
Standby On / Off switch
(Switches TV On or Off standby)
Sound mute On / Off
Changes aspect ratio
(p. 15)
Selects programmes in sequence
Teletext
(p. 18)
OK button to con
fi
rm selections and choices
Press after selecting programme positions to
quickly change programme.
VCR / DVD operations
(p. 17)
Volume
Programme Information
(p. 15)
Teletext Index
(p. 19)
Coloured buttons used for the
selection, navigation and operation of
various functions
EXIT
(Returns to TV screen)
DIRECT TV Recording
To immediately record programme in VCR /
DVD recorder with Q-Link connection
(p. 36)
Programme / channel change buttons (0-9)
and Teletext page buttons.
(p. 14 and p. 18)
When in Standby mode, switches TV On.
Access VIERA Link Menu
(p. 39)
Programme Guide
(p. 14)
Option menu
Sets the preferred settings of viewing
and sound options easily
(p. 15)
Main Menu
Press to access VIERA Link, Picture,
Sound and Setup menus
(p. 20)
Subtitles
Showing subtitles
(p. 15)
Surround
(p. 22)
Changes the input mode
TV - switches DVB (digital broadcasting)
/ Analogue mode
(p. 14)
AV - changes AV input mode
(p. 16)
Viewing SD Card
(p. 34)
Returns to the previous menu
Still picture
(p. 15)
Teletext Hold
(p. 19)
Remove the screws at both top corners on the
rear of the TV, and attach the clamps to the
TV using the removed screws.
Band (2)
Screw (2)
Nominal diameter 4 mm × 12
Wood screw (2)
Clamp (2)
Installation of the pedestal
■
Securing to a base
Fix pedestal and base together with band.
■
Securing to a wall
Fix to wall or post with strong commercial wire or chain.
Remove
Attach
■
Attaching the bands for fixing cables
To tighten:
To loosen:
Preventing the TV from falling over
The TV could fall over during an earthquake, etc.
We recommend that measures are taken to prevent the TV from falling over in such an event.
•
The information in this section is designed to reduce the risk of injuries caused by the TV falling over during an
earthquake, etc.
However, no measure can guarantee protection against all earthquakes.
•
The precautions in this section are recommendations for providing more secure installation of your TV if you live
in an earthquake prone area.
Identifying Controls
DVB LED
•
DVB system active during
Direct TV Recording (Standby) :orange
Power LED
•
Standby: red
On: green
Swing door
to open
Mains power
On / Off switch
Increases or decreases the
programme position by one. When a
function is already displayed, press
to increase or decrease the selected
function. When in Standby mode,
switches TV On.
Changes the input mode
Function select
•
Volume / Contrast / Brightness / Colour /
Sharpness / Tint (NTSC mode) / Bass /
Treble / Balance / Auto Setup (p. 29)
Headphones jack
(p. 40)
AV3 terminals
(p. 40)
SD CARD slot (p. 35)
C.A.T.S.
(Contrast Automatic Tracking System) sensor
( senses brightness to adjust picture quality
in “Auto” Mode in Picture Menu) (p. 22)
Remote control
signal receiver