background image

Advanced

HDMI1/2

20

21

How to Use Menu Functions


Menu list

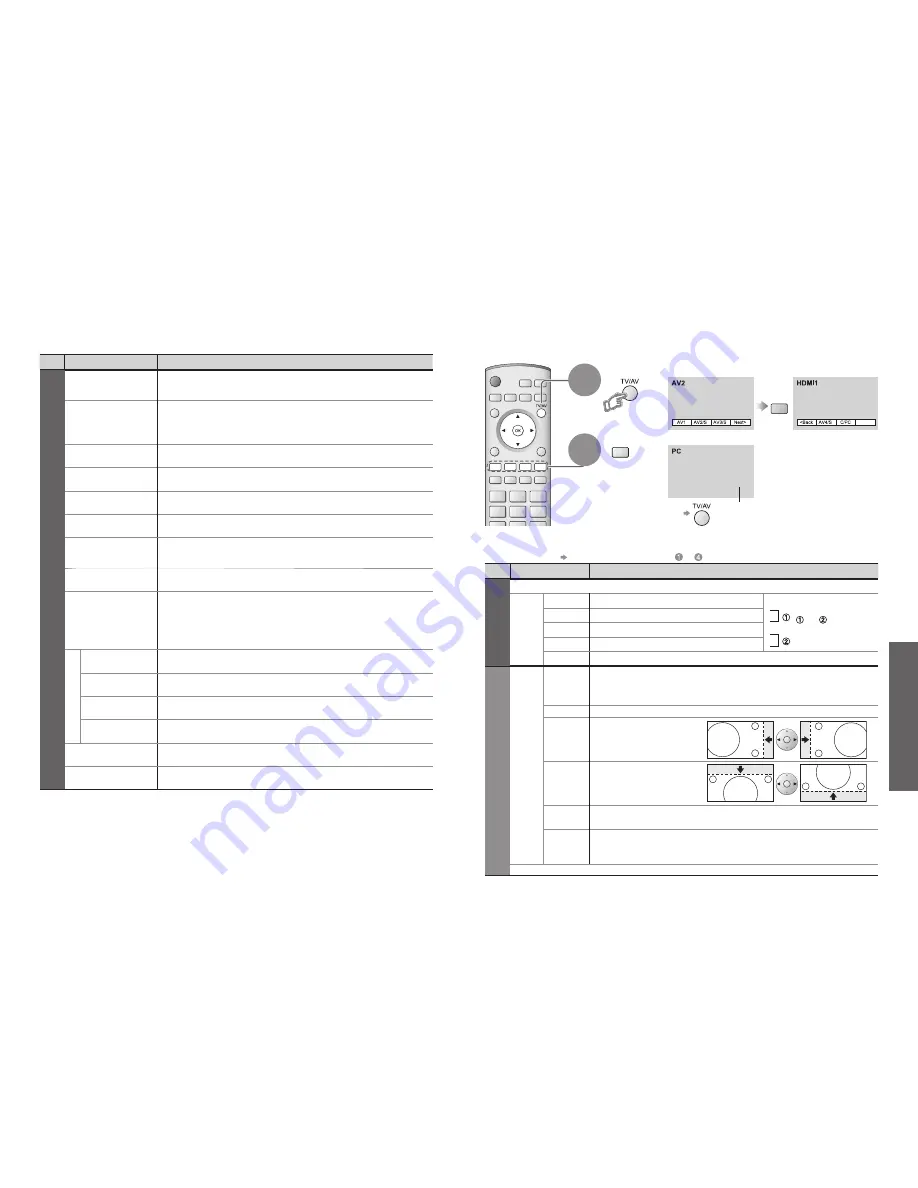
Displaying PC Screen on 

TV

How to Use Menu Functions (picture, sound quality

, etc.)

Menu

Item

Adjustments / Con

fi

 gurations (alternatives)

Setup menu

Q-Link

Selects which AV terminal is to be used for data communication between this TV and a 

compatible recording equipment 

(AV2 / AV3)

 (p. 30)

AV2/AV3 out

Chooses the signal to be transmitted from the TV to Q-Link 

(TV / AV1 / AV2 / AV3 / 

AV4 / Monitor)

• 

Monitor: Image displayed on screen 

• 

Component, PC and HDMI signals cannot be outputted

Control with HDMI

Control with HDMI function 

(Off / On)

 (p. 32)

Teletext

Teletext display mode 

(FASTEXT / List)

 (p. 14)

Off timer

Sets the time the unit automatically turns Off. 

(Off / 15 / 30 / 45 / 60 / 75 / 90)

 (minutes)

Volume correction

Adjusts volume for AV, PC, HDMI and component mode

Side panel

Increases the brightness of the side panel 

(Off / Low / Mid / High)

• 

The recommended setting is "High" to prevent panel "after-image"

Power save

Reduces brightness of picture to economise on power consumption 

(Off / On)

Power on preference

Set to "TV" to view picture from TV tuner.

Set to "AV" to view input from an external equipment connected to a SCART terminal, 

e.g. satellite receiver 

(TV / AV)

• 

The external equipment must be switched on and sending a control signal for 

automatic switching at power on to occur

Tuning menu

Programme edit

Edits channels (p. 23)

Auto setup

Sets channels automatically (p. 23)

Manual tuning

Sets channels manually (p. 23)

Fine tuning

Fine tuning of channels (during rain, etc.)

Owner ID

Inputs the owner ID (p. 25)

Shipping condition

Resets all settings, for example, when moving house (p. 24)

• 

A different menu will be displayed while PC or SD Card is used.

 (p. 21 and p. 27)

• 

In AV mode, the Setup menu gives a reduced number of options.


To return to TV   

yellow


(Press twice)

Displaying PC Screen on TV

Select the external input

Select "PC"

The screen of the PC connected to the unit can be displayed on the TV.

You can also listen to PC sound with the audio cable connected. To connect PC


(p. 34)

Displays PC screen

• 

Corresponding signals 

(p. 37)

• 

If "H-freq." or "V-freq." 

is shown in red, the 

signals may not be 

supported.


PC menu setting 

(changed as desired)

 • 

To make settings   "How to Use Menu Functions" 

 to 

 (p. 18)

Menu

Item

Adjustments / Con

fi

 gurations (options)

Picture menu

Viewing mode, Contrast, Brightness, Sharpness, Colour balance (p. 19)

Advanced

setting

W/B High R

White balance of bright red area

 and 

repeatedly adjusted

W/B High B

White balance of bright blue area

W/B Low R

White balance of dark red area

W/B Low B

White balance of dark blue area

Gamma

(2.0 / 2.2 / 2.5 / S Curve)

Setup menu

PC

setup

Input

resolution

Switches to a wide view


VGA (640 x 480 dots), WVGA (852 x 480 dots),

XGA (1,024 x 768 dots), WXGA (1,366 x 768 dots)


Options change depending on signals

Clock 

Set to the minimum level if noise occurs

H-pos

Adjusts horizontal position


V-pos

Adjusts vertical position


Clock phase

Eliminates 

fl

 icker and distortion


Adjust after Clock adjustment


Set to the minimum level if noise occurs

Sync

Chooses another synchronous signal if the image is distorted 

(H&V / On G)


H&V  : by the horizontal and vertical signals from your PC

On G  : by the green signal from your PC (if available)

Volume correction, Side panel, Power save (p. 20)

• 

Sound menu


(p. 19)

blue

To 

next 

page

1

2

Summary of Contents for Viera TH-42PV600EY

Page 1: ...nd the environment which could otherwise arise from inappropriate waste handling Please contact your local authority for further details of your nearest designated collection point Penalties may be applicable for incorrect disposal of this waste in accordance with national legislation For business users in the European Union If you wish to discard electrical and electronic equipment please contact...

Page 2: ...om card MPEG4 Videos and photos 26 Recording to card 28 Q Link Functions 30 HDMI Functions 31 External Equipment 34 Enjoy your TV Technical Information 36 FAQs 39 On screen messages 40 On screen messages SD Card 41 Index 42 Licence 42 Specifications 43 FAQs etc Accessories Options 6 Identifying Controls 7 Basic Connection 8 Auto Setup 10 Enjoy rich multi media Camcorder Amplifier with Speaker syst...

Page 3: ...ent electrical shock An apparatus with CLASS I construction shall be connected to a mains socket outlet with a protective earthing connection Note If the set is not switched off when the TV station stops transmitting it will automatically go to standby mode after 30 minutes This function will operate only in TV mode Do not expose to direct sunlight and other sources of heat Avoid exposing the TV s...

Page 4: ...g mode p 19 Power LED Remote control signal receiver STR Normalisation store Stores tuning and other function settings TV AV switch Volume Contrast Brightness Colour Sharpness Tint NTSC mode Bass Treble Balance Manual tuning p 22 Cursor buttons to make selections and adjustments Headphones jack p 34 AV4 terminals p 34 Red light indicates Standby mode When using the remote control indicates the TV ...

Page 5: ...erial RGB S Video Video Choose between these three video formats depending on personal preference and equipment requirement RGB Red Green and Blue VCR Video Cassette Recorder Rear of the TV Satellite receiver External equipment and cables shown are not supplied with this TV Please ensure that the TV is disconnected from the mains socket before attaching or disconnecting any leads Basic Connection ...

Page 6: ... can now use the remote control to turn On the unit or turn the unit to standby mode Power LED On 2 If you input the ID later Owner ID p 25 If a compatible recording equipment with Q Link or similar technologies p 30 is connected channel information is automatically downloaded to the equipment Auto Setup will start to search for TV channels and store them To check programme list at a glance Progra...

Page 7: ...t red green To swap blue To change the source of sub screen yellow To return to the normal single screen view MULTI WINDOW Prog Name Chan VCR 1 2 3 4 5 6 7 8 9 10 11 12 CH21 CH44 CH51 CH41 CH47 CH23 CH26 CH58 Das Erste ZDF RTL Prog Name Chan 13 14 15 16 17 18 19 20 21 22 23 24 select page Corresponds to the colour bar select programme watch 1 BBC 1 MAINS power On Off switch should be On Picture wi...

Page 8: ...urite pages Watch TV while waiting for update If you wish to hold the current page without updating Stop automatic updating P108 yellow yellow Appears when updating is completed You cannot change the channel Teletext automatically updates itself when new information becomes available The news page provides a function that indicates arrival of latest news News Flash Changes to TV screen temporarily...

Page 9: ...video input AV3 AV3S S video input AV4 AV4S S video input Compo nent PC HDMI1 HDMI2 Auto input selection EC1 RGB AV1 RGB RGB input EC2 EC3 RGB AV3 RGB RGB input EC HDMI1 HDMI2 Screen display Main menu Picture menu Sound menu Setup menu Viewing mode Contrast Brightness Colour Sharpness Tint Colour balance Colour management 3D COMB Normal On On P NR Off Picture menu Dynamic Advanced setting Access O...

Page 10: ...ontrast Brightness Colour Sharpness Increases or decreases the levels of these options according to your personal preference Tint With an NTSC signal source connected to the TV the picture hue can be adjusted to suit your taste Colour balance Allows you to set the overall colour tone of the picture Cool Normal Warm Colour management Automatically adjusts colours to vivid ones Off On P NR Picture N...

Page 11: ...5 Shipping condition Resets all settings for example when moving house p 24 A different menu will be displayed while PC or SD Card is used p 21 and p 27 In AV mode the Setup menu gives a reduced number of options To return to TV yellow Press twice Displaying PC Screen on TV Select the external input Select PC The screen of the PC connected to the unit can be displayed on the TV You can also listen...

Page 12: ...tion flash Channel number flash Channel The channel settings can be changed according to your needs and reception conditions To return to TV To return to TV Manual tuning screen Edit channels Delete Add Move Change name Lock Download to equipment Programme edit Set automatically Auto setup Set manually Manual tuning To download channel information to a Q Link compatible equipment connected to the ...

Page 13: ...ty to enter your details and help the police crack crime see instruction book PIN NUMBER NAME POSTCODE Owner ID HOUSE NO NAME A POSTCODE Owner ID HOUSE NO Owner ID Input owner ID Owner ID To change the stored information Characters Entry field Select the entry field To check the personal information stored Hold down for about 6 sec Displays the information on the screen for several sec The PIN num...

Page 14: ...lect MPEG4 view or Photo view Video Photo Select the file to be viewed 4 Date Movie without sound Movie for which lock has been set Displayed one at a time Rewind press and hold To previous video Pause Playback Fast forward press and hold To next video Stop To previous photo To thumbnail Rotate 90 clockwise To next photo ZOOM Select the SD mode select watch SD menu screen Rotate 90 anti clockwise ...

Page 15: ...ile will be unreadable Do not remove the SD card while recording The data being recorded and other data stored on the SD card may become unreadable SD recording may not be fully compatible or playable in some PC software or PDA devices When two pictures are shown on the same screen as Multi window functions the main window is the one that is recorded The picture can be switched for the sub window ...

Page 16: ...t and the equipment HDMI compatible equipment 1 with an HDMI or DVI output terminal such as a set top box or a DVD player can be connected to the HDMI terminal using an HDMI compliant fully wired cable About connections see External Equipment p 34 Note HDMI is the world s first complete digital consumer AV interface complying with a non compression standard If the external equipment has only a DVI...

Page 17: ...Only when TV is in Standby mode Power off link When TV is set to Standby mode the connected Panasonic equipment is also automatically set to Standby Theatre speaker You can control the theatre speaker with TV s remote control This function is available when Panasonic Amplifier or Player theatre is connected Display the menu Select Home theatre or TV speaker Home theatre Adjustment for equipment au...

Page 18: ... volume in the Sound menu p 19 Satellite receiver DVD Recorder VCR SCART cable RF cable or Q Link SCART cable Q Link To watch satellite broadcasts To record playback To watch DVDs DVD player External Equipment SCART cable Y PB PR Pin No Signal Name Pin No Signal Name Pin No Signal Name R GND Ground NC not connected G GND Ground NC not connected B GND Ground HD SYNC NC not connected NC not connecte...

Page 19: ...s the image at the standard 4 3 without distortion Displays a 2 35 1 letterbox anamorphic image full screen without distortion At 16 9 displays the image at its maximum with slight enlargement 4 3 14 9 16 9 Zoom3 Zoom2 Zoom1 Auto aspect The best ratio is chosen and the picture expanded to fill the screen Auto aspect Technical Information SCART S VIDEO and HDMI terminal information Input signal tha...

Page 20: ...IF Max number of files 65 535 Image resolution 8 x 8 to 5 120 x 3 840 Sound format G 726 32 Kbps 8 kHz sampling frequency monaural Compliant card type maximum capacity SD Card 1 GB Multi Media Card 128 MB miniSD Card 512 MB requiring miniSD adapter Check the latest information on the card type at the following website English only http panasonic co jp pavc global cs DCF Design rule for camera file...

Page 21: ...Check Equipment The tape or disc is active Stop the equipment and try again WARNING All current tuning data will be erased Auto setup will be erased all present tuning data p 23 FAQs TV unit goes into Standby mode The sleep function is activated The TV unit enters Standby mode about 30 min after broadcasting ends The remote control does not work Are the batteries installed correctly p 6 Has the TV...

Page 22: ...C signals VGA SVGA XGA SXGA compressed Horizontal scanning frequency 31 69 kHz Vertical scanning frequency 59 86 Hz Receiving Systems Band name PAL I UHF E21 68 VHF Ireland channel PAL 525 60 Playback of NTSC tape from some PAL Video recorders VCR or NTSC disc playback from DVD player and recorder M NTSC Playback from M NTSC Video recorders VCR NTSC AV input only Playback from NTSC Video recorders...

Reviews: