


FAQs, etc.
26
27
Technical Information
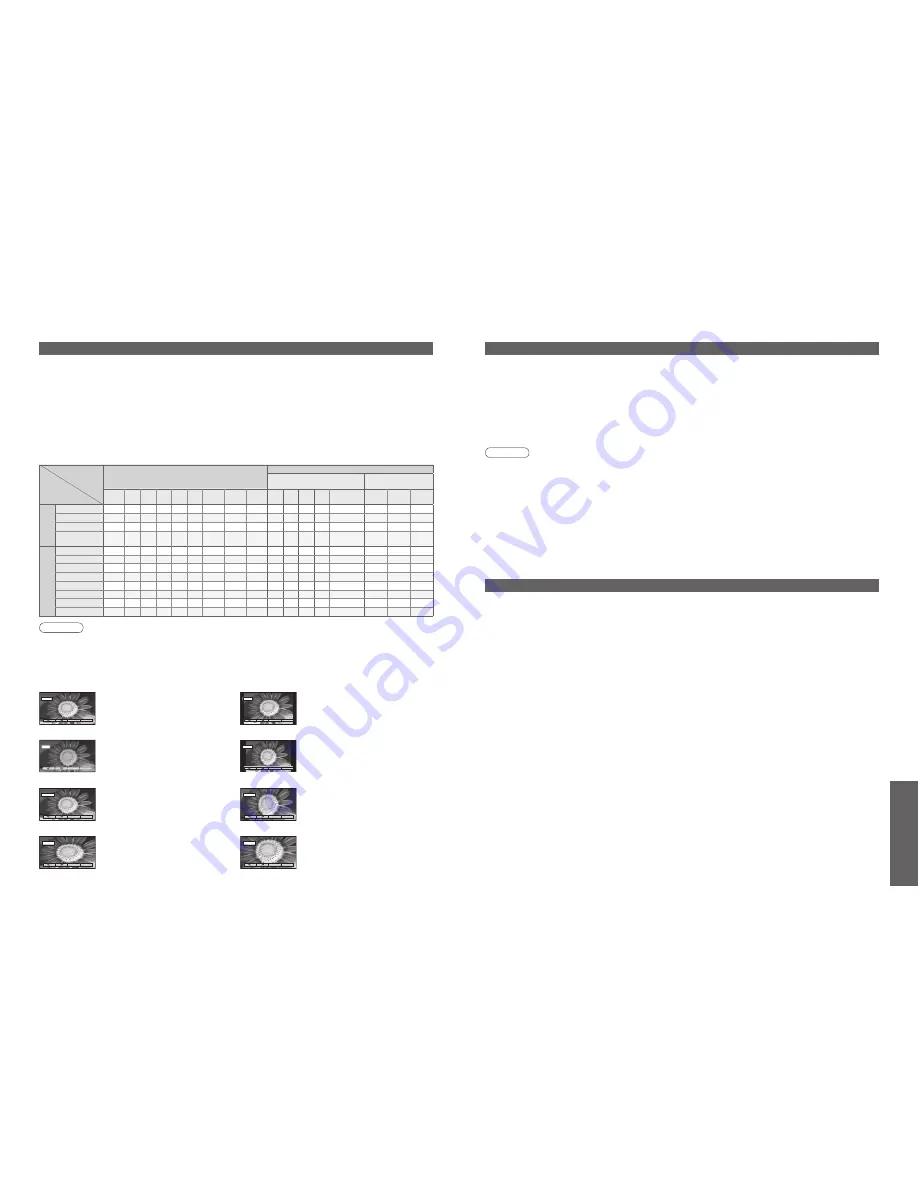
Aspect Ratio
Signal name
Aspect modes
Aspect Control Signal
Widescreen signal (WSS) Control signal through
SCART terminal (pin 8)
Auto
aspect 16:9 14:9 Just 4:3
4:3
Full Zoom1 Zoom2 Zoom3 TV AV1 AV2 AV3 Component AV1
AV2
AV3
TV/A
V1/
AV2/A
V3
PAL I
O
O O O O
-
O
O
O
O O O O
-
O
O
O
PAL 525/60
O
O O O O
-
O
O
O
- - - -
-
O
O
O
M.NTSC
O
O O O O
-
O
O
O
- - - -
-
O
O
O
NTSC
(AV input only)
O
O O O O
-
O
O
O
- - - -
-
O
O
O
Component/HDMI
525(480)/60i
O
O O O O
-
O
O
O
- - - -
-
-
-
-
525(480)/60p
O
O O O O
-
O
O
O
- - - -
-
-
-
-
625(576)/50i
O
O O O O
-
O
O
O
- - - -
O
-
-
-
625(576)/50p
O
O O O O
-
O
O
O
- - - -
O
-
-
-
750(720)/50p
O
O O O O O
O
O
O
- - - -
-
-
-
-
750(720)/60p
O
O O O O O
O
O
O
- - - -
-
-
-
-
1125(1080)/50i O
O O O O O
O
O
O
- - - -
-
-
-
-
1125(1080)/60i O
O O O O O
O
O
O
- - - -
-
-
-
-
Note
•
The ratio varies depending on the programme, etc. If the ratio is greater than the standard "16:9", black bands
may appear at the top and bottom of the screen.
•
If the screen size looks unusual when a widescreen-recorded programme is played back on a VCR, adjust the
tracking of the VCR. (See the VCR manual.)
•
To select the ratio manually:
The optimum size and aspect can be chosen, and you can enjoy finer images. (p. 10)
■
Auto aspect: Auto aspect determines the best aspect ratio to use to fill your screen. It does this using a four step
process to determine if the picture being viewed is a widescreen picture.
If Auto aspect detects a widescreen signal it switches into the appropriate 16:9 or 14:9 widescreen mode. If Auto
aspect does not detect a widescreen signal then this advanced TV set enhances the picture for optimum viewing
pleasure.
The text shown on the screen indicates how Auto aspect determined which ratio to use:
"WIDE" appears in the top left of the screen if a widescreen identification signal (WSS) is found or a signal found
through a SCART terminal. Auto aspect switches to the appropriate 16:9 or 14:9 widescreen ratio. This function
will also work in any aspect mode. "Auto aspect" appears in the top left of the screen if black stripes above and
below the picture are detected. Auto aspect chooses the best ratio and expands the picture to fill the screen. This
process can take several minutes, depending on the darkness of the picture.
14:9
16:9
Directly displays the image at "16:9"
without distortion (anamorphic).
Displays the image at the standard "14:9"
without enlargement.
14 : 9
16 : 9
Zoom3
Zoom2
Displays a "16:9" letterbox (anamorphic)
image full-screen without distortion.
Displays a "2.35:1" letterbox (anamorphic)
image full-screen without distortion. At
"16:9", displays the image at its maximum
(with slight enlargement).
Zoom3
Zoom2
HDMI connection
•
HDMI is the world's first complete digital consumer AV interface complying with a non-compression standard.
•
If the external equipment has only a DVI output, connect to the HDMI terminal via a DVI to HDMI adapter cable (
∗
2).
•
When the DVI to HDMI adapter cable is used, connect the audio cable to the audio input terminal.
•
Audio settings can be made on the "HDMI input" menu screen. (p. 14)
•
Applicable audio signal sampling frequencies (2ch L.PCM): 48 kHz, 44.1 kHz, 32 kHz
(
∗
1): The HDMI logo is displayed on an HDMI-compliant equipment. (
∗
2): Enquire at your local digital equipment retailer shop.
HDMI (high-definition multimedia interface) allows you to enjoy high-definition digital images and high-quality sound
by connecting the TV unit and the equipment.
HDMI-compatible equipment (
∗
1) with an HDMI or DVI output terminal, such as a set top box or a DVD player, can
be connected to the HDMI terminal using an HDMI compliant (fully wired) cable.
Note
•
Use with a PC is not assumed.
•
The 720p/1080i signals will be reformatted before being displayed on the screen.
•
If the connected equipment has an aspect adjustment function, set the aspect ratio to "16:9".
•
This HDMI connector is "type A".
•
An equipment having no digital output terminal may be connected to the input terminal of either "Component", "S-
VIDEO", or "Video" to receive analogue signals.
•
The HDMI input terminal can be used with only the following image signals:
480i, 480p, 576i, 576p, 720p and 1080i. Match the output setting of the digital equipment.
•
For details of the applicable HDMI signals, see p. 28.
•
Technical Information
Just
Displays a 4:3 image full-screen.
Stretching is only noticeable at the left
and right edges.
Just
4:3
Displays the image at the standard "4:3"
without distortion.
4 : 3
Control with HDMI
•
Setup the equipment to enable this function. Read the manual of the equipment.
•
Switch the TV unit on again with the equipment on when connection or setup is changed.
•
This function may not work normally depending on the equipment condition.
•
The equipment can be operated by TV’s remote control with this function on even if TV is in Standby mode.
•
Image or sound may not be available for the first few seconds when the playback starts.
•
Image or sound may not be available for the first few seconds when Input mode is switched.
•
Volume function will be displayed when adjusting the volume of the equipment.
•
Easy playback is also available by using the remote control for Amplifier. Read the manuals of Amplifier.
HDMI connections to some Panasonic equipments allow you to enjoy the easy playback or home theatre.
Zoom1
Displays a "16:9" letterbox or "4:3" image
without distortion.
Zoom1
4 : 3 Full
4:3 Full
Displays a "4:3" image enlarged
horizontally to fit the screen.


