Panasonic Viera TC-L32C22 Quick Start Manual Download Page 19

36

37

Advanced

 Input Labels

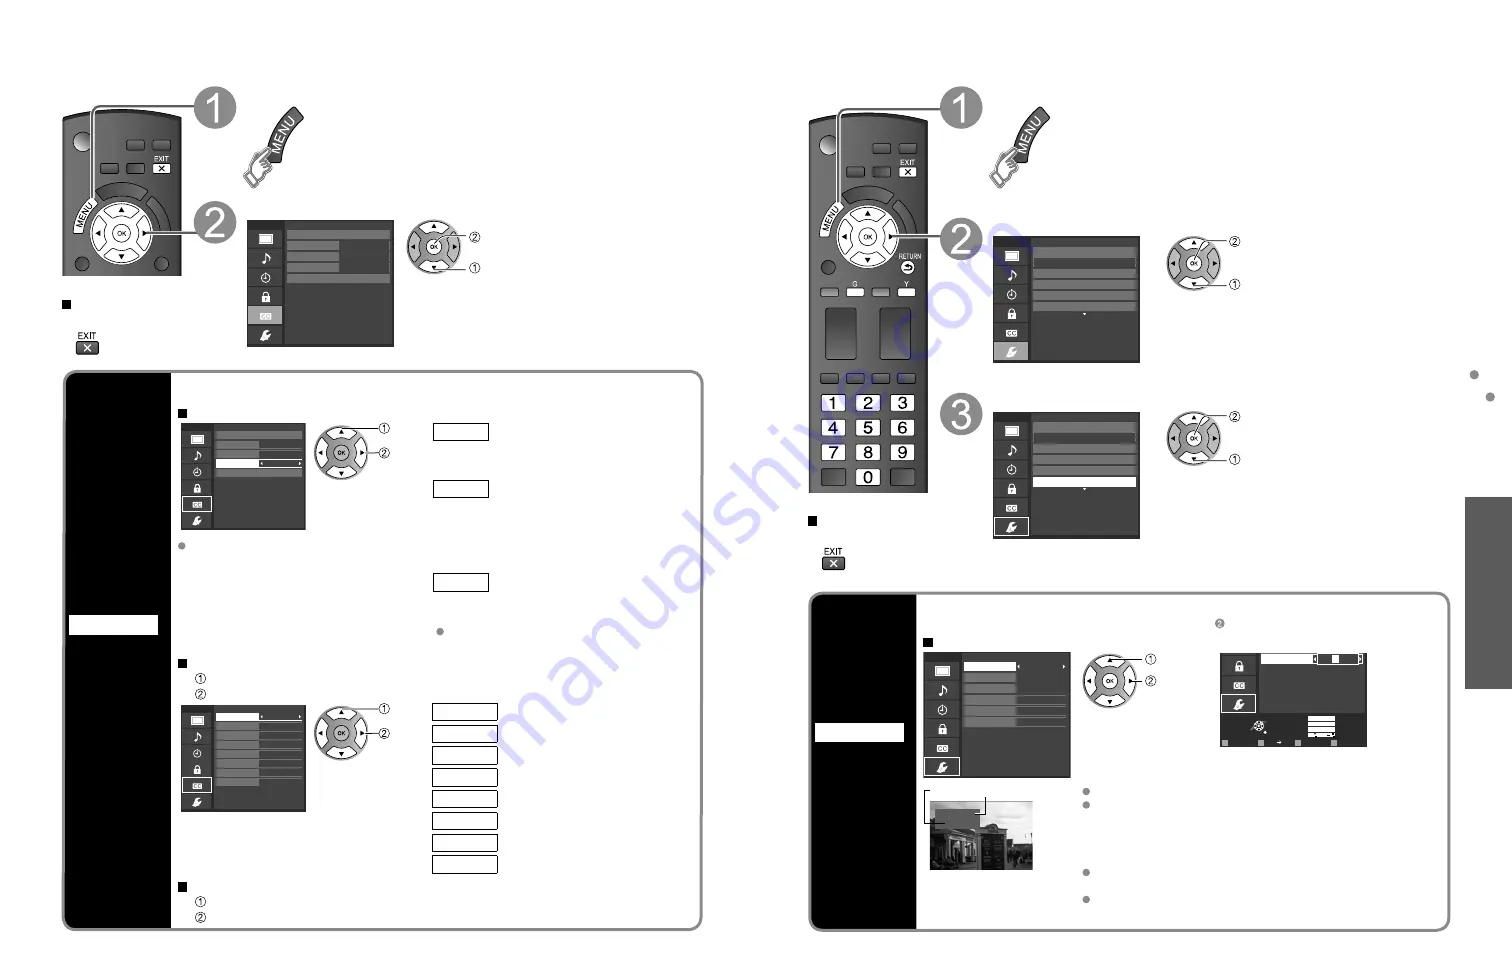
 Closed Caption

Input Labels

Input labels

Display

labels of

Connected 

devices

Devices connected to external input terminals can be labeled for easier identification during the 
input selection. (In selecting the input mode from p. 20  )

 Select the terminal and label of the external equipment

Menu

Input labels

Video 1
Video 2
PC

HDMI 2
Component

HDMI 1

Select or enter the name of the device
connected to the HDMI 1 terminal.

 select

 set

or

Select

OK

RETURN

ABC

Delete

abc

R

G

B

Y

1

@.

4

GHI

7

PQRS

2

ABC

5

JKL

8

TUV

3

DEF

6

MNO

9

WXYZ

0 - ,

LAST

PC

Select if a computer is connected to the
TV’s PC input.

@

 A 

D

PC

Follow the instructions on screen to 

complete the following operations.

Video 1

VCR

Label

Terminal

[example]


Terminals:   HDMI 1-2/Component/Video 1-2/PC


Label:   [BLANK] Not used/Blu-ray/DVD/DVD REC/HOME 

THTR/GAME/COMPUTER/VCR/CABLE/SATELLITE/
DVR/CAMERA/MONITOR/AUX/RECEIVER/MEDIA 
CTR/MEDIA EXT/OTHER


For the PC terminal, only “Not used” is available.


If “Not used” is selected, the INPUT button press will skip its 
input.


Each selected label will be displayed on the “Input select” 
screen. (p. 20)

 Press to exit from 

a menu screen

Display the menu

Select “Setup”

Menu

Adjusts Surf mode, Language, Clock,
Channels, Inputs, and other settings.

Setup

1/2

Clock
ANT/Cable setup
Input labels

Language

All

Channel surf mode

 next

 select

Select “Input labels”

Menu

Customize TV inputs with the names of your

connected devices. For easier input

selections.

Setup

1/2

Clock
ANT/Cable setup

Input labels

Language

All

Channel surf mode

 next

 select

Closed Caption

Closed caption

Display

Closed 

caption

The television includes a built-in decoder that is capable of providing a text display of the audio. The 

program being viewed must be transmitting the Closed caption (CC) information. (p. 41)

 Select the item and set

Menu

Selects style and language for displaying
digital Closed Caption.

Primary

CC1

On

Closed caption

Digital

Mode
Analog

Digital setting

Reset to defaults

 select

 set

Mode

On: 

To display Closed captions.

CC on mute:  To display Closed captions 

when the audio is muted. 

(when not using, select “Off”).

Analog

(Choose the Closed caption service 

of Analog broadcasting.)

CC1-4: 

Information related to pictures 

(Appears at the bottom of the screen)

T1-4:

Textual information

(Appears over the entire screen)

Digital

(The Digital Closed caption menu lets 

you configure the way you choose to 

view the digital captioning.)

Select the setting.

  “Primary”, “Second.”, “Service 3”, “Service 4”, 

“Service 5”, “Service 6”

  The settings in “Analog” or “Digital”

depend on the broadcaster.

 To make more in-depth display settings in digital programs


 Select “Digital setting” and press OK


 Select the item and set

Menu

Selects the text size.

Small

Default

None

Solid

Black

Solid

Black

Black

Digital setting

Size

Foreground

Font
Style

Fore. opacity
Background
Back. opacity
Outline

 select

 set

Size

Text size

Font

Text font

Style

Text style (Raised, Depressed, etc.)

Foreground

Color of text

Fore. opacity

Opacity of text

Background

Color of text box

Back. opacity

Opacity of text box

Outline

Outline color of text (Identify the 

setting options on the screen.)

 To reset the settings


 Select “Reset to defaults”. Confirmation screen is displayed.


 Select “Yes” and press OK.

 Press to exit from 

a menu screen

Display the menu

Select “Closed caption”

Menu

Display broadcast TV’s Closed Caption (CC)
text when available.

Primary

CC1

On

Closed caption

Digital

Mode
Analog

Digital setting

Reset to defaults

 next

 select

Summary of Contents for Viera TC-L32C22

Page 1: ...please contact your local authorities or the Electronic Industries Alliance http www eiae org Este producto tiene una l mpara fluorescente que contiene mercurio Debido a consideraciones ambientales p...

Page 2: ...17 Viewing with VIERA IMAGE VIEWER 18 Watching Videos and DVDs 20 Displaying PC Screen on TV 22 How to Use Menu Functions picture sound quality etc 23 VIERA LinkTM HDAVI ControlTM 26 Lock 32 Editing...

Page 3: ...20 Unplug this LCD TV from the wall outlet and refer servicing to qualified service personnel under the following conditions a When the power cord or plug is damaged or frayed b If liquid has been spi...

Page 4: ...are other than software licensed under the GPL and or LGPL GPL LGPL SOFTWARE IS DISTRIBUTED IN THE HOPE THAT IT WILL BE USEFUL BUT WITHOUT ANY WARRANTY EXPRESS IMPLIED OR STATUTORY INCLUDING THE IMPLI...

Page 5: ...all cables and external equipment shown in this book are supplied with the TV For more details on the external equipment s connections please refer to the operating manuals for the equipment For addi...

Page 6: ...from SD Card p 18 19 Selects OK Change Returns to previous menu Channel up down Displays or removes the channel banner p 16 Operates the Favorite channel list function p 16 Numeric keypad to select an...

Page 7: ...First Time Setup First time setup screen is displayed only when the TV is turned on for the first time after the power cord is inserted into a wall outlet and when Auto power on p 25 is set to No Pres...

Page 8: ...ode Other Useful Functions Operate after First Time Setup Continued Note About broadcasting systems Analog NTSC Conventional broadcasting Digital ATSC New programming that allows you to view more chan...

Page 9: ...splayed channel Set favorite 1 3 26 1 1 2 3 4 5 select the list number save the displayed channel select the list number to save the channel without pressing OK or Delete a favorite channel Set favori...

Page 10: ...g microSDHC Card miniSD Card microSD Card adapter If a microSDHC Card miniSD Card or microSD Card is used insert remove it together with the adapter For cautions and details on SD Cards p 42 Gently in...

Page 11: ...s see the manual for the connected equipment If you connect equipment that has the HDAVI Control function to the TV using an HDMI cable you will find it easier to use Please refer to p 26 31 Before us...

Page 12: ...nu adjust or select Displaying PC Screen on TV The screen of the PC connected to the unit can be displayed on the TV You can also listen to PC sound with the audio cable connected To connect PC p 39 P...

Page 13: ...s Sub menu list Menu Item Adjustments Configurations alternatives Setup SUB MENU Channel surf mode Sets the mode to select the channel with Channel up down button All Favorite Digital only Analog only...

Page 14: ...components using one button on the TV remote Enjoy additional HDMI Inter Operability with Panasonic products which have the HDAVI Control function This TV supports HDAVI Control 5 function Connection...

Page 15: ...on about the TV settings can be transmitted to each piece of an equipment Recorder Home theater Player that has HDAVI Control 3 or later function connected to a TV with HDMI cable Transmittable data R...

Page 16: ...f three for Home theater Player Camcorder LUMIX Digital camera Note There is a limit to the number of HDMI connectors Recorder TV VIERA Link control Speaker output Back to TV select change You can sel...

Page 17: ...cific age based rating level the Off rating and any other more restrictive ratings will also be blocked To select the channel or the rating of the program to lock Channel lock Select up to 7 1 7 chann...

Page 18: ...ack to the previous page select the item to edit Caption Favorite Add next Caption Changes the station identifier Favorite Registers channels to the Favorite List Add Adds or skips channels To cancel...

Page 19: ...a built in decoder that is capable of providing a text display of the audio The program being viewed must be transmitting the Closed caption CC information p 41 Select the item and set Menu Selects st...

Page 20: ...cally turns Off after 90 minutes when turned On by the Timer This operation will be cancelled if the Off time is selected or if a key is pressed Display the menu Select Timer Menu Set the TV to turn o...

Page 21: ...empt Exempt programming G General Programming intended for audience of all ages Contains no violence or the violence content is minimal or is depicted appropriately 8 ans 8 General Not recommended for...

Page 22: ...volume of the equipment If you connect equipment that has HDAVI Control 2 or later function to the TV with HDMI cable the sound from DIGITAL AUDIO OUT terminal can be output as multi channel surround...

Page 23: ...e surface is dry Do not scratch or hit the surface of the panel with fingernails or other hard objects Furthermore avoid contact with volatile substances such as insect sprays solvents and thinner oth...

Page 24: ...and is produced with advanced technology through an intricate process Sometimes a few pixels may be bright or dark These pixels do not indicate a defective panel and will have no impact on the perform...

Page 25: ...they are not warranted This warranty only applies to products purchased and serviced in the United States or Puerto Rico This warranty is extended only to the original purchaser of a new product whic...

Page 26: ...erson for whom it was purchased as a gift of a Panasonic brand product mentioned above sold by an authorized Panasonic dealer in Canada and purchased and used in Canada which product was not sold as i...

Reviews: