


20
21
V
iewing
W
atching V
ideos and DVDs
VIERA Link
TM
Setting
If you connect equipment that has the “HDAVI Control” function to the TV using an HDMI cable,
you will find it easier to use. Please refer to p. 26-31. Before using these functions, you need to
set “VIERA Link” setting to “On” as shown below.
Press to exit from
a menu screen
Press to return to
the previous screen
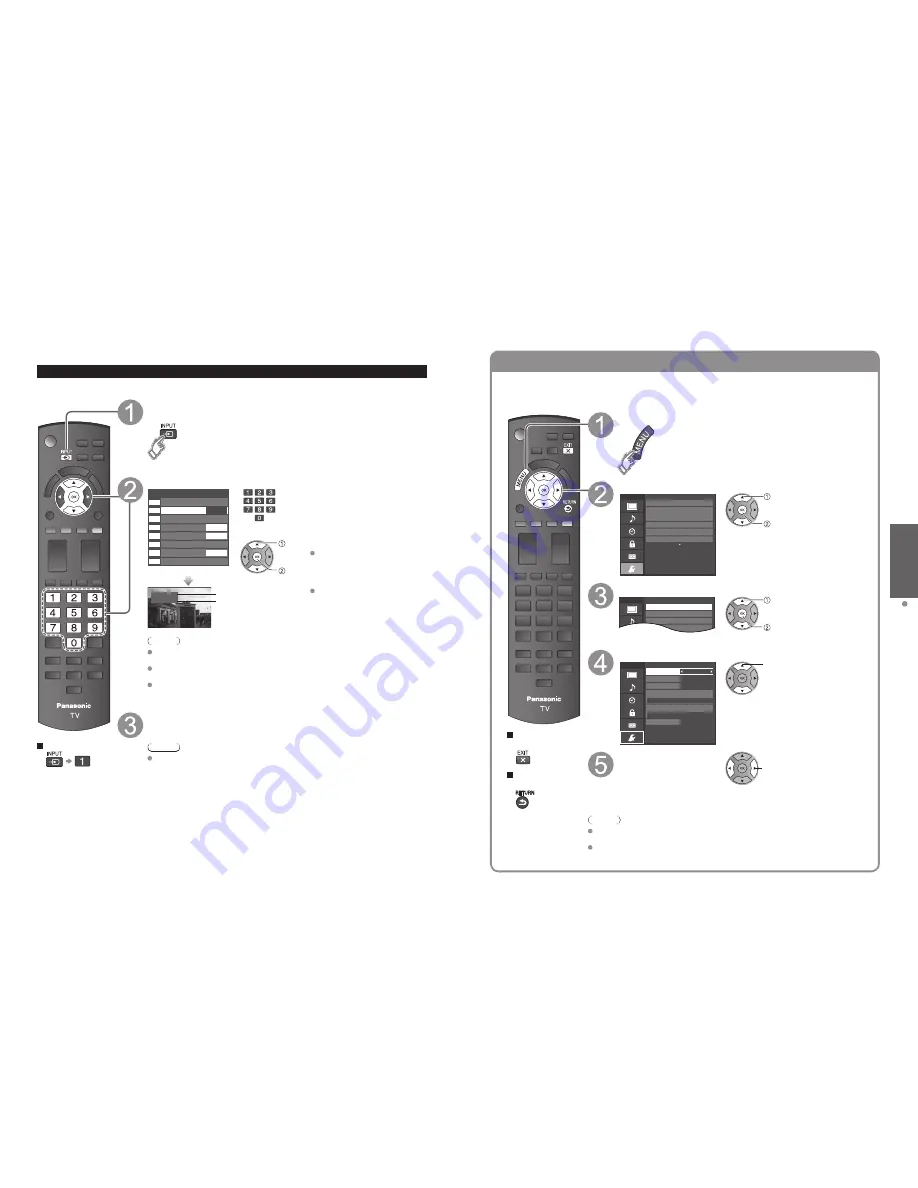
Display the menu
Select “Setup”
Menu
Adjusts Surf mode, Language, Clock,
Channels, Inputs, and other settings.
Setup
2/2
Advanced setup
First time setup
About
Reset to defaults
VIERA Link settings
ECO / energy saving
select
next
Select “VIERA Link settings”
Setup
Menu
2/2
Advanced setup
Repeat 1st time setup
VIERA Link settings
ECO / energy saving
select
next
Select “VIERA Link”
On
No
Yes
TV
Quick start
No (stay on)
Menu
Enables or disables interoperability of
“HDAVI Control” compliant HDMI devices.
VIERA Link settings
VIERA Link
Power on link
Power off link
Default speakers
Energy saving mode
Unselected device energy save
select
Select “On”
(default is On)
change
Now you can set each “VIERA Link” function according to your preference
(p. 28-31).
Note
If no HDMI equipment is connected or standard HDMI equipment (non- “VIERA
Link”) is used, set it to “Off”.
For more details on the external equipment’s connections, please refer to the
operating manuals for the equipment.
Watching Videos and DVDs
If you have applicable equipment connected to the TV, you can watch videos and DVDs on the TV screen.
Input Select
You can select the external equipment to access.
To return to TV
With the connected equipment turned On
Display the Input select menu
Select the input mode
Input select
TV
1
5
2
3
4
6
7
8
Component
HDMI 1
HDMI 2
HDMI 3
Video 1
PC
Video 2
AUX
GAME
GAME
GAME
(example)
or
select
enter
Press the corresponding NUMBER
button on the remote control to
select the input of your choice.
Select the input of your choice,
then press OK.
During the selection, if no action
is taken for several seconds, the
“Input select” menu disappears.
HDMI 1
GAME
Terminal
(example)
Label
The terminal and label of the
connected equipment are
displayed.
To label each of the inputs,
please refer to p. 37.
Note
The input label will be displayed on the “Input select” screen if the Input label is set
on p. 37.
For side input terminals (HDMI 3/Video 2), “GAME” input label is set as default.
(Picture mode is set to “Game”, refer to p. 43.)
For more details on the Picture mode setting, refer to p. 43. For “Input labels”, refer
to p. 37.
Operate the connected equipment using the remote
control supplied with the equipment
Note
For details, see the manual for the connected equipment.


