


18
19
V
iewing
V
iewing with VIERA
IMAGE VIEWER
Viewing with VIERA IMAGE VIEWER
The VIERA Image Viewer is a function that lets you easily view still images on a VIERA television by simply inserting an
SD card into the VIERA SD card slot.
(Media other than SD Cards will not work.)
Press to exit from
a menu screen
Press to return to
the previous screen
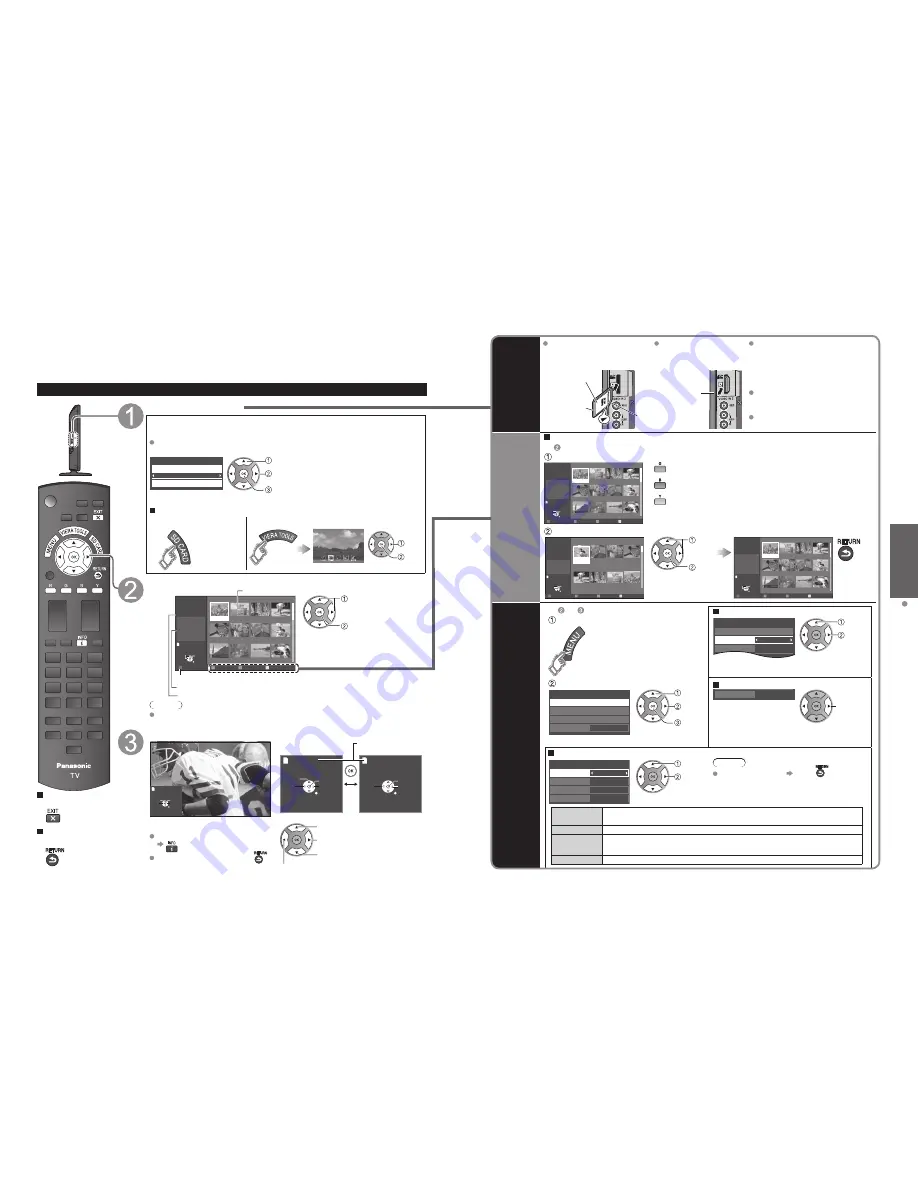
Insert the SD card
* This setting will be skipped next time unless you select “Set later”.
Set “Image viewer settings” and select “Play image viewer now”
“Image viewer settings” will be displayed automatically each time an SD card is
inserted for the first time.
Set later
Image viewer settings
Image viewer auto play
Play image viewer now
select
change
set
Slideshow:
A Slideshow will start
automatically next time.
Thumbnail:
The Photo viewer menu will be
displayed automatically next time.
Set later:
“Image viewer settings” menu
will be displayed repeatedly.
Off:
The data can be played manually.
Manual operation
(“Image viewer auto play” is “Off”)
Display “Photo viewer”
Start the Slideshow
select
next
Slideshow
Select the data to be viewed
Slideshow
Folders
R
Y
Sort by month
G
Sort by date
B
OK
Select
RETURN
Name
Pana0001
Date
03/04/2010
Size
1029×1200
Photo viewer
All photos
Total
238
Pana0001
Pana0002
Pana0003
Pana0004
Pana0005
Pana0006
Pana0007
Pana0008
Pana0009
Pana0010
Pana0011
Pana0012
select
view
Thumbnail view
To launch Slideshow
Selected picture information is displayed
Total number of images
Note
Depending on the JPEG format, “Information” contents may not be displayed
correctly. Refer to p. 42 (Data format for SD card browsing) for details.
View
Next
Rotate
Prev.
RETURN
Play
Accessing
Displays one at a time
To display/hide the Navigation area
Return to the Thumbnail view
Accessing
Next
Prev.
Rotate
RETURN
Accessing
Pause
Next
Prev.
RETURN
Play
Navigation area
Present status
(While reading the data)
Single photo view
Slideshow
Rotate 90 degrees (counter-clockwise)
To next photo
Rotate 90 degrees (clockwise)
To previous photo
Photo viewer
SD Card
Insert the card
Remove the card
Compliant card type (maximum
capacity): SDHC Card (32 GB),
microSDHC Card (16 GB), SD Card
(2 GB), miniSD Card (2 GB), microSD
Card (2 GB) (requiring microSDHC Card/
miniSD Card/microSD Card adapter)
If a microSDHC Card, miniSD Card
or microSD Card is used, insert /
remove it together with the adapter.
For cautions and details on SD
Cards (p. 42)
Gently insert the SD Card label
surface facing front.
Label surface
Push until a
click is heard
Press in lightly
on SD Card,
then release.
Sort
To sort by Folder, month or date
In
Select the sort type
Slideshow
Folders
R
Y
Sort by month
G
Sort by date
B
OK
Select
RETURN
Name
Pana0001
Date
03/04/2010
Size
1029×1200
Photo viewer
All photos
Total
238
Pana0001
Pana0002
Pana0003
Pana0004
Pana0005
Pana0006
Pana0007
Pana0008
Pana0009
Pana0010
Pana0011
Pana0012
Folders (ascending order of numeric/alphabetical)
Sort by month (ascending order of the month)
Sort by date (ascending order of the date )
Select the directory
Accessing
Slideshow
R
Y
G
B
OK
Select
RETURN
09/23/2009
28 photos
09/28/2009
58 photos
10/10/2009
3 photos
11/20/2009
8 photos
12/25/2009
24 photos
01/01/2010
10 photos
02/15/2010
16 photos
03/04/2010
32 photos
Date
09/23/2009
Number of photos
28 photos
Photo viewer
All photos
Sort by date
15
Accessing
Slideshow
R
Y
G
B
OK
Select
RETURN
Name
Pana0001
Date
09/23/2009
Size
1029×1200
Photo viewer
All photos
09/23/2009
Total 28
Pana0001
Pana0002
Pana0003
Pana0004
Pana0011
Pana0012
Pana0013
Pana0014
Pana0055
Pana0056
Pana0057
Pana0058
select
OK
Return to
previous
screen
Photo
settings
In or
Adjust the Picture/Audio
Display “Photo settings”
example: Picture menu
Picture menu/Audio menu (p. 24)
0
20
Vivid
Picture
1/2
Picture mode
Contrast
Back light
Reset to defaults
select
adjust
Select the item
Set the Soundtrack
Off
Photo settings
Picture
Audio
Slideshow settings
Soundtrack
select
change
next
Off
Soundtrack
change
Select the music from 5 types.
(Off/Music 1/Music 2/Music 3/Music 4/Music 5)
Slideshow settings
Fast
Off
Off
Sepia
Slideshow settings
Display interval
Repeat playback
Transition effect
Photo effect
select
adjust
Note
To stop in mid-cycle Press
Display interval
You can set how many seconds each image is displayed in the Slideshow
mode.
(Short/Fast/Normal/Slow/Very slow)
Repeat playback
Turn the Slideshow Repeat function on or off
(Off/On)
.
Transition effect
Select the Transition effect
(Off /Wipe
↓
/Wipe
↑
/Wipe
→
/Wipe
←
/Comb
↑↓
/Comb
→←
/Dissolve/Checker wipe/Random/Array/Collage)
Photo effect
Select the conversion effect
(Off/Sepia/Gray scale)
Cutout


